background image


17


=


TECHNICAL PASSPORT, INSTALLATION AND MAINTENANCE INSTRUCTION


When using pellets, saw dust briquettes, damp wood or other wood fuel or its residues, we 

recommend using air supply ventilator (Fig. 2), and for enhancing burn stability we recommend 
putting  other  fuel  in  between  firewood  layers  in  specific  areas.  Air  supply  ventilator  (Fig.  2)  is 
necessary when using pellets, sawdust briquettes, coal and peat. Any type of fuel must always be 
loaded through upper doors (8) (Fig. 1). 


When using calorific coal, we recommend leaving air distributor in lifted position and when 

half a load is left - to let it rest on the fuel. This will enhance the longevity of the air distributor. 


ATTENTION!


7.2 

RECOMMENDATIONS WHEN FIRING UNIVERSAL 

‘‘STROPUVA“  BOILER 


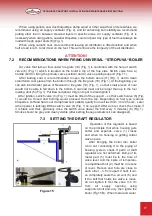
Air valve that lets air flow under fire grate  (19) (Fig. 1) is controlled with the help of switch 

valve  (6)  (Fig.  1)  which  is  located 

on  the  boiler’s  top  of  the  flue  side.  Switch  valve  has:  a) 

handle (bolt for fixing the primary valve position) and b) valve opening support (Fig. 11).


After loading  coal,  it  is  recommended to  open  the bottom doors (11) (Fig.  1)  and to clean 

small fallen coal pieces from the bottom through the fire grate (19) (Fig. 1). At the beginning, you 
can  also  load  smaller  pieces  of  firewood  on  fire  grate  (19)  (Fig.  1),  so  that  small  pieces  of  coal 
would not be able to fall down to the bottom. Coal load must not be larger than up to the fuel 
loading door (8) (Fig. 1). Put firewood (about 2 kg) on top of coal and ignite it.


After ignition, switch valve (6) (Fig. 1) must be lifted of the support 

– so that switch valve (6) (Fig. 

1)  would  be  closed  and  burning  would  proceed  from  the  top.  Depending  on  fuel  type  (various 
briquettes, soft and hard coal, damp firewood, pellets) quality burn will last from 3 to 24 hours.  Later 
(when power is lacking) lift the switch valve (6) (Fig. 1) on support. After an hour check the smoke, if 
it  is  black  and  thick,  gradually  close  the  switch  valve  (lower  the  bolt  every  5  minutes)  (6)  (Fig.  1). 
Smoke should be grey and clearly visible (after setting these parameters it can disappear).  


7.3 

SETTING THE DRAFT REGULATOR  


Operation  of  this  regulator  is  based 

on  the  principle  that  while  housing  gets 
hotter  and  expands,  valve  (1)  closes 
and  when  its  housing  is  getting  colder 
valve opens.


After  bringing  the  boiler  into  boiler 

room  ant  connecting  it  to  the  piping  of 
heating  system,  check  if  parts  of  draft 
regulator  are  not  deformed. Bump  of  its 
metal  part  (5)  must  be  in  the  hole  of 
valve  lever  and  the  spike  of  temperatu-
re adjustment bolt (2) must be in recess 
of  lever.  Recess  and  hole  are  close  to 
each other 

– 3,5 cm apart. Check if val-

ve completely seals the air vent (6) and 
if  the  bolt  that  holds  the  valve  is  loose, 
do  not  tighten  it.  Set  the  valve  3-5  cm 
from 

air 

supply 

opening 

using 

supportive  bolt  and  only  then  ignite  the 
boiler (Fig.15 B). When metal and water


Figure 15 

Summary of Contents for BIO S10 U

Page 1: ...STROPUVA TECHNICAL PASSPORT INSTALLATION AND MAINTENANCE INSTRUCTION Solid fuel boiler for central heating...

Page 2: ...ther boiler water heater and floor heating 13 6 3 Connection diagram of Stropuva boiler to another boiler water heater radiator floor heating 14 6 4 Connection diagram of Stropuva boiler to another bo...

Page 3: ...m2 1 1 MAIN TECHNICAL SPECIFICATIONS Fuel used firewood wood residue sawdust briquettes peat briquettes coal pellets Recommended fuel moisture up to 30 Model of boiler S7 S10 S12 S20 S30 S40 S7 BIO S1...

Page 4: ...ound and the chimney mm 991 1413 5 1302 1550 1285 1549 991 1413 5 1302 1550 1285 1549 1494 1302 1673 5 1285 1664 Dimensions mm 1900 1900 1900 1900 1900 1900 h d 1330 450 1900 450 1700 550 2100 550 170...

Page 5: ...arger diameter steel cylinder which provides thermal insulation Heated water resides between these two cylinders There is a draft regulator on the front side of the boiler 2 see 7 3 The construction h...

Page 6: ...rpose is to correctly distribute air in generation zones located below and next to air distributor as well as in combustion zones located near and above the distributor Air distributor 9 Fig 1 rests u...

Page 7: ...at the bottom of the boiler inside the lower doors 11 Fig 1 Fire grates 19 Fig 1 Fig 7 can be found by opening the ash removal doors 11 Fig 1 This part is attached in U boiler for additional air to go...

Page 8: ...boilers from overheating When water pressure reaches critical levels the valve opens up releasing the heated water into the sewerage at the same time adding cold water through the automatic system Va...

Page 9: ...nless steel will have to be used Rectangular liners are not as reliable because openings caused by temperature changes appear at the connections Boiler is placed directly on concrete floor When carryi...

Page 10: ...ple and proven diagrams We don t recommend building accumulative heat tanks because our boiler is more efficient while working in preservation mode than while charging accumulative tank in maximum pow...

Page 11: ...11 TECHNICAL PASSPORT INSTALLATION AND MAINTENANCE INSTRUCTION 6 HEATING SYSTEM DIAGRAM Figure 10 Stropuva...

Page 12: ...warmer than selected value Thanks to this pump P water loudly circulates through coil pipes F of floor heating also flows to boiler through distribution valve T 3 20 50 which when water from radiator...

Page 13: ...atic valve 1 pcs 7 Circulation pump installation kit D25 1 pcs 23 Valve 1 5 bar 1 pcs 8 Separable connection D25 V i 2 pcs F to out of floor heating 9 Automatic bleeding device 1 pcs B to out of water...

Page 14: ...cs 21 Adapter D32 x D25 2 pcs 7 Circulation pump installation kit D25 1 pcs 22 Thermostatic valve 1 pcs 8 Separable connection D25 V i 2 pcs 23 Valve 1 5 bar 1 pcs 9 Automatic bleeding device 1 pcs F...

Page 15: ...lbow D25 x D15 3 pcs 18 Filling valve i i 1 2 1 pcs 7 Circulation pump installation kit D25 8 Separable connection D25 V i 1 pcs 2 pcs 19 Release valve 1 2 20 Brass disc valve V V 1 21 Adapter D32 x D...

Page 16: ...ets and sawdust briquettes immediately ignite so that the load of fuel would not be ignited by leftover ember Before igniting the boiler carefully read the instruction of traction regulator see sectio...

Page 17: ...all down to the bottom Coal load must not be larger than up to the fuel loading door 8 Fig 1 Put firewood about 2 kg on top of coal and ignite it After ignition switch valve 6 Fig 1 must be lifted of...

Page 18: ...disappears see Fig 10 c If fuel is burning well but temperature increases very slowly and there is condensation leaking out of flue it means that the flow of heated water going through boiler is exces...

Page 19: ...ll stick deeper into fuel its lifespan will be reduced significantly Most common installation mistakes Consequences Troubleshooting 1 Installed using other boiler manufacturer diagrams 1 High flow coo...

Page 20: ...diagrams According to Figure 10 we recommend connecting gravity controlled radiator a radiator without thermos valve Hot water goes through balance tap bk1 Fig 10 to the nearest radiator which can wor...

Page 21: ...ts No need to move the boiler and repeatedly connect to the chimney or heating system Usually no need to make changes in the heating system This solutions allows a complete automatization of firing pr...

Page 22: ...fuel boiler STROPUVA 1 pcs Safety pressure valve 1 5 bar 1 pcs Thermometer 1 pcs Deflectors 2 pcs Air injection collector 1 pcs Air distributor 1 pcs Fire grate 1 pcs Technical passport 1 pcs PACKAGE...

Page 23: ...c procedures inspection of boiler and control elements at least once a year To preserve warranty agreement and its entries We recommend that the installation assessment the first start up adjustment o...

Page 24: ...aris Trak distr LT 25144 Lithuania tel 370 525 51763 Boiler model Product number Date of sale Signature Stamp SELLER Date of sale Signature Stamp PERSON RESPONSIBLE FOR INSTALLATION Installation addre...

Page 25: ...e Surname Signature The boiler has a year warranty If the heat exchanger is broken seller has to fix the boiler on its own expense but if other components are broken not due to the fault of the end us...

Page 26: ...JSC Stropuva ir ko company code 300149972 K stu io g 1A Lentvaris Trak distr LT 25144 Tel 370 5 255 17 63 mob 370 656 08961 www stropuva lt info stropuva lt...

Reviews: