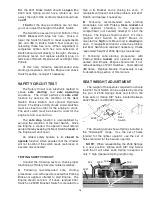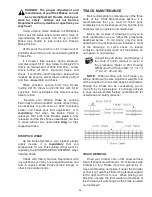
Reinsert Lever Rod and rotate the Track
forward
. Hold the above alignment and allow the
Sprocket’s teeth to enter their respective Track’s
Inner & Outer Chain.
While rotating Track,
remove all Track Rods as they drop free.
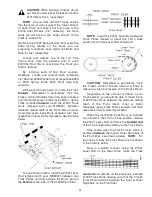
Continue
rotating
Track
forward
while
inserting Track Rods into the alternate mating
teeth of the Front Idler’s Inner & Outer
Sprockets...keep Rods centered over their
respective Inner & Outer Sprockets.
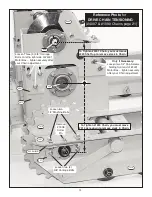
When the last Track Rod inserted rotates to
the 12:00 o’clock position, remove the Lever Rod
and force the Track
inward
until the Track’s Inner
& Outer Chains align with their mating Inner &
Outer Sprockets on the Front Idler.
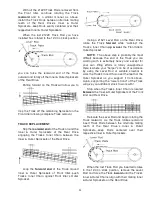
Rotate the Track
rearward
while holding the
above alignment and allow the Sprocket’s teeth to
engage their respective Inner & Outer Track
Chains. Remove all the Track Rods as they drop
free; save them for next time.
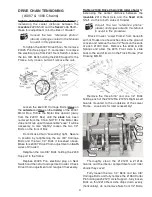
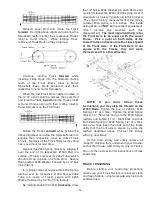
Replace the #234 Spring (black) by slipping it
over the end of its respective #1030 Rod (on
outside of Track) and over its #262 Tube, which
should still be in place on #1030 Rod. Secure
Spring with a #235 Washer followed by a 1/2” Nut
(fine thread).
In a similar manner replace the #233 Spring
(yellow) over its respective #1030 Rod & #262
Tube (on inside of Track)...secure with #235
Washer followed by 1/2” Nut (fine thread).
By rotating each #1030 Rod
clockwise
, draw
the 1/2” Nut & #235 Washer (on each Rod’s end)
against its respective #233 or #234 spring. A set of
pneumatic air tools will greatly aid in this process!
The original factory measurement of the (black,
outside) #234 Spring is 4.5 inches. The inside
spring #233, will
NOT
be the same measurement.
(Don’t
include
the
washers
with
this
measurement).
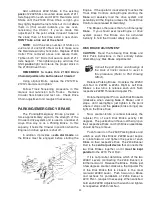
The most important thing is for
the Front Axle to be square with the Lower
Frame.
Pick a point on both sides of the
Lower Frame and measure to the closest point
of the Front Axle.
If the Front Axle is not
square with the Tracks, they will work
themselves off in either direction
.
NOTE
:
If
you
don’t
follow
these
instructions, you may strip the threads on the
#1030 Rods.
Tighten the pair of #233 & #234
Springs 1/4” at a time. Tighten the #234 Spring
(black) 1/4”, then stop and go to the #233 Spring
(yellow) and tighten it 1/4”. Work back and forth
from #234 Spring to #233 Spring 1/4” at a time.
Once you have taken the slack out of the tracks
verify that the front axle is square by using the
method described above.
(Contact the factory
with any questions!)
At this time, slowly and safely remove all
“support” blocking from underneath your Crawler
so that the Crawler rests firmly on only its Tracks.
Go on to the next section for instructions on Track
Tensioning.
TRACK TENSIONING
Before starting your tensioning procedure,
make sure your Track System is relatively clean
and free of debris...a high-pressure wash job is an
excellent idea.
26
235
235


