6
www.stryker.com
EN
0940-001-025 Rev-L
▪
ALWAYS use extreme caution when cutting synthetic cast material. The
blade may overheat and cause a burn injury.
▪
DO NOT remove a non-padded cast with the Cast Cutter. Skin may
adhere to the cast material and result in a cut or burn injury.
▪
DO NOT operate this equipment with a damaged power cord or power
cord plug.
▪
DO NOT use Stainless Steel Cast Cutter Blade REF 0940-025-000 to cut
synthetic cast material.
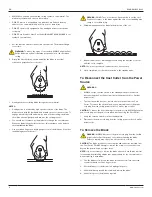
1. Set the function switch to the desired speed mode. The blade will begin
to oscillate.
WARNING:
To reduce the spray of cast debris, ALWAYS align the Cast
Cutter blade in a vertical orientation, perpendicular to the cast when
cutting.
2. Grasp the Cast Cutter as shown, and align the blade in a vertical
orientation, perpendicular to the cast.
3. Gently push the oscillating blade through the cast material.
NOTES:
▪
Cutting action is achieved by high speed oscillation of the blade. The
blade cuts on both the backward and forward strokes of the excursion. To
engage more blade teeth and allow for more efficient cutting, the blade
should be moved slightly up and down as the cut progresses.
▪
You should feel resistance as the blade cuts through the cast material.
When the blade fully penetrates the cast, this resistance ends, and you
should withdraw the blade.
▪
Use your index finger as a depth gauge to control the blade as it reaches
the padding beneath the cast.
WARNING:
DO NOT use a continuous, linear motion to cut the cast.
Continuous contact of the blade against the skin or cast padding may
cause a cut or burn injury.
4. Withdraw and advance the blade in the direction of the cut.
5. Repeat this motion of alternating pressure along the direction of the cut
until the cut is complete.
NOTE:
Use a cast spreader to remove the cast, if necessary.
6. Upon completion, set the function switch to the standby mode.
To Disconnect the Cast Cutter from the Power
Source
WARNINGS:
▪
ALWAYS set the function switch to the standby mode position before
disconnecting the Cast Cutter from the facility power outlet or CastVac
power outlet.
▪
The function switch does not remove electrical power from the Cast
Cutter. To remove the electrical power, you must disconnect the power
cord plug from the facility power outlet or CastVac power outlet.
CAUTION:
To reduce the risk of damage to the power cord, ALWAYS grasp the
power cord plug, not the power cord, when disconnecting the Cast Cutter.
1. Verify the function switch is in the standby mode.
2. Disconnect the power cord plug from the facility power outlet or CastVac
power outlet.
To Remove the Blade
WARNING:
ALWAYS disconnect the power cord plug from the facility
power outlet or CastVac power outlet before removing the blade.
Failure to comply may cause fire, electric shock, or injury.
CAUTION:
The blade retention screw is captive and cannot be removed from
the Cast Cutter. DO NOT attempt to remove the screw or loosen the screw
beyond the point when it no longer turns.
NOTE:
It is not necessary to remove the blade after each use. Blade removal
is required when installing a blade that is appropriate for the cast material or
when replacing a worn blade.
1. Use the blade tool to loosen the blade retention screw. Turn the screw
counterclockwise until it no longer turns.
2. Pull the blade off of the bottom two blade guide posts.
3. Slide the blade up behind the screw and remove the blade.
4. Save or dispose of the blade as required.


