background image

8

www.stryker.com

EN

0940-001-025 Rev-L

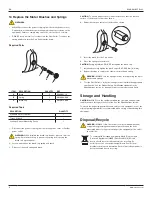
To Replace the Motor Brushes and Springs

WARNINGS:


ALWAYS disconnect the power cord plug from the facility power outlet or 
CastVac power outlet before performing maintenance procedures on the 
equipment. Failure to comply may cause fire, electric shock, or injury.


DO NOT insert a metal tool or object into the Cast Cutter. To remove the 
spring and brush, turn the Cast Cutter upside down.

Required Parts

A

B

C

ITEM

DESCRIPTION

QUANTITY

REF

A

Brush

2

0940-001-113

B

Spring

2

0038-049-000

C

Brush Cap

2

0058-018-000

Required Tools

DESCRIPTION

QUANTITY

Standard Slot Screwdriver

1

Torque Wrench

1

Leakage Current Measuring Device

1

1.  Disconnect the power cord plug from the facility power outlet or CastVac 

power outlet.

WARNING: 

When installed, the brush cap is under pressure from the 

spring. Hold the brush cap to prevent the spring from ejecting the 
brush cap upon removal.

2.  Loosen and remove the brush cap, spring and brush.

3.  Dispose of the used spring and brush.

CAUTION: 

To ensure proper contact, install the brush so that the concave 

surface of the brush is oriented as shown.

4.  Orient the concave surface of the brush as shown.

5.  Insert the brush into the Cast Cutter.

6.  Place the spring onto the brush.

CAUTION: 

During installation, DO NOT overtighten the brush cap.

7.  Install and carefully tighten the brush cap to 0.45-0.90 N·m [4-8 lb·in].

8.  Repeat the steps to replace the other motor brush and spring.

WARNING: 

ALWAYS test the leakage current after replacing the motor 

brushes and springs.

9.  Test the Cast Cutter to verify the leakage current is within the appropriate 

specification. See the 

Product Safety Certification

 standards in the 

Specifications

 section for leakage current test procedures and limits.

Storage and Handling

CAUTION: 

ALWAYS store the equipment within the specified environmental 

condition values throughout its useful life. See the 

Specifications

 section.

To ensure the longevity, performance and safety of this equipment, use of the 
original packaging material is recommended when storing or transporting this 
equipment.

Disposal/Recycle

WARNING: 

ALWAYS follow the current local recommendations and/

or regulations governing environmental protection and the risks 
associated with recycling or disposing of the equipment at the end of 
its useful life.

To comply with European Community Waste Electrical and 
Electronic Equipment (WEEE) Directive 2012/19/EU, this 
device should be collected separately for recycling. Do 
not dispose of as unsorted municipal waste. Contact local 
distributor for disposal information. Ensure infected equipment is 
decontaminated prior to recycling. 

Summary of Contents for 0940-000-000

Page 1: ...he document should not appear on produced Labels or IFUs Description Type Stryker Instruments 269 323 7700 800 253 3210 Part Number Rev 6FRSH 2 5 635 3URFHVV 2ZQHU 7HFK 3XEV 0DQDJHU N A 8 5 inch width...

Page 2: ...2016 10 0940 001 025 Rev L www stryker com Cast Cutter 0940 000 000 0941 000 000 Instructions For Use ENGLISH EN...

Page 3: ...aster Stainless Steel 0940 025 000 Synthetic Titanium Nitrided 0940 035 000 User Patient Safety WARNINGS Before using any system component or any component compatible with this system read and underst...

Page 4: ...000 to Stryker PlasterVac REF 0886 000 000 0940 886 000 Adaptor Hose with Cord to connect Cast Cutter REF 0940 000 000 to Stryker PlasterVac REF 0846 000 000 or 0856 000 000 0940 855 000 Adaptor Hose...

Page 5: ...ly J Power Cord Plug Model REF 0941 000 000 Only K Power Source Cord Plug L Power Source Cord M Appliance Inlet Connector Plug N Appliance Inlet Connector Function Switch High Speed Mode The Cast Cutt...

Page 6: ...de is securely installed and the blade retention screw is tight against the blade To Connect the Cast Cutter to a Power Source WARNING ALWAYS set the function switch to the standby mode position befor...

Page 7: ...e direction of the cut 5 Repeat this motion of alternating pressure along the direction of the cut until the cut is complete NOTE Use a cast spreader to remove the cast if necessary 6 Upon completion...

Page 8: ...duals trained and experienced in the maintenance of reusable medical devices should inspect test and maintain this equipment DO NOT disassemble or service this equipment unless otherwise specified Fai...

Page 9: ...e the spring onto the brush CAUTION During installation DO NOT overtighten the brush cap 7 Install and carefully tighten the brush cap to 0 45 0 90 N m 4 8 lb in 8 Repeat the steps to replace the othe...

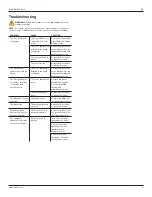
Page 10: ...nstalled in the wrong orientation Remove and install the motor brushes See the Inspection Testing and Maintenance section The Cast Cutter does not operate smoothly or operates with excessive noise The...

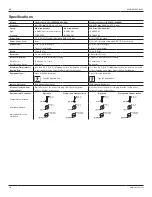
Page 11: ...ith Intermittent Loading Duty Cycle 15 minutes on 1 time 15 minutes on 1 time Rest Between Cycles 20 minutes 20 minutes Maximum Temperature of Applied Part Less than 48 C 118 F Maximum surface tempera...

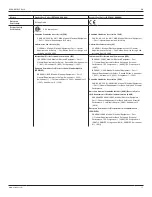
Page 12: ...NELEC EN 60601 1 1990 Medical Electrical Equipment Part 1 General Requirements for Safety Amendment 1 1993 Amendment 11 1993 Amendment 12 1993 Amendment 2 1995 Amendment 13 1996 International Electrot...

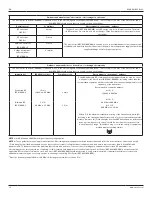
Page 13: ...ding cables than the recommended separation distance calculated from the equation applicable to the frequency of the transmitter Recommended separation distance d 1 2 P 150 kHz to 80 MHz d 1 2 P 80 MH...

Page 14: ...000 000 be powered from an uninterruptible power supply or a battery Power frequency 50 60 Hz magnetic field IEC 61000 4 8 3 A m 3 A m 50Hz CRT 1A m Power frequency magnetic fields should be at levels...

Page 15: ......

Page 16: ......

Page 17: ...25 Rev L www stryker com Manufactured for Stryker Instruments 4100 E Milham Kalamazoo Michigan USA 49001 1 269 323 7700 1 800 253 3210 ES DE FR IT NL EL 0940 001 715 JA ZH KO 0940 001 725 SV DA FI PT...

Reviews: