background image

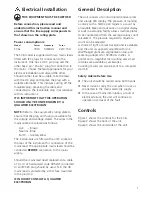
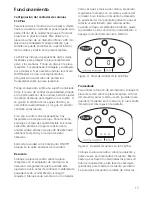
a red LED spot at the top left hand corner of the 
display will be visible:

Figure 5:  Active averaging facility on the SC6

To resume counting press the <average> key 
again.  When the count is complete, press and 
hold the <correct/reset> key until the display 
returns to zero. This will clear the memory of 
saved counts.

When all counting is completed switch the unit 
OFF at the mains.

Printing results

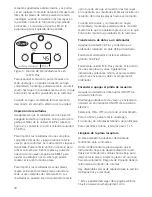
Ensure the colony counter is off. Plug the printer 
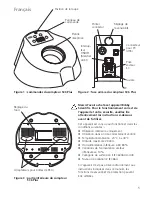
into the port on back of the SC6 Plus (see fig 2) 
and connect the printer to the mains. Turn the 
SC6 Plus on.

To print the results of a single dish, complete the 
count and then press the <save> key to confirm. 
Three dashes will appear on the screen. Press the 
<print> key and the printer will be activated. 
Remove the dish and press the <save> key again 
followed by RESET to set the display to zero. You 
can now count another dish.

To print the results of multiple dishes, count each 
dish in turn pressing the <save> key after each 
count. The results can be printed by pressing the 
<print> key whenever the three dashes appear 
on the screen. The printed results will include all 
the dishes counted up to that point.

When the count and print is complete, press and 
hold the <correct/reset> key until the display 
returns to zero. This will clear the memory of 
saved counts. 

Transfering data to a computer

Turn the SC6 Plus off and connect to a computer 
using the USB cable provided.

Turn on the computer and install the free SC6 
Software*.

Turn on the SC6 Plus and count either single or 
multiple plates following the directions above. 
Now when the <print> key is pressed the data 
will be sent to the computer programme.

Turning the audible counting bleep 
ON or OFF

Turn the unit off at the mains ON/OFF switch.
Hold the <save> key down and switch the unit 
ON at the mains ON/OFF switch.
Select either ‘ON’ or OFF using the <correct/
reset> key.
To confirm, press the <average> key.
The colony counter is now ready to use.  
To turn the bleep on, repeat steps 1 to 5.

Cleaning the receiver plate

The receiver plate can easily be removed for 
cleaning. 
To remove, make sure that the instrument is 
switched off at the mains. Tip the colony counter 
upside down to remove the plate. Clean the plate 
using a damp cloth only. Once cleaned the plate 
should be returned to the colony counter.

Replacement plates are available (see Spares and 
Accessories section).

This can de downloaded from the Stuart 

website at www.stuart-equipment.com

3

ave

save

average

reset

print

correct

ave

save

average

reset

print

correct

ave

save

average

reset

print

correct

Summary of Contents for SC6 Plus

Page 1: ...ave save average reset print correct Version 1 2 Colony Counter Instructions for use Mode d emploi Istruzioni per l uso Instrucciones de funcionamiento Bedienungsanweisung SC6 Plus ...

Page 2: ...e 5 C to 40 C Altitude to 2000m Relative humidity not exceeding 80 Mains supply fluctuation not exceeding 10 Overvoltage category II IEC60364 4 443 Pollution degree 2 IEC664 If the equipment is not used in the manner described in this manual the protection provided by the equipment may be impaired Background adjustment Dish adapters ave save average reset print correct Figure 1 SC6 Plus controls C...

Page 3: ...riate mains lead should be connected before connection to the mains supply Should the mains lead need replacement a cable of 1mm2 of harmonised code H05W F connected to an IEC320 plug should be used N B the UK mains lead is protected by a 10A fuse mounted in the plug top IF IN DOUBT CONSULT A QUALIFIED ELECTRICIAN 1 General Description The unit consists of an illuminated receiver plate and a large...

Page 4: ...g Position the Petri dish on the receiver plate using the centering adapter if required Ensure the display is set to zero before counting by pressing and holding the correct reset key Mark each colony with a felt tip pen Every time a colony is marked the apparatus will register the count with a bleep and counter advance If unwanted counts are made they can be removed from the display by pressing t...

Page 5: ...that point When the count and print is complete press and hold the correct reset key until the display returns to zero This will clear the memory of saved counts Transfering data to a computer Turn the SC6 Plus off and connect to a computer using the USB cable provided Turn on the computer and install the free SC6 Software Turn on the SC6 Plus and count either single or multiple plates following t...

Page 6: ...bby Scientific Ltd or its agents should be used Fitting of non approved parts may affect the performance and safety features designed into the instrument If in any doubt please contact the Technical Service Department of Bibby Scientific Ltd or the point of sale Bibby Scientific Ltd Stone Staffordshire ST15 0SA United Kingdom Tel 44 0 1785 812121 Fax 44 0 1785 813748 e mail info bibby scientific c...

Page 7: ...é relative inférieure à 80 80 Variations de l alimentation secteur inférieures à 10 Catégorie de surtension II IEC60364 4 443 Niveau de pollution 2 IEC664 Si l appareil n est pas utilisé conformément aux instructions indiquées dans ce manuel les fonctions de sécurité et de protection peuvent être altérées Réglage du fond Adaptateurs pour boîtes de Pétri ave save average reset print correct Figure ...

Page 8: ... Si le cordon d alimentation doit être remplacé utilisez un câble de section 1 mm2 de type H05VV F harmonisé raccordé à une prise IEC320 Remarque le cordon d alimentation équipé d une prise britannique est protégé par un fusible de 10 A monté dans la partie supérieure de la prise EN CAS DE DOUTE CONSULTEZ UN ÉLECTRICIEN QUALIFIÉ Description générale L appareil se compose d une plaque réceptrice éc...

Page 9: ... Pétri sur la plaque réceptrice à l aide de l adaptateur de centrage si nécessaire Vérifiez que l afficheur est réglé à zéro avant le comptage appuyez et maintenez enfoncée la touche correct reset Marquez chaque colonie à l aide d un crayon feutre A chaque marquage d une colonie l appareil enregistre le coup avec un bip et une avance du compteur Si des coups involontaires sont réalisés vous pouvez...

Page 10: ...ées jusqu alors Lorsque la numération et l impression sont terminées appuyez et maintenez enfoncée la touche correct reset jusqu à ce que l afficheur revienne à zéro pour effacer les numérations enregistrées en mémoire Transfert des données dans un ordinateur Éteignez le compteur SC6 Plus et connectez le à un ordinateur au moyen du câble USB fourni Allumez l ordinateur et installez le logiciel gra...

Page 11: ...fiées par Bibby Scientific Ltd ou un de ses représentants doivent être utilisées Le montage de pièces non approuvées peut perturber le fonctionnement des dispositifs de sécurité intégrés à l appareil En cas de doute veuillez contacter le service technique de Bibby Scientific Ltd ou votre revendeur Bibby Scientific Ltd Stone Staffordshire ST15 0SA United Kingdom Tel 44 0 1785 812121 Fax 44 0 1785 8...

Page 12: ...2000 metri con una umidità relativa non superiore all 80 con fluttuazioni dell alimentazione da rete non superiori al 10 categoria di sovratensione II IEC60364 4 443 grado di contaminazione 2 IEC664 Se l apparecchio non è usato come specificato nel presente manuale la protezione offerta dall apparecchio stesso può essere ridotta Regolazione sfondo Riduttori per capsule ave save average reset print...

Page 13: ...il cavo di alimentazione con un cavo da 1 mm2 codice armonizzato H05VV F collegato a un connettore IEC320 N B il cavo di rete tipo UK è protetto da un fusibile da 10 A montato sulla sommità del connettore IN CASO DI DUBBIO CONTATTARE UN ELETTRICISTA 11 Descrizione generale L apparecchio è composto da un piano di appoggio illuminato e da un display LED di grandi dimensioni La pressione esercitata d...

Page 14: ...recchio agendo sull interruttore di accensione ON OFF posto sul retro dell apparecchio Conteggio Sistemare la capsula Petri sul piano di appoggio servendosi eventualmente del riduttore di centraggio Verificare che il display sia stato azzerato prima di procedere al conteggio delle colonie premendo e tenendo premuto il tasto correct reset Marcare le singole colonie con un pennarello Ogni volta che ...

Page 15: ...tutte le capsule conteggiate fino a quel punto Una volta ultimati il conteggio e la stampa premere e tenere premuto il tasto correct reset fino a quando appare la cifra zero sul display Così facendo si cancellano dalla memoria tutti i conteggi memorizzati in precedenza Trasferimento di dati su un computer Spegnere l apparecchio SC6 PLUS e collegarlo a un computer usando il cavo USB in dotazione Ac...

Page 16: ...dell apparecchio Usare solo i ricambi forniti o autorizzati da Bibby Scientific Ltd o dai suoi rappresentanti L impiego di componenti non omologati può compromettere le prestazioni e le caratteristiche di sicurezza dello strumento In caso di dubbio contattare il centro assistenza di Bibby Scientific Ltd o il punto vendita Bibby Scientific Ltd Stone Staffordshire ST15 0SA United Kingdom Tel 44 0 17...

Page 17: ...dad relativa no superior al 80 Fluctuaciones del suministro de la red no superiores al 10 Categoría de sobrevoltaje II IEC60364 4 443 Grado de contaminación 2 IEC664 Si el equipo no se usa de acuerdo como se describe en este manual la protección proporcionada por el equipo puede verse afectada Ajuste de fondo Adaptadores de placa ave save average reset print correct Figura 1 Controles de la unidad...

Page 18: ...rá conectarse al instrumento ANTES de conectarse al suministro de la red Si es preciso cambiar el cable de la red deberá utilizarse un cable de 1 mm2 homologado de código H05W F conectado a un enchufe IEC 320 Nota El cable de red para el Reino Unido está protegido con un fusible de 10 A montado en la parte superior del enchufe SI TIENE DUDAS AL RESPECTO CONSULTE A UN ELECTRICISTA CUALIFICADO Descr...

Page 19: ...y el campo de visión necesario Encienda la unidad con el interruptor ON OFF situado en la parte posterior de la unidad Recuento Coloque la placa de cultivo sobre la placa receptora con el adaptador de centrado si es necesario Asegúrese de que la pantalla está ajustada en cero antes de continuar manteniendo pulsada la tecla correct reset corregir reajustar Marque cada colonia con un rotulador Cada ...

Page 20: ...stren las tres rayas en la pantalla Los resultados impresos incluirán el recuento de todas las placas hasta ese momento Cuando el recuento y la impresión se hayan completado mantenga pulsada la tecla correct reset hasta que la pantalla regrese a cero lo que borrará los recuentos guardados en la memoria Transferencia de datos a un ordenador Apague la unidad SC6 Plus y conéctela a un ordenador media...

Page 21: ...ezas de repuesto suministradas o especificadas por Bibby Scientific Ltd o sus agentes La instalación de piezas no aprobadas puede afectar al rendimiento y a las funciones de seguridad incorporadas en el instrumento Si tiene alguna duda póngase en contacto con el departamento de servicio técnico de Bibby Scientific Ltd o con el punto de venta Bibby Scientific Ltd Stone Staffordshire ST15 0SA Reino ...

Page 22: ...temperaturbereich 5 C bis 40 C Höhe bis 2000m Relative Luftfeuchtigkeit nicht über 80 Schwankungen der Netzstromversorgung nicht über 10 Überspannungskategorie II IEC60364 4 443 Verschmutzungsgrad 2 IEC664 Der Einsatz des Gerätes auf eine im Handbuch nicht vorgesehene Weise kann eine Beeinträchtigung des durch dieses Gerät gegebenen Schutzes zur Folge haben Einstellung des Hintergrunds Teller Adap...

Page 23: ...mleiter muss verbunden werden BEVOR der Anschluss an die Stromversorgung erfolgt 21 Sollte ein Austausch des Netzkabels erforderlich sein muss ein Kabel mit einem Querschnitt von 1 mm2 mit dem harmonisierten Code H05VV F und einem IEC320 Stecker verwendet werden Hinweis Das GB Netzkabel ist durch eine im Oberteil des Steckers angebrachte 10A Sicherung geschützt BEI ZWEIFELN WENDEN SIE SICH AN EINE...

Page 24: ...dass die gewünschte Vergrößerung bzw das erforderliche Gesichtsfeld erreicht wird Das Gerät mit dem EIN AUS Schalter auf der Geräterückseite einschalten Zählvorgang Die Petrischale auf den Zählteller setzen ggf den Reduzierring verwenden Darauf achten dass das Display auf Null gesetzt ist Hierzu die Taste correct reset Korrektur Rücksetzen gedrückt halten Alle Kolonien mit einem Filzstift markiere...

Page 25: ...druckten Resultate beinhalten alle bis zu diesem Zeitpunkt gezählten Schalen Wenn die Zählung und das Ausdrucken abgeschlossen sind die Taste correct reset gedrückt halten bis sich das Display auf Null zurück stellt Dadurch wird der Speicher gelöscht Daten auf einen Computer übertragen Das SC6 Plus ausschalten und das Gerät über das mitgelieferte USB Kabel an einen Computer anschließen Den Compute...

Page 26: ...Vertretern geliefert oder angegeben werden Die Verwendung nicht genehmigter Teile kann die Leistung und die Sicherheitsfunktionen des Geräts beeinträchtigen Falls Zweifel bestehen sollten wenden Sie sich an die Technische Serviceabteilung von Bibby Scientific Ltd oder an Ihren Händler Bibby Scientific Ltd Stone Staffordshire ST15 0SA United Kingdom Tel 44 0 1785 812121 Fax 44 0 1785 813748 e mail ...

Page 27: ...s We cannot be sure that other equipment used in their vicinity will meet these standards and we cannot guarantee that interference will not occur in practice Where there is a possibility that injury damage or loss might occur if equipment malfunctions due to radio frequency interference or for general advice before use please contact the Technical Service Department of Bibby Scientific Ltd ...

Page 28: ...x France Tel 33 1 64 45 13 13 Fax 33 1 64 45 13 00 e mail bsf bibby scientific fr www bibby scientific com Bibby Scientific Italia Srl Via Alcide de Gasperi 56 20077 Riozzo di Cerro al Lambro Milano Italia Tel 39 0 2 98230679 Fax 39 0 2 98230211 e mail marketing bibby scientific it www bibby scientific it Bibby Scientific US Ltd 3 Terri Lane Suite 10 Burlington NJ 08016 USA Tel 800 225 9243 Fax 60...

Reviews: