background image

Metal Museum Easel

p.3

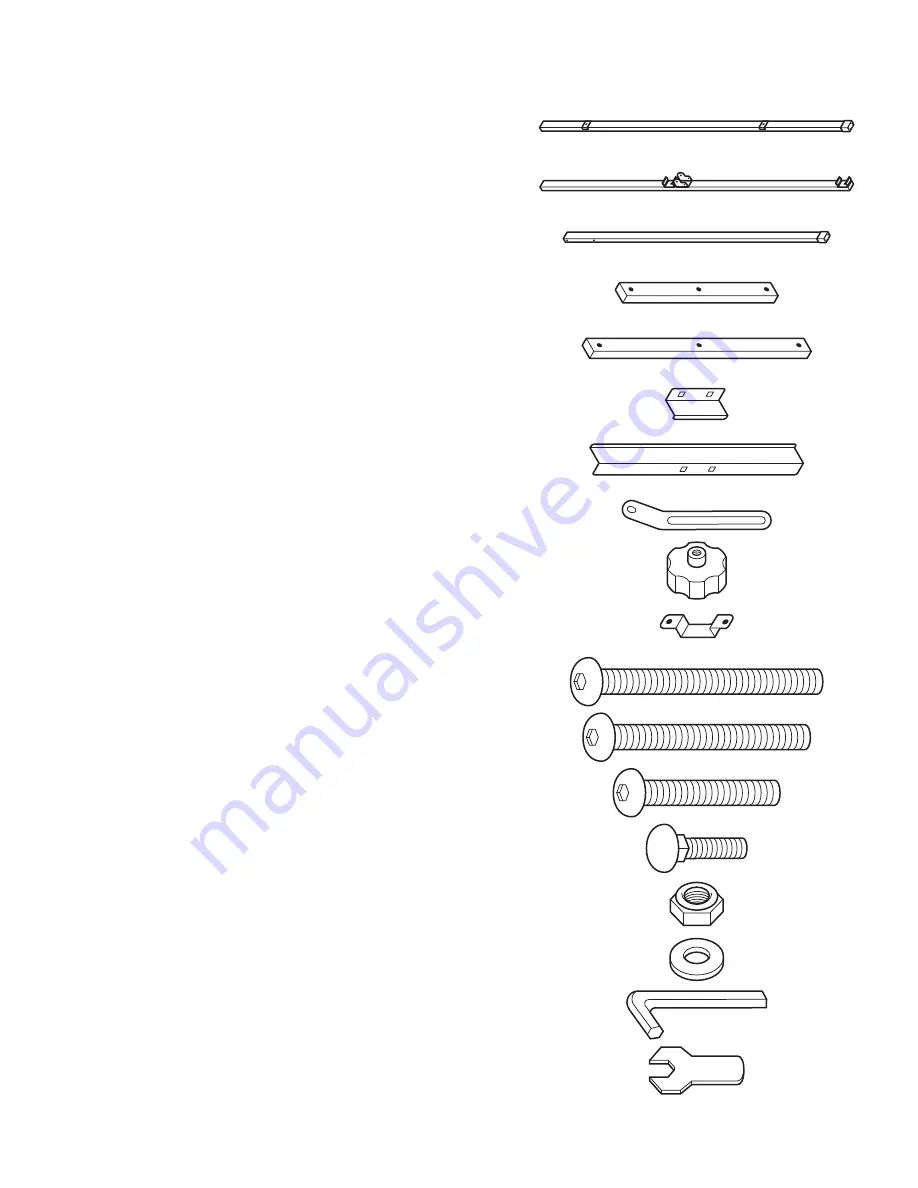
PARTS LIST  /  LISTA DE PARTES  /  LISTE DES PIÈCES DÈTACHÉES

DESCRIPTION / DESCRIPCIÓN / DESCRIPTION  

QTY / CANT/ QTÉ 

PICTURE / DIBUJO / IMAGE

1.  Front Leg 

2


Pata Delantera


Jambe Avant

2.  Center Bar 

1


Barra Central


Barre Centrale

3.  Rear Leg 

1


Pata Trasera


Jambe Arrière

4.  Short Crossbar 

1


Travesaño Corto


Barre Transversale Court

5.  Long Crossbar 

1


Travesaño Largo


Barre Transversale Long

6.  Top Clamp 

1


Abrazadera Superior


Plateau Supérieure

7.  Bottom Clamp 

1


Abrazadera Inferior


Plateau Inférieure

8.  Angled Lever 

2


Palanca en Ángulo


Levier avec Angle

9. Knob 

5

 Perilla

 Poignée

10. Bracket 

2

 Apoyo

 Support

11.  Allen Bolt - 1/4" x 2" 

2


Perno Allen - 6mm x 50mm


Boulon Allen - 6mm x 50mm

12.  Allen Bolt - 1/4" x 1-3/4" 

1


Perno Allen - 6mm x 45mm


Boulon Allen - 6mm x 45mm

13.  Allen Bolt - 1/4" x 1-1/4" 

6


Perno Allen - 6mm x 32mm


Boulon Allen - 6mm x 32mm

14.  Round Bolt - 3/16" x 5/8" 

4


Perno Redondo - 5mm x 16mm


Boulon Rond - 5mm x 16mm

15.  Lock Nut 

2


Tuerca de Bloqueo


Écrou de Blocage

16. Washer 

3

 Arandela

 Rondelle

17.  Allen Key 

1


Llave Allen


Clé Allen

18.  Hex Wrench 

1


Llave Hexagonal


Clé Hexagonale

Summary of Contents for 017342131491

Page 1: ...ns Inc Gracias por comprar nuestro mueble Studio Designs Inc Merci d avoir achet un meuble Studio Designs Inc METAL MUSEUM EASEL 13149 Black Negro Noir Rev 3 27 2019 Office 562 942 0492 Product Suppor...

Page 2: ...ecessario para ensamblar Si necesita ayuda con el armado partes o informaci n sobre otros productos viste por favor nuestra p gina en el internet www studiodesigns com o por favor ll menos Revise los...

Page 3: ...u Sup rieure 7 Bottom Clamp 1 Abrazadera Inferior Plateau Inf rieure 8 Angled Lever 2 Palanca en ngulo Levier avec Angle 9 Knob 5 Perilla Poign e 10 Bracket 2 Apoyo Support 11 Allen Bolt 1 4 x 2 2 Per...

Page 4: ...g up Coloque las patas y barra central como se muestra con agujeros hacia arriba Placez les pieds et la barre centrale comme indiqu avec les trous dirig s vers le haut Do not fully tighten any bolt un...

Page 5: ...tighten any bolt until step 6 No apriete completamente nungun perno hasta el paso 6 Ne pas serrer tout boulon jusqu l tape 6 Do not fully tighten any bolt until step 6 No apriete completamente nungun...

Page 6: ...Metal Museum Easel p 6 5 9 11 16 Do not fully tighten any bolt until step 6 No apriete completamente nungun perno hasta el paso 6 Ne pas serrer tout boulon jusqu l tape 6...

Page 7: ...todos los pernos del paso 1 6 Serrer tous les boulons des tapes 1 6 Rotate bolts 14 so they fit into square hole then attach clamps Gire los pernos 14 para que encajen en el agujero cuadrado luego fij...

Page 8: ...s que no sean usadas mantenidas en buenas condiciones o instaladas de acuerdo con las directrices de instalaci n y mantenimiento de la Empresa y o otras directrices pertinentes Conforme a la presente...

Reviews: