background image

Page 50

Electronic Control System

Wine Storage 

Wine Storage 

(400-

(400-

2

2

)

)

Series

Series

3-34

#3758410 - Revision C - May, 2014

UNIT

REFRIGERATOR

ON/OFF

ON/OFF

WARMER

COLDER

OFF

SERVICE

ICE

UNIT

REFRIGERATOR

ON/OFF

ON/OFF

WARMER

COLDER

OFF

SERVICE

ICE

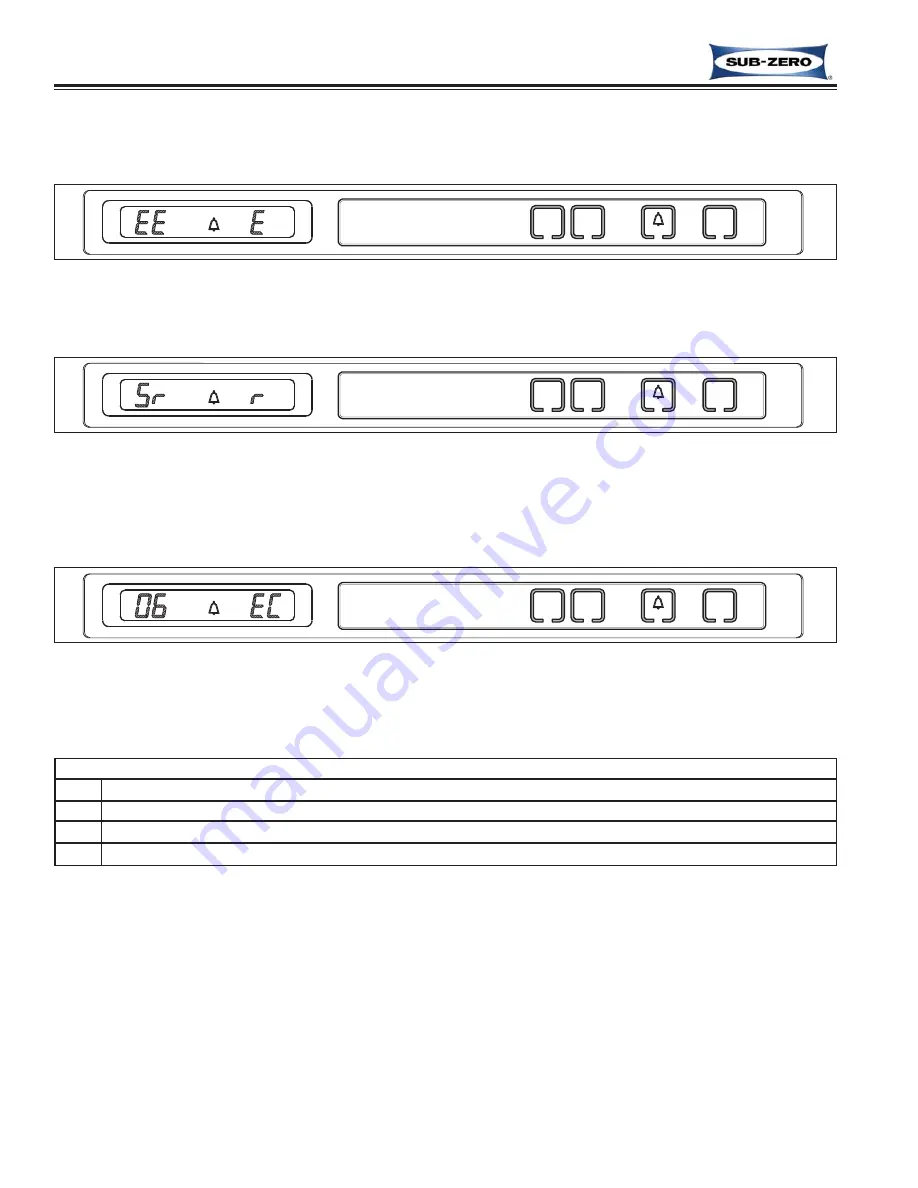
Figure 3-66.  “EE” Observed in Diagnostic Mode = Thermistor Fault in Location Indicated by Code

Figure 3-67.  “Sr” Observed While in Diagnostic Mode = Unit is in Showroom Mode

If “Sr” is observed during Diagnostic Mode, the unit is in Showroom Mode, which was explained earlier in this sec-
tion (See Figure 3-67).

If “EC” is observed in the right display area during Diagnostic Mode, the numbers at left are “Error Codes” (See
Figure 3-68).  Error Codes indicate problems registered by specific components.  If error codes are registered, they
will appear before temperature readings and can be toggled through with the temperature readings as described on
the previous page.  (See Error Code Table below and instructions on clearing Error Codes on next page.)

UNIT

REFRIGERATOR

ON/OFF

ON/OFF

WARMER

COLDER

OFF

SERVICE

ICE

Figure 3-68.  “EC” Observed While in Diagnostic Mode = Error Code

(See table below & how to clear Error Codes on next Page)

427R-2 Refrigerator Compartment Error Code Table

CODE INDICATION

05

Refrig. cabinet thermistor read open or shorted for 10+ seconds, or repeatedly read erratic temp’s

06

Refrig. evaporator thermistor read open or shorted for 10+ seconds, or repeatedly read erratic temp’s

50

Excessive Refrigerator Compressor Run

Diagnostic Mode Indicators

If “EE” is observed in left display area during Diagnostic Mode, the thermistor in that location is open or shorted, or
there is a break in that thermistor’s wiring (See Figure 3-66).

Summary of Contents for 424FS/G-2

Page 1: ...General Information 2 Installation Information 10 Controls Operation 30 subzero com 800 222 7820 400 Service Manual ...

Page 2: ...at hazardous or unsafe practices could result in minor personal injury and or product dam age and or property damage In addition please pay attention to the signal word NOTE which highlights information that is especially important for the topic being covered This manual is designed to be used by Authorized Service Personnel only Sub Zero Freezer Co Inc assumes no responsibility for any repairs ma...

Page 3: ...a 60 day parts labor warranty for cosmetic defects 5 Year SEALED SYSTEM parts only ONE FIVE YEAR Display Model Home Warranty Display units sold three years after date of manu facture 1 Year TOTAL PRODUCT parts and labor NOTE Stainless Steel Classic carBon Platinum doors panels product frames are covered by a 60 day parts labor warranty for cosmetic defects 5 Year SEALED SYSTEM parts only Warranty ...

Page 4: ...G P 2 400 Series 24 Wide Glass Platinum Steel Wrapped Door 424HAG P 2 400 Series 24 Wide High Altitude Glass Platinum Steel Wrapped Door 424G S 2 400 Series 24 Wide Glass Stainless Steel Wrapped Door 424HAG S 2 400 Series 24 Wide High Altitude Glass Stainless Steel Wrapped Door 424S B 2 400 Series 24 Wide Solid CarBon or Black Steel Wrapped Door 424S O 2 400 Series 24 Wide Solid Overlay Panel Appl...

Page 5: ... Wide High Altitude Glass Framed Panel Application Door 430G O 400 Series 30 Wide Glass Overlay Panel Application Door 430HAG O 2 400 Series 30 Wide High Altitude Glass Overlay Panel Application Door 430G P 2 400 Series 30 Wide Glass Platinum Steel Wrapped Door 430HAG P 2 400 Series 30 Wide High Altitude Glass Platinum Steel Wrapped Door 430G S 2 400 Series 30 Wide Glass Stainless Steel Wrapped Do...

Page 6: ...rkling Wines 41 5 Wine Storage Unit Minimum Temperature 38 3 Fahrenheit Celsius The table below shows the temperature range of the Sub Zero Wine Storage Units This table also shows the rec ommended temperatures for serving wines Serving wines at the recommended temperatures will insure that white wines maintain their lively and interesting taste and red wines will maintain their scent and flavor N...

Page 7: ... location 2 Secure bracket to wall studs or flooring making sure screws extend 7 8 22 2 mm into each wall stud or flooring 3 Refer to Installation Guide provided with unit for any additional information needed INSTALLATION CONSIDERATIONS This section covers common installation issues seen by Service Technicians Improper installation though not a valid service issue has the potential to lead to a c...

Page 8: ...od block must extend a minimum of 3 76 2 mm over unit 4 Utilizing front and rear levelers raise and level unit until it contacts wood block See leveling instructions on following pages 5 Refer to Installation Guide provided with the unit for any additional information needed Unit Leveling 424 2 424FS 2 NOTE Model 424 2 must be leveled before installing into rough in opening If unit is already inst...

Page 9: ...igure 2 7 Kickplate Grille Removal Side Molding Unit to Cabinet Bracket Kickplate Grille Rear Leveler Adjusting Screw Front Leveling Leg Rear Leveler Assy Screw Unit Leveling 427 2 427R 2 NOTE Unit must be installed before final leveling If unit is anchored to cabinets remove anchor screws before leveling reinstalled after See Figure 2 6 1 Remove kickplate grille See Figure 2 7 2 To raise front tu...

Page 10: ...gure 2 10 1 Remove kickplate See Figure 2 11 2 To raise front turn front leveler legs counterclock wise clockwise to lower See Figure 2 12 3 At front of unit base is an adjusting screw that reach es to rear leveler roller assembly To raise unit rear use 5 16 socket wrench to turn adjusting screw clockwise to raise counterclockwise to lower See Figure 2 13 NOTE Level is best checked at top side mai...

Page 11: ...r adjusting door tighten cabinet hinge screws and check for proper door seal Door and or Drawer Adjustment 427 2 427R 2 NOTE Door and or drawers on models 427 2 427R 2 are non adjustable Instead door and or drawer pan els must be adjusted if there is alignment problems Refer to Installation Manual NOTE Unit must be level before adjusting door and or drawer panels Door Adjustment 430 2 If unit is p...

Page 12: ... and top hinges Door Stop Installation 430 2 For the model 430 optional 90 and 105 door stops are available free of charge from Parts Distributors and or Product Distributors The part number for the 90 stop is DS90 and the part number for the 105 stop is DS105 To install a door stop the door must be closed then See Figure 2 18 1 Slide door stop cam up onto bottom hinge pin 2 Position stub on door ...

Page 13: ...emoved from the unit To Remove the Door 1 Remove mounting screws securing door closer to the unit base See Figure 2 19 2 Slide door closer down off of bottom door hinge pin NOTE It may be necessary to lean unit back slightly to create enough clearance between hinge pin and floor 3 Open door and extract screws from top door hinge 4 Lean door away from unit slightly and lift door out of bottom cabin...

Page 14: ...rlay panels are attached to the door using screws passing through the door frame from the rear into the panel The handle may also be attached through the door frame or just through the panel To Remove an Overlay Panel 1 Open door 2 Remove Poly tape under gasket which covers panel mounting screw holes See Figure 2 22 NOTE Do not discard tape It must be reapplied when panel is reinstalled 3 Extract ...

Page 15: ...re 2 24 NOTE Do not discard tape It must be reapplied when panel is reinstalled 3 Extract panel mounting screws See Figure 2 25 4 Pull panel from door NOTE To install panel reverse steps above Drawer Panel Removal and Installation 427R 2 NOTE Model 427R 2 is NOT supplied with panels from the factory Panels are purchased separately Drawer panels are attached using screws passing through mounting br...

Page 16: ...sconnect Remove E Ring Pry down Screwdriver up into holes Figure 7 28a Trim Hinge Removal Lean door away from unit and lift up Door Trim Door Hinge Figure 7 28b Door Removal 5 Remove hinge side door trim See Figure 7 28a 6 With a 1 8 Allen wrench and Phillips screwdriver extract all screws from top door hinge 7 Lean door away from unit and lift off of bottom cabi net hinge See Figure 7 28b NOTE Wh...

Page 17: ... trim is secured to the door with screws The screw heads are then concealed by a magnetic trim strip To Remove Handle or Handle side Trim See Figure 7 30 7 31 1 Press a sticky piece of tape to center of magnetic trim strip 2 Pull tape so that trim strip bows away from door disengaging both ends of trim strip from the end caps 3 With mounting screws exposed extract the screws then pull handle or ha...

Page 18: ...t Point The desired compartment temperature established by pressing the COLDER or WARMER keys High Offset Cut in During normal operation of a wine storage unit it is the maximum evaporator temperature the electronic control system will allow before calling for cooling Low Offset Cut out During normal operation of a wine storage unit it is the minimum compart ment air temperature the electronic con...

Page 19: ... the control board located directly behind the control panel Temperatures and possible problems with the unit are displayed at the control panel display The entire electronic control system is described in greater detail on the following pages NOTE The diagram below is not an exact electrical representation of the electronic control system For more detailed electrical diagrams refer to the wiring ...

Page 20: ...S TEMPERATURE ORANGE YELL UPPER EVAPORATOR P8 SENSES TEMPERATURE 400 SERIES CONTROL BOARD SUMMARY LAYOUT LOWER EVAP FAN P8 BLUE COOLS LOWER COMPARTMENT EMPTY P7 UPPER EVAP FAN COOLS UPPER COMPARTMENT LIGHTS OVERRIDE P9 ORANGE ON WHEN LIGHTS ON 100 P1 REFRIGERANT VALVE P5 ALARM CIRCUIT NORMALLY OPEN P3 FOR HOME ALARMS EMPTY P2 ALARM CIRCUIT COMMON FOR HOME ALARMS ALARM CIRCUIT NORMALLY CLOSED P4 FO...

Page 21: ... adjusting set point temperature adjustment switching lighting system ON OFF and enabling and disabling temperature alarm feature Please note that though possible to display temperatures in Fahrenheit or Celsius in most cases Fahrenheit readings are shown Unit ON OFF 400 2 Series units are shipped in the Off Mode By pressing and releasing the UNIT ON OFF key power is allowed past the control board...

Page 22: ...ure 3 6 Adjust Set Point Press COLDER or WARMER Keys Lighting System ON OFF For the purpose of displaying a wine supply it is possible to energize the lights 100 of the time even if the door is closed To do so press and release the LIGHTS ON OFF key See Figures 3 7 To disable this feature press and release the LIGHTS ON OFF key again Alarm BELL ON OFF Temperature Alarm There is an audio visual tem...

Page 23: ... convert temperature units of measure from Fahrenheit F to Celsius C readings press and hold the alarm bell key and the UNIT ON OFF key simultaneously for five 5 seconds then release the keys See Figure 3 9 A tem perature is now shown in the left display window and the right display window indicates the units of measure as F or C In this case a temperature will be displayed in Celsius C units of m...

Page 24: ...nit OFF First Figure 3 12 Initiate Sabbath Mode Press and Hold UNIT ON OFF Key for 10 Seconds Hold for 10 Seconds Showroom Mode Showroom Mode was incorporated into the electronic control system so the appliance could be displayed in a show room setting When in Showroom Mode all cooling functions are disabled but the lighting system remains active To initiate Showroom Mode the unit must first be sw...

Page 25: ...OVERLOAD PROTECTOR GRAY WHITE PINK BROWN TAN ORANGE ORANGE PINK STARTING RELAY CONDENSER FAN MOTOR COMPRESSOR COMPRESSOR EVAPORATOR FAN MOTORS AWECO REF VALVE LIGHTS 680 Ω LOWER LIGHTS NEUT WHITE UPPER BLUE BLUE N O N O N C PINK BLUE 1 M M M M Supply Power to the Lighting System When the unit is plugged in a continuous 115 Volts AC is supplied to the lighting system making it possible to ener gize...

Page 26: ...emperature is associated with Though compartment air temperature fluctuates slightly the average temperature is displayed See Figure 3 16 NOTE The temperature range in a wine storage compartment is 38 F 3 C to 65 F 18 C NOTE If a compartment temperature should ever exceed either the high offset or low offset for example when a door is left open the temperature displayed at the control panel will c...

Page 27: ... Figure 3 17 NOTE If neither compartment is calling for cooling the compressor and condenser fan are switched off NOTE Evaporator fans are switched off when the door is open and disabled if the unit is in Showroom Mode NOTE When in Sabbath Mode evaporator thermistors still control energizing of the compressor and evaporator fans except there is a ran dom fifteen 15 to twenty five 25 sec ond delay ...

Page 28: ...RANGE W RED BLUE W YELLOW ORANGE W YELLOW WHITE W RED WHITE W BLUE GRAY W WHITE THERMISTER 1 LOWER CABINET UPPER CABINET THERMISTER 2 LOWER EVAPORATOR THERMISTER 3 UPPER EVAPORATOR THERMISTER 4 MEMBRANE SWITCH DISPLAY WINE CONTROL BOARD J2 J1 J8 1 8 LOW VOLTAGE 60 CYCLES 115 VOLTS GREEN YELLOW J3 CONTROL BOARD BLACK E3 14 E1 E2 WINE J8 2 8 J1 J2 1 L1 OVERLOAD PROTECTOR GRAY WHITE PINK BROWN TAN OR...

Page 29: ...e cycles During a warm temperature alarm warm temperature readings may be dis played at the control panel the SERVICE indicator will flash See Figure 3 19 A warm temperature alarm also cuts power to the compressor and fans and logs error code 10 or 12 and possibly 15 covered later in this section depending on the compartment experiencing the warm temperature alarm If the temperature alarm feature ...

Page 30: ... maximum run time cycles During a cold temperature alarm cold temperature readings may be displayed at the control panel the SERVICE indicator will flash See Figure 3 22 A cold temperature alarm also cuts power to the compressor and fans and logs error code 11 or 13 covered later in this section depending on the compartment experiencing the cold temperature alarm If the temperature alarm feature h...

Page 31: ...ed by pressing the bell key on the control panel the BELL ON indicator will also flash and the audible alarm will beep NOTE Correcting repairing the thermistor problem will clear the Thermistor Malfunction Error Indicator Figure 3 25 EE at Right and SERVICE Flashing Upper Compartment Thermistor or its Wiring Fault NOTE Alarm will Beep and BELL ON will also Flash if Alarm is Enabled Figure 3 26 EE ...

Page 32: ...l indicators will illuminate Pressing either COLDER key or either WARMER key while in Diagnostic Mode will toggle to the next or previous thermistor location respectively See Figure 3 29 3 30 and 3 31 NOTE If the COLDER and UNIT ON OFF keys are pressed and held for ten 10 seconds Manual Valve Activation Mode will be initiated this is covered later in the section NOTE Diagnostic Mode will end ten 1...

Page 33: ...repeatedly read erratic temp s 06 Upper Evaporator Thermistor read open or shorted for 10 seconds or repeatedly read erratic temp s 07 Lower Cabinet Thermistor read open or shorted for 10 seconds or repeatedly read erratic temp s 08 Lower Evaporator Thermistor read open or shorted for 10 seconds or repeatedly read erratic temp s 10 Upper Cabinet Warm Temperature alarm 11 Upper Cabinet Cold Tempera...

Page 34: ...erature for that com partment will be displayed in left display window and the right display window will show the thermistor location code NOTE If the COLDER and UNIT ON OFF keys are pressed and held for less then ten 10 seconds Diagnostic Mode will be initiated This was covered earlier in the section NOTE It is possible to toggle through the other temperature readings as in Diagnostic Mode but in...

Page 35: ...g this temperature history data so it can be viewed on the display is accomplished by initiating Temperature Log Recall Mode To initiate the Temperature Log Recall Mode the unit must be ON Now press and hold the desired compartment WARMER key then press the UNIT ON OFF key then release both keys See Figure 3 36 The left display window will show average compartment thermistor temperature and in the...

Page 36: ... of the 64 indexes average temperatures will continue to be logged No event indicator will appear with these temperatures NOTE If the unit was switched OFF by pressing the UNIT ON OFF key during any of the 64 indexes and there was still 115V AC supplied to the control board the average temperatures will continue to be logged This means tem peratures would be expected to rise and the SERVICE indica...

Page 37: ...Hours WINE STORAGE TEMPERATURE LOG INDEX CHART 45 180 Hours 46 184 Hours 47 188 Hours 48 192 Hours 8 Days 49 196 Hours 50 200 Hours 51 204 Hours 52 208 Hours 53 212 Hours 54 216 Hours 9 Days 55 220 Hours 56 224 Hours 57 228 Hours 58 232 Hours 59 236 Hours 60 240 Hours 10 Days 61 244 Hours 62 248 Hours 63 252 Hours 64 256 Hours 10 Days 16 Hours Index Previous Hours Time Frame Index Previous Hours T...

Page 38: ...isplay A semi liquid substance sandwiched between glass in the display of the control panel assembly The molecules of this semi liquid substance have no specific orientation However when electricity is applied to them they react predictably aligning and straightening in such a way as to control light passage Indicators The words numbers and icons that appear on the display of the control panel ass...

Page 39: ...tire electronic control system is described in greater detail on the following pages NOTE For more detailed electrical diagrams refer to the wiring diagram and schematic supplied with the unit 115 VOLTS 60 CYCLES LOW VOLTAGE HIGH VOLTAGE L1 STARTING RELAY COMPRESSOR COMPRESSOR PROTECTOR OVERLOAD NEUT 3 1 5 6 4 DPDT RELAY BOARD MAIN BLACK PURPLE BLUE WHITE BLUE PURPLE BOARD MAIN BLACK WHITE BLUE RE...

Page 40: ...el assembly must be replaced CIRCUIT LOW VOLTAGE THERMISTOR CIRCUITS 120 VOLT CIRCUITS TERMINAL MAIN CONTROL BOARD SUMMARY DESCRIPTION WHITE PURPLE COLOR BLACK BLUE RED YELLOW ORANGE ORANGE BLUE YELLOW BLACK WHITE YELLOW BLUE WHITE BLUE YELLOW RED BLUE GROUND FOR DISPLAY BOARD POWER SUPPLY 12VDC POWER SUPPLY FOR DISPLAY BOARD GROUND FOR DISPLAY BOARD POWER SUPPLY SERIAL DATE TRANSMIT SERIAL DATA R...

Page 41: ... SECTION CONTROL PANEL LAYOUT NOTE The LCD is not back lit It will appear darker than the LED s in the wine section UNIT REFRIGERATOR ON OFF ON OFF WARMER COLDER OFF SERVICE Figure 3 45 427R 2 Refrigerator Control Panel Layout REFRIGERATOR SET POINT ADJUSTMENT KEYS LCD Liquid Crystal Display DRAWER AJAR ALARM ON OFF KEY UNIT ON OFF KEY ...

Page 42: ...nit This will be indicated by the unit lights and LCD energizing NOTE Whenever the unit is switched OFF using the UNIT ON OFF key a trace of the word OFF will be visible on the LCD as long as power is supplied to the unit This differs in Sabbath Mode which will be covered later Adjusting Set Point Temperature Adjustments To adjust set points press WARMER or COLDER key on control panel in multiple ...

Page 43: ...Mode Sabbath Mode Showroom Mode and Manual Freezer Evaporator Defrost Temperature Units Selection Mode Selecting Degrees Fahrenheit or Degrees Celsius Display The electronic control is initially set to display temperature in Fahrenheit F units of measure Units of measure can be converted from F to C Celsius and or back again This operation is called Temperature Units Selection NOTE Temperature Uni...

Page 44: ...ER COLDER OFF Figure 3 50 To Enter Sabbath Mode Switch Unit OFF First Press and hold for 10 seconds Showroom Mode Showroom Mode allow the appliance to be displayed in a showroom setting When in Showroom Mode all cooling functions are disabled but the lighting system and LCD remain active To initiate Showroom Mode the unit must first be switched OFF using the UNIT ON OFF key See Figure 3 52 With th...

Page 45: ...0 CYCLES HIGH VOLTAGE L1 STARTING RELAY COMPRESSOR COMPRESSOR PROTECTOR OVERLOAD NEUT 3 1 5 6 4 DPDT RELAY BOARD MAIN BLACK PURPLE BLUE WHITE NEUTRAL WHITE NEUTRAL WHITE RED PURPLE ORANGE BLACK RED YELLOW LOWER DRAWER LIGHTS CONDENSER FAN MOTOR EVAPORATOR FAN MOTOR TOP DRAWER LIGHTS M M 2000 Ω MULLION HEATER NEUTRAL WHITE M ORANGE ORANGE DOOR SWITCH DOOR SWITCH P4 J5 J4 J6 J3 P2 P1 P3 J2 1 115 Vol...

Page 46: ...ill be logged NOTE If evaporator thermistor is faulty the compressor will not energize until zone air temperature exceeds high offset by 5 F 3 C SERVICE flashes and Error Code 06 is logged NOTE When in Sabbath Mode the refrigerator compartment thermistor still controls compressor operation except there is a random 15 to 25 second delay before the compressor is energized Figure 3 56 Signal Trace Re...

Page 47: ...VICE to display constant NOTE If the unit is ever switched OFF then immediately back ON the compressor will not energize for at least 3 minutes This 3 minute minimum OFF time is used to protect the compressor and its electricals Figure 3 58 Service Flashing if several 100 compressor run periods occurred a drawer was not opened during last excessive run period and temperature is not able to fall ha...

Page 48: ... Fault Figure 3 61 Service Flashing Several 100 Run Periods a Drawer was Not Open During Last 100 Run Period and Zone Temperature Not Able to Fall Half Way Between Set Point and Low Off Set UNIT REFRIGERATOR ON OFF ON OFF WARMER COLDER SERVICE UNIT REFRIGERATOR ON OFF ON OFF WARMER COLDER SERVICE Figure 3 62 SERVICE Steady not Flashing Error Codes Observed in Diagnostic Mode but Not Cleared UNIT R...

Page 49: ...D will be the real time temperature of the ther mistor at the right will be the thermistor location code and all icons will illuminate Pressing the COLDER key while in Diagnostic Mode will toggle forward to the next thermistor location See Figures 3 65 while pressing the WARMER key will toggle to the previous thermistor location NOTE If the COLDER and UNIT ON OFF keys are pressed and held for ten ...

Page 50: ...codes are registered they will appear before temperature readings and can be toggled through with the temperature readings as described on the previous page See Error Code Table below and instructions on clearing Error Codes on next page UNIT REFRIGERATOR ON OFF ON OFF WARMER COLDER OFF SERVICE ICE Figure 3 68 EC Observed While in Diagnostic Mode Error Code See table below how to clear Error Codes...

Page 51: ...t having to wait for the zone to call for cooling To initiate Manual Component Activation Mode the unit must be ON then press and hold the COLDER key and the UNIT ON OFF key for ten 10 seconds See Figure 3 71 All cooling functions will begin and the compartment temperature will be displayed at left in the LCD and at right will be the thermistor location code NOTE If a COLDER and the UNIT ON OFF ke...

Page 52: ...d evaporator temperature his tory see following page To View Compartment Temperature History Only Begin with the unit ON Now press and hold the desired compartment WARMER key then press the UNIT ON OFF key then release both keys See Figure 3 72 The left display area on the LCD will show average compartment thermistor temperature and in the right display area will be the index number The first inde...

Page 53: ...ON OFF key first then the WARMER key then release both keys See Figure 3 78 The left display area on the LCD will show average thermistor tempera ture and in the right display area will be the index number 1 indicating the most recent two hour temperature aver age The right display area will also flash the thermistor location code at 3 second intervals See Figure 3 79 UNIT REFRIGERATOR ON OFF ON O...

Page 54: ...ed OFF by pressing the UNIT ON OFF key during any of the 168 indexes and there was still power supplied to the control board the average temperatures will continue to be logged This means tem peratures would be expected to rise and the SERVICE icon would be present in all indexes in which the unit was OFF NOTE Temperature Log Recall Mode will end twenty 20 seconds after the last key stroke Tempera...

Page 55: ... 196 Hrs 99 198 Hrs 100 200 Hrs 101 202 Hrs 102 204 Hrs 103 206 Hrs 104 208 Hrs 105 210 Hrs 106 202 Hrs 107 214 Hrs 108 216 Hrs 9 Days 109 218 Hrs 110 220 Hrs 111 222 Hrs 112 224 Hrs 113 226 Hrs 114 228 Hrs 115 230 Hrs 116 232 Hrs 117 234 Hrs 118 236 Hrs 119 238 hrs 120 240 Hrs 10 Days 121 242 Hrs 122 244 Hrs 123 246 Hrs 124 248 Hrs 125 250 Hrs 126 252 Hrs Index Hours Past 127 254 Hrs 128 256 Hrs ...

Page 56: ...tered as soon as power is supplied to the unit While in this mode open the bottom drawer then toggle through the model codes by pressing the WARMER or COLDER keys until proper model code is displayed See Figure 3 86 and 3 87 and Model Code Table below With proper model code dis played press UNIT ON OFF key to lock the model configuration See Figure 3 88 MODEL CODE TABLE CODE MODEL br 700BR 3 bC 70...

Page 57: ...figuration Mode with the model code of the last configuration displayed See Figure 3 89 and Model Code Table on previous page If needed toggle through the model codes by pressing WARMER or COLD ER keys until appropriate model code is displayed See Figure 3 90 and 3 91 With appropriate model code dis played press UNIT ON OFF key to store model configuration See Figure 3 92 Figure 3 89 Press Alarm a...

Reviews: