background image

Page 8

Wine Storage 

Wine Storage 

(400-

(400-

2

2

)

)

Series

Series

Installation Information

2-3

#3758410 - Revision C - May, 2014

Sub-Zero Unit

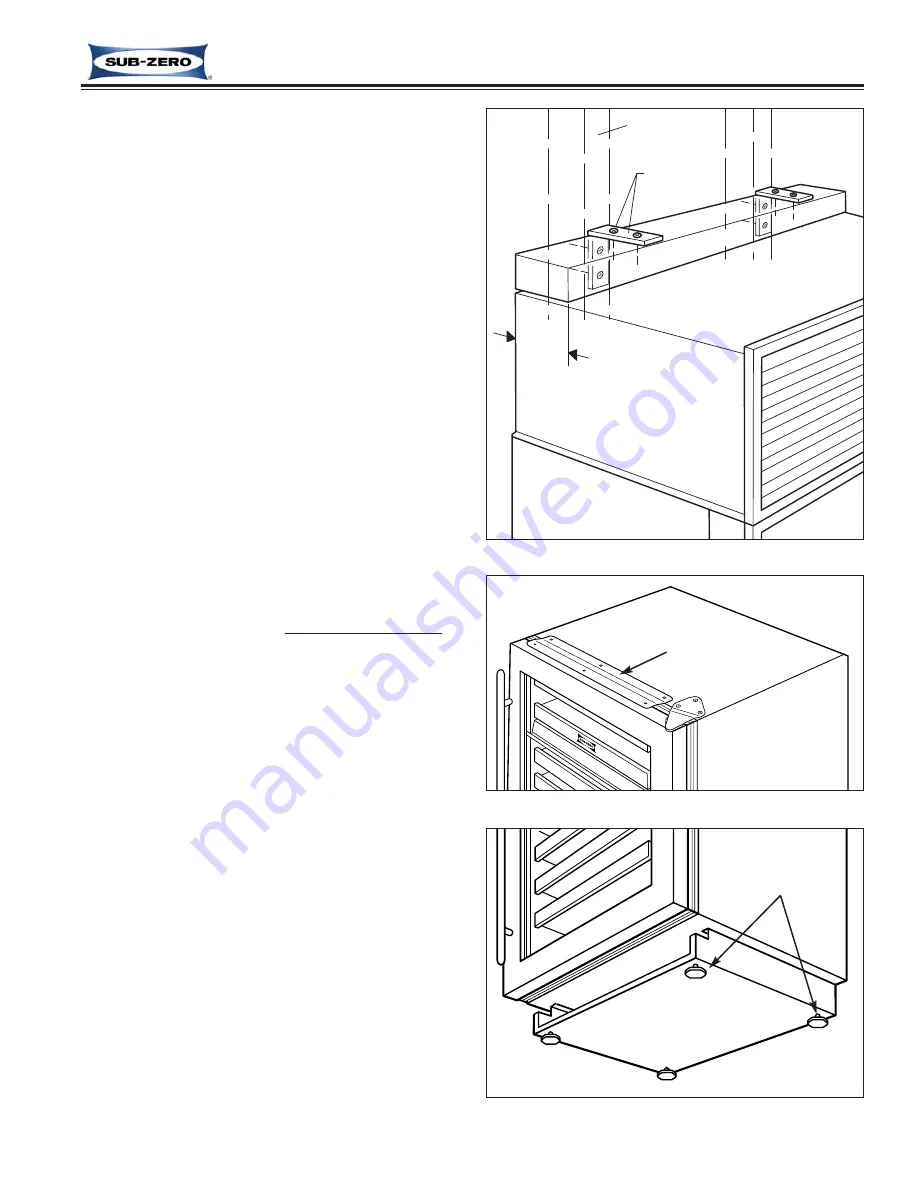
Figure 2-3.  Anti-Tip Components

Wall Stud

Wood Block

Screws &
L-Bracket

Min. 3”
(76.2 mm)

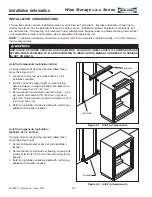
Anti-Tip Components Installation (430-2)

If anti-tip components (aka wood block / blocking kit)
need be installed, follow these steps (See Figure 2-3):

1. Locate and mark two wall studs at back of unit

installation location.

2. Identify and mark proper height to clear unit top.

Space between unit top and bottom of wood block
must NOT be more then 1/4" (6.1 mm).

3. Using the L-brackets and screws provided, secure

wood block to wall studs, located in step 1, making
sure screws extend 7/8" (22.2 mm) into each wall
stud.  The wood block must extend a minimum of 3"
(76.2 mm) over unit.

4. Utilizing front and rear levelers, raise and level unit

until it contacts wood block (See leveling instructions
on following pages).

5. Refer to Installation Guide provided with the unit for

any additional information needed.

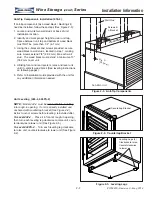
Unit Leveling  (424-2, 424FS-2)

NOTE:

Model 424-2 must be leveled before installing

into rough-in opening.  If unit is already installed and
anchored with countertop bracket (See Figure 2-4),
Extract anchor screws before leveling, reinstalled after.

To Level 424-2

-  Place it in front of rough-in opening,

then turn each leveling leg clockwise to raise unit, coun-
terclockwise to lower unit (See Figure 2-5).

To Level 424FS-2

-  Turn each leveling leg clockwise

to raise unit, counterclockwise to lower unit (See Figure
2-2).

Figure 2-5.  Leveling Legs

Figure 2-4.  Countertop Bracket

Leveling Legs (4)
Clockwise to raise,
Counterclockwise
to lower

Countertop Bracket

Summary of Contents for 400-2 SERIES

Page 1: ...General Information 2 Installation Information 10 subzero com 800 222 7820 400 Service Manual ...

Page 2: ...at hazardous or unsafe practices could result in minor personal injury and or product dam age and or property damage In addition please pay attention to the signal word NOTE which highlights information that is especially important for the topic being covered This manual is designed to be used by Authorized Service Personnel only Sub Zero Freezer Co Inc assumes no responsibility for any repairs ma...

Page 3: ...a 60 day parts labor warranty for cosmetic defects 5 Year SEALED SYSTEM parts only ONE FIVE YEAR Display Model Home Warranty Display units sold three years after date of manu facture 1 Year TOTAL PRODUCT parts and labor NOTE Stainless Steel Classic carBon Platinum doors panels product frames are covered by a 60 day parts labor warranty for cosmetic defects 5 Year SEALED SYSTEM parts only Warranty ...

Page 4: ...G P 2 400 Series 24 Wide Glass Platinum Steel Wrapped Door 424HAG P 2 400 Series 24 Wide High Altitude Glass Platinum Steel Wrapped Door 424G S 2 400 Series 24 Wide Glass Stainless Steel Wrapped Door 424HAG S 2 400 Series 24 Wide High Altitude Glass Stainless Steel Wrapped Door 424S B 2 400 Series 24 Wide Solid CarBon or Black Steel Wrapped Door 424S O 2 400 Series 24 Wide Solid Overlay Panel Appl...

Page 5: ... Wide High Altitude Glass Framed Panel Application Door 430G O 400 Series 30 Wide Glass Overlay Panel Application Door 430HAG O 2 400 Series 30 Wide High Altitude Glass Overlay Panel Application Door 430G P 2 400 Series 30 Wide Glass Platinum Steel Wrapped Door 430HAG P 2 400 Series 30 Wide High Altitude Glass Platinum Steel Wrapped Door 430G S 2 400 Series 30 Wide Glass Stainless Steel Wrapped Do...

Page 6: ...rkling Wines 41 5 Wine Storage Unit Minimum Temperature 38 3 Fahrenheit Celsius The table below shows the temperature range of the Sub Zero Wine Storage Units This table also shows the rec ommended temperatures for serving wines Serving wines at the recommended temperatures will insure that white wines maintain their lively and interesting taste and red wines will maintain their scent and flavor N...

Page 7: ... location 2 Secure bracket to wall studs or flooring making sure screws extend 7 8 22 2 mm into each wall stud or flooring 3 Refer to Installation Guide provided with unit for any additional information needed INSTALLATION CONSIDERATIONS This section covers common installation issues seen by Service Technicians Improper installation though not a valid service issue has the potential to lead to a c...

Page 8: ...od block must extend a minimum of 3 76 2 mm over unit 4 Utilizing front and rear levelers raise and level unit until it contacts wood block See leveling instructions on following pages 5 Refer to Installation Guide provided with the unit for any additional information needed Unit Leveling 424 2 424FS 2 NOTE Model 424 2 must be leveled before installing into rough in opening If unit is already inst...

Page 9: ...igure 2 7 Kickplate Grille Removal Side Molding Unit to Cabinet Bracket Kickplate Grille Rear Leveler Adjusting Screw Front Leveling Leg Rear Leveler Assy Screw Unit Leveling 427 2 427R 2 NOTE Unit must be installed before final leveling If unit is anchored to cabinets remove anchor screws before leveling reinstalled after See Figure 2 6 1 Remove kickplate grille See Figure 2 7 2 To raise front tu...

Reviews: