background image

9

ENGLISH

Congratulations on your purchase

Congratulations on purchasing the latest energy-efficient ceiling fan technology. This fan uses (AC) alternating current, 

allowing for very high energy efficiency and high air circulation volume without added noise.

Operation options:

 Your (AC) motor is the latest in fan design technology. It can be controlled via a wall panel, manually using 

a pull chain or using a remote control (depending on the model).

Caution

Follow these instructions carefully to enjoy maximum safety in the installation and operation of this 

equipment.
The minimum distance between the lamp and any illuminated objects must be greater than 1m.
The electrical installation of the ceiling fan must be carried out by an authorized electrician in order 

to be covered by our warranty.
This device can be used by children aged 8 years and above and people with reduced physical, 

sensory or mental abilities or lack of experience or knowledge, if they have been given appropriate 

supervision or training regarding the use of the device and they understand the dangers of its use. 

Children should not play with the device. The cleaning and maintenance of the device should not be 

carried out by children without supervision.
The fan must be installed in such a way that the blades are more than 2,3m above the ground. Make 

sure that there is a space of at least 30cm between the fan’s blades and any wall or other obstacle 

that they could hit. It is important to note that the greater the distance, the more efficient the air flow 

produced will be.
Before contacting the technical service, it is recommended to read the troubleshooting guide inclu-

ded in this manual.

Safety precautions

The information contained in the following pages has been prepared to ensure your maximum enjoyment of your fan:

1. The installation must be carried out by qualified personnel to do electrical installations in accordance with the regulations 

in force in the country of installation.

2. Any action performed for the electrical connection of the device, such as its cleaning, must be carried out after ensurin 

that the general power supply is disconnected, by removing the corresponding fuse or disarming the protective switch in 

order to ensure total isolation of the power supply. 

3. The fan must be installed at a location on the ceiling sch that the blades are at least 2.3 m above the floor and 300 mm 

from any object or wall. The mounting bracket must be attached to a ceiling structure that is capable of supporting a 

minimum of 30 kg using the two screws provided. At least 30 mm of the length of the screws must be screwed into the 

bracket. When deciding where to mount the fan, be sure that there is at least 30 cm of space between the fan and any 

wall or other obstruction that the fan blades could collide with. The greater this distance, the more effective the air flow 

produced.After the fan is mounted, be sure that the blades are no less than 2.3 m above the ground

4. The ground wire of the fan must be connected to the earth network of the installation, to avoid any derivation that may 

put people in danger.

5. Do not connect the fan’s power supply to any dimmers, potentiometers, or light switches, as it will cause the fan to mal-

function and/or will damage the motor. For the electrical connection it is necessary to incorporate a switch disconnector 

in accordance with the installation regulations, which ensures an omnipolar cut, directly connected to the power termi-

nals and must have a contact separation at all its poles, which provides total disconnection under conditions of Category 

III overvoltage. The fan must be directly connected to a properly protected installation circuit (magnetothermal differential 

switch with the adequate size for the fan’s consumption and technical specifications). Only use the fan’s control to turn 

it on or stop it.

6. It is recommended to not use these types of fans along with gas installations simultaneously in the same room.

7. The fan must be not be moving and must have come to a complete stop before changing its direction of rotation. This will 

prevent damage to its motor and to the control unit, when applicable.

8. Do not insert anything that could hit the fan’s blades into its pathway while it is moving, as this could cause damage to 

people, can damage the blades, and can offset the balance of the unit, causing vibrations and wobbling.

9.  After installing the fan, ensure that all fastenings are secure and tightened in order to avoid any noise caused by loose 

elements.

10. Due to the fan’s movement, certain fastenings may become loose. Check all fastenings twice per year at a minimum in 

order to ensure that they are sufficiently tight. If necessary, they must be retightened.

FAQ

¿?

<8

min 2,3m

min 0,3m

Summary of Contents for ANKE

Page 1: ...ca sat sulion es y a trav s de nuestra web www sulion es donde encontrar s un acceso a v deos instrucciones y una gu a de preguntas frecuentes In the event of any questions incidents or missing parts...

Page 2: ...stalling the fan Installation du ventilateur Instalando o ventilador Installieren Sie den L fter Installazione della ventola 51 ndice Indice Index1 x1 x4 x1 x1 x1 x1 x1 x1 x1 x1 x1 x1 x1 Componentes P...

Page 3: ...talaci n 2 Cualquier actuaci n sobre el conexionado el ctrico del aparato as como para su limpieza debe ser solamente realizado tras asegurarse que la alimentaci n el ctrica general de la instalaci n...

Page 4: ...montaje es de 120 minutos Este producto s lo puede ser instalado por un electricista cualifi cado Desembalar el ventilador de forma cuidadosa evitando el uso de cutters o navajas que podr an rayar cu...

Page 5: ...ca En caso de perder la sincronizaci n dispone de dos dos modos Modo Universal y Modo de Unitario Modo Unitario Este tipo de sincronizaci n le permite controlar dos o mas ventiladores pr ximos de mane...

Page 6: ...de garant a se indica en el documento de garant a incluido en este manual Equilibrado Problemas de Balanceo en el funcionamiento del ventilador El balanceo del cuerpo del ventilador durante su funcion...

Page 7: ...resin cronizar control remoto y receptor D Falta de alimentaci n el ctrica Comprobar si la instalaci n dispone de tensi n y sta llega al apa rato 2 Balanceo del ventilador Siga las instrucciones en l...

Page 8: ...ar su ca da si se mont siguiendo este manual de forma adecuada al techo Este ventilador de techo dispone de un sistema de montaje totalmente seguro por medio de soportes de acero y esferas de uni n pa...

Page 9: ...fan must be installed at a location on the ceiling sch that the blades are at least 2 3 m above the floor and 300 mm from any object or wall The mounting bracket must be attached to a ceiling structur...

Page 10: ...ing the use of cutters or blades that could scratch any part of it Device technical spectifications Installing a fan without a shaft flush with the ceiling can reduce airflow Environmental protection...

Page 11: ...fans and just then within the next 5 seconds press STOP for 5 seconds 2 A sound of type beep indicates that the connection is being executed 3 Inmediatly after this press LOW button for 2 seconds 4 N...

Page 12: ...can be carried out as shown in the following diagram If variations exist and you have already correctly tightened the screws check that all blades have the same shape If any of them have a shape that...

Page 13: ...t by a certified electrician C The remote control is unresponsive Replace the remote control battery if necessary Otherwise resyn chronize the transmitter and receiver D No power supply Check that the...

Page 14: ...erfectly acceptable and does not indicate any malfunction nor will it cause the fan to fall as long as it was mounted to the ceiling correctly following the instructions in this manual This ceiling fa...

Page 15: ...e par du personnel qualifi pour r aliser les installations lectriques conform ment la r glementation en vigueur dans le pays d installation 2 Toute intervention sur le raccordement de l appareil ains...

Page 16: ...16 32 48 RPM du ventilateur 99 169 220 Flux d air du ventilateur m min 41 81 122 Niveau sonore dB 45 48 52 Caract ristiques de l appareil L installation du ventilateur ras du plafond peut r duire le d...

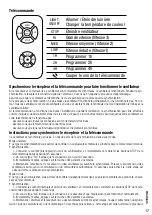
Page 17: ...ilateurs proximit avec la m me t l commande Synchronisation 1 Connecter le courant interrupteur du mur du ventilateur s et imm diatement maintenir les boutons STOP de la t l commande appuy s pendant 5...

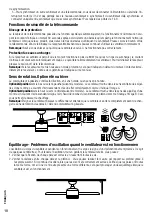
Page 18: ...endeur La dur e de la garantie est indiqu e sur ce manuel quilibrage Probl mes d oscillation quand le ventilateur est en fonctionnemen L oscillation du corps du ventilateur pendant son fonctionnement...

Page 19: ...ctu par un lectricien agr C Il ne r pond pas la t l commande Changez la pile d charg e de la t l commande ou resynchronisez l metteur et le r cepteur D D faut d alimentation lectrique V rifiez si l in...

Page 20: ...ionnement L oscillation de deux centim tres est tout fait acceptable et ne sugg re aucun dysfonctionnement et ne peut provoquer sa chute si le montage au plafond a t r alis en suivant correctement ce...

Page 21: ...sobre a liga o el trica do aparelho certifique se de que a alimenta o el trica da instala o est desli gada desconectando o respetivo fus vel ou desativando o interruptor de prote o para garantir o iso...

Page 22: ...entoinha da embalagem evitando o uso de l minas ou objetos cortantes que possam riscar qualquer parte Retirar todas a pe as Colocar o motor sobre um pano ou superf cie suave para n o danificar o seu r...

Page 23: ...r de parede do ventilador ou dos ventiladores e ent o pressione STOP por 5 segundos 2 Um som de tipo beep indica que a conex o est sendo executada 3 Em seguida pressione o bot o LOW por 2 segundos 4 A...

Page 24: ...pode ser ser feita como mostra a seguinte figura Caso ainda existam varia es depois de todos os parafusos apertados confirme que todas as p s t m a mesma forma Se alguma delas apresentar uma forma nit...

Page 25: ...controlo remoto ou poder ser necess rio sin cronizar o transmissor e o recetor D Falta de alimenta o el trica Comprovar que a instala o el trica disp e de tens o e que est ligada ao aparelho 2 Oscila...

Page 26: ...ntoinhas de teto tendem a oscilar durante o seu funcionamento A oscila o de dois cent metros totalmente aceit vel e n o pressup e nenhuma avaria nem originar a sua queda caso a montagem tenha seguido...

Page 27: ...nahmen die f r den elektrischenAnschluss sowie die S uberung des Ger ts notwendig sind d rfen erst nach dem Trennen der Stromversorgung durch das Entfernen der entsprechenden Sicherung oder durch das...

Page 28: ...Produkt darf nur von einer Elektrofachkraft installiert werden TrennenSiedieTeiledesL fterssorgf ltigvoneinander ohnedassSieMesseroderKlingenverwenden dieirgendeinenTeildesL fters zerkratzen k nnten...

Page 29: ...er des oder der L fter an und dr cken Sie dann innerhalb der n chsten 5 Sekunden 5 Sekunden lang STOP 2 Ein Ton vom Typ Beep zeigt an dass die Verbindung gerade ausgef hrt wird 3 Unmittelbar danach dr...

Page 30: ...chungen gibt und Sie die Schrauben bereits richtig nachgezogen haben berpr fen Sie ob alleVentilatorbl tter die gleiche Form haben Wenn einer von ihnen eine andere Form hat kann dies zu einer Unwucht...

Page 31: ...g reagiert nicht Ersetzen Sie gegebenenfalls die Batterie der Fernbedienung Andernfalls m ssen Sender und Empf nger neu synchronisiert werden D Keine Stromversorgung Vergewissern Sie sich dass das Sys...

Page 32: ...eptabelundweistwederauf eine Fehlfunktion desVentilators hin noch verursacht es einen Sturz sofern er korrekt und gem denAnweisungen in dieserAnleitung an der Decke montiert wurde Dieser Deckenventila...

Page 33: ...e 3 Il ventilatore dev essere installato in una zona del soffitto tale che le lame siano ad almeno 2 3 m dal suolo e a 300 mm da ogni muro o altro oggetto La staffa di montaggio deve essere fissata at...

Page 34: ...ida per non danneggiarne le finiture Maneg giarlo con cura per non ammaccare o graffiare l involucro esterno Velocit 1 2 3 Potenza del ventilatore W 16 32 48 Giri al minuto del ventilatore 99 169 220...

Page 35: ...Modalit universale Questo tipo di sincronizzazione consente di controllare uno o pi fan vicini con lo stesso telecomando Sincronizzazione 1 Connettere l alimentazione interruttore a parete della vento...

Page 36: ...rebbe essere la diversa forma di qualche pala rispetto alle altre l interruttore o l automatico e quindi riaccenderla dopo 10 secondi questo passaggio quello che chiude il processo di sincronizazione...

Page 37: ...re la batteria del telecomando altrimenti sincroniz zare di nuovo trasmettitore e ricevitore D Mancanza di alimentazione Controllare che la rete elettrica sia funzionante e che il dispositivo vi sia c...

Page 38: ...vigorosa pu causare rumore eccessivo e oscillazioni che non saranno coperte della garanzia Eseguendo una manutenzione regolare per stringere questi elementi e pulire attentamente pu prevenire questi...

Page 39: ...ilador Installing the ceiling fan Installation du ventilateur Ins tala o da ventoinha Installation des ventilators Installare il ventilatore 2 3 4 1 5 6 7 8 9 10 11 12 13 14 x3 A B NO INCLUIDO NOT INC...

Page 40: ...40 16 17 18 19 20 21 22 23 24 25 26 27 29 30 33 34 32 31 Click ON ON 15 28...

Page 41: ...41 9 10 11 12 13 14 15 16 17 ON ON OPTION 2...

Page 42: ...dassdienachfolgendaufgef hrtenProduktein bereinstimmungmitdenfolgendeneurop ischen Normen hergestellt wurden DECLARACI N DE CONFORMIDAD CE DECLARATION OF CONFORMITY D CLARATION DE CONFORMIT CE DECLARA...

Page 43: ......

Reviews: