Section 2
DESCRIPTION
15
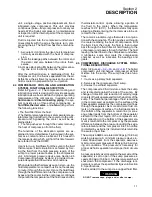
COLD START
When the compressor is started, the sump pressure
will quickly rise from 0 to 40 psig (0 to 2.8 bar). Dur-
ing this period the pressure regulator valve is inac-
tive. At this pressure range the idle warm---up con-
trol maintains a closed inlet valve for engine idle op-
eration. After engine start---up, turn the handle of
the selector valve warm---up control (located on the
instrument panel) from the “start” to the “run” posi-
tion within the first 30 seconds of operation. The in-
strument panel annunciator light will go off after 30
seconds. The inlet valve is fully open due to inlet air
pressure, and the compressor operates at full ca-
pacity operation. As the compressor operates at full
capacity, the engine runs at full speed.
NORMAL OPERATION -- 55 TO 100 PSIG (3.8 TO
6.9 BAR) OR 55 TO 150 PSIG (3.8 TO 10.3 BAR)
FOR “H” MACHINES
When the warm---up control selector valve handle is
moved to the “run” position, the sump pressure
rises above 85 psig (5.9 bar). At this time, the inlet
valve remains fully open for maximum air output.
The engine will continue to run at full speed during
this phase of operation.
MODULATION -- 100 TO 110 PSIG (6.9 TO 7.6
BAR) OR 150 TO 165 PSIG (10.3 TO 11.4 BAR)
FOR “H” MACHINES
Should less than the rated capacity of air be used,
the service line pressure will rise above 100 psig (6.9
bar) low or single pressure rating, 150 psig (10.3
bar) dual or high pressure rating. The pressure reg-
ulating valve gradually opens, applying pressure to
the inlet valve piston and speed control cylinder .
This causes the inlet valve to partially close and re-
duces the speed of the engine. As the pressure in-
creases, the inlet valve piston will further close the
inlet valve and continue reducing the speed until it
reaches a pre---set idle speed. Now as air demand
increases, the sump pressure will fall below the 110
psig (7.6 bar) or 165 psig (11.4 bar) for “H” ma-
chines.
The pressure regulating valve will close, the air inlet
valve will fully open and the engine will once again
run at a pre---set full load speed.
Between the pressure regulating valve and inlet
valve, a small orifice is installed which vents a small
amount of air to the atmosphere, when the pressure
regulating valve is open. This allows variance of air
output to match air demand. The orifice also bleeds
any accumulated moisture from the regulator.
SHUTDOWN
The blowdown valve is normally closed. Upon shut-
down, the back pressure in the compressor inlet
signals the blowdown valve to vent the sump pres-
sure to the atmosphere.
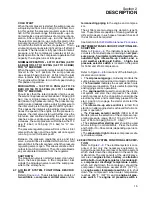
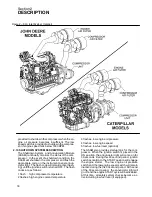
2.7 AIR INLET SYSTEM, FUNCTIONAL DESCRIP-
TION
Refer to Figure
. The air inlet system consists of
two air filters
, a
compressor air inlet valve
and
in-
terconnecting piping
to the engine and compres-
sor.
The air filters are two---stage dry element---type fil-
ters. These filters are capable of cleaning extremely
dirty air. However, in such cases, frequent checks of
the air filter will be required.
See Section 5 for
Air Filter Maintenance Procedures
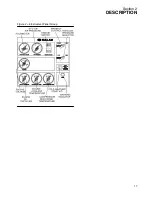
2.8 INSTRUMENT PANEL GROUP, FUNCTIONAL DE-
SCRIPTION
Refer to Figure
. The instrument panel group
consists of a molded panel containing an
air pres-
sure gauge, hourmeter, ignition/start switch, an-
nunciator light, idle warm--up control, and a
cold weather starting aid button.
A
high--low
pressure selector switch
is located on the panel
for 185H and 210H compressors.
Refer to Figure
for locations of the following in-
dicators and controls:
S
The
air pressure gauge
continually monitors the
sump pressure at various load or unload conditions.
S
The
hourmeter
indicates the accumulative hours
of compressor operation. This is useful for planning
and logging service operations.
S
The
engine switch
is used to energize the electri-
cal system and start the compressor. The starter
switch is pressed to the on position to energize the
electrical system and momentarily pressed to the
start position to engage the starter and start the
compressor.
S
The
idle warm--up valve control
is turned from
start to run after engine start is achieved for full com-
pressor operation.
S
The
Pressure selector switch
(185H & 210H
Models) allows the selection of the compressor op-
erating pressure range, 85 to 110 psig (5.9 to 7.6
bar) or 85 to 160 psig (5.9 to 11.0 bar).
S
The
cold weather starting aid
should be used
when starting in cold amibients. Press the button
and hold for 10---30 seconds (depending upon tem-
perature).
S
The
annunciator light
indicates compressor safe-
ty shutdown status.
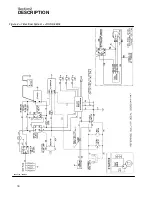
2.9 ELECTRICAL SYSTEM, FUNCTIONAL DESCRIP-
TION
Refer to Figure
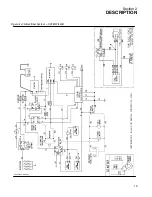
. The electrical system is com-
prised of not only the necessary equipment re-
quired to operate the compressor, but also a system
which shuts down the compressor in the event of a
malfunction. The components of the electrical sys-
tem are an
engine starter,
a
battery,
an
alternator
with a built--in voltage regulator
, a
fuel solenoid
,
a
compressor discharge temperature switch,
which will shut down the compressor should the
compressor temperature exceed 250
_
F (121
_
C),
an
engine water temperature switch
set to shut
down the compressor when water temperature
reaches 225
_
F (107
_
C) and an
engine oil pres-
sure switch
. The
engine oil pressure switch
is
Summary of Contents for 185H
Page 6: ......
Page 14: ...8 NOTES...
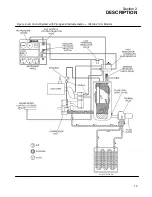
Page 20: ...Section 2 DESCRIPTION 14 Figure 2 4B Control System with Piping and Instrumentation 260 Models...
Page 23: ...Section 2 DESCRIPTION 17 Figure 2 6 Instrument Panel Group...
Page 24: ...Section 2 DESCRIPTION 18 Figure 2 7 Electrical System JOHN DEERE 02250144 446R05...
Page 25: ...Section 2 DESCRIPTION 19 Figure 2 7A Electrical System CATERPILLAR P02250144 395R04...
Page 26: ...20 NOTES...
Page 30: ...24 NOTES...
Page 36: ...Section 5 MAINTENANCE 30 Figure 5 4 Control System Adjustment 185H 210 MODELS 260 MODELS...
Page 42: ...36 NOTES...
Page 49: ...Section 7 ILLUSTRATIONS AND PARTS LIST 43 NOTES...
Page 90: ...Section 7 ILLUSTRATIONS AND PARTS LIST 84 7 10 ELECTRICAL PARTS ALL MODELS 02250148 897R00...
Page 128: ...Section 7 ILLUSTRATIONS AND PARTS LIST 122 7 20 DECALS...
Page 130: ...Section 7 ILLUSTRATIONS AND PARTS LIST 124 7 20 DECALS...
Page 132: ...Section 7 ILLUSTRATIONS AND PARTS LIST 126 7 20 DECALS...
Page 134: ...Section 7 ILLUSTRATIONS AND PARTS LIST 128 7 20 DECALS...
Page 136: ...Section 7 ILLUSTRATIONS AND PARTS LIST 130 7 20 DECALS...
Page 138: ...Section 7 ILLUSTRATIONS AND PARTS LIST 132 7 21 DECAL LOCATIONS 02250149 633R01...
Page 142: ......
Page 143: ......

