background image

SECTION 3

300HH, 375, 375H, 375HH, 425 AND 425H USER MANUAL R00


57


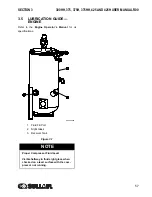
3.5

LUBRICATION GUIDE— 

ENGINE

Refer to the 

Engine Operator’s Manual

 for oil

specifications.

1. Fluid Fill Port
2. Sight Glass
3. Receiver Tank

Figure 3-1

 NOTE

Proper Compressor Fluid Level 

Visible halfway in fluid sight glass when 
checked on a level surface with the com-
pressor not running.

SU_0000699

Summary of Contents for 300HH

Page 1: ...BER KEEP FOR FUTURE REFERENCE USER MANUAL SULLAIR CORPORATION The information in this manual is current as of its publication date and applies to compressor serial number and all subsequent serial numbers 02250184 068 R00 201205120000 PORTABLE AIR COMPRESSOR 300HH 375 375H 375HH 425 AND 425H JOHN DEERE STANDARD AND AFTERCOOLED AND FILTERED ...

Page 2: ...d at Michigan City Indiana Instruction includes training on the function and installation of Sullair service parts troubleshooting common faults and malfunctions and actual equipment operation These seminars are recommended for maintenance contractor maintenance and service personnel For detailed course outlines schedule and cost information contact SULLAIR TRAINING DEPARTMENT 1 888 SULLAIR or 219...

Page 3: ...RODUCTION 17 2 2 DESCRIPTION OF COMPONENTS 19 2 3 SULLAIR COMPRESSOR UNIT FUNCTIONAL DESCRIPTION 19 2 4 COMPRESSOR COOLING AND LUBRICATION SYSTEM FUNCTION AL DESCRIPTION 20 2 5 COMPRESSOR DISCHARGE SYSTEM FUNCTIONAL DESCRIPTION 20 2 6 CAPACITY CONTROL SYSTEM FUNCTIONAL DESCRIPTION 28 2 7 AIR INLET SYSTEM FUNCTIONAL DESCRIPTION 28 2 8 INSTRUMENT PANEL GROUP FUNCTIONAL DESCRIPTION 47 2 9 WIRING DIAG...

Page 4: ... 4 4 RESTART PROCEDURE SECTION 5 MAINTENANCE 61 5 1 GENERAL 61 5 2 ENGINE COOLANT REQUIREMENTS 62 5 3 MAINTENANCE AFTER INITIAL 50 HOURS OF OPERATION 62 5 4 MAINTENANCE EVERY 50 HOURS 62 5 5 MAINTENANCE EVERY 100 HOURS 62 5 6 MAINTENANCE EVERY 250 HOURS 63 5 7 MAINTENANCE EVERY 1500 HOURS 63 5 8 PART REPLACEMENT AND ADJUSTMENT PROCEDURES 70 5 9 TROUBLE SHOOTING SECTION 6 NOISE CONTROL 73 6 1 NOISE...

Page 5: ...ntil the condition is corrected Use and operate the air compressor only in full compliance with all pertinent OSHA requirements and or all pertinent Federal State and Local codes or requirements DO NOT modify the compressor except with written factory approval Each day walk around the air compressor and inspect for leaks loose or missing parts damaged parts or parts out of adjustment Perform all r...

Page 6: ...aces which might cause wear that could render them inoperative H On two wheeled models fully retract front screw jack and any rear stabilizer legs If a caster wheel is provided on the screw jack it is part of the screw jack and can not be removed Follow the same procedure for stowing away the wheeled jack as you would for the standard screw jack Pull the pin connecting the jack to the drawbar and ...

Page 7: ... the towing speeds listed below under ideal conditions Reduce your speed according to posted speed limits weather traffic road or terrain conditions 1 Two axle four wheel or three axle six wheel steerable models 15 MPH 24 km h 2 All other models 55 MPH 88 km h C Remember that the portable air compressor may approach or exceed the weight of the towing vehicle Maintain increased stopping distances a...

Page 8: ...cted or otherwise disabled B Install an appropriate flow limiting valve between the compressor service air outlet and the shutoff throttle valve when an air hose exceeding 1 2 13 mm inside diameter is to be connected to the shutoff throttle valve to reduce pressure in case of hose failure per OSHA Standard 29 CFR 1926 302 b 7 or any applicable Federal State and Local codes standards and regulation...

Page 9: ... make sure coolant is not boiling before removing cap completely Remove radiator filler cap only when cool enough to touch with a bare hand P The ethyl ether in the replaceable cylinders used in diesel ether starting aid systems optional is under pressure DO NOT puncture or incinerate those cylinders DO NOT attempt to remove the center valve core or side pressure relief valve from these cylinders ...

Page 10: ...er used in diesel engine ether starting aid systems is extremely flammable Change cyl inders or maintain or troubleshoot these sys tems only in well ventilated areas away from heat open flame or sparks DO NOT install store or otherwise expose ether cylinders to tem peratures above 160 F 71 C Remove ether cylinder from the compressor when operating in ambient temperatures above 60 F 16 C P DO NOT a...

Page 11: ...ressor D Keep a first aid kit handy Seek medical assis tance promptly in case of injury DO NOT ignore small cuts and burns as they may lead to infec tion 1 7 TOXIC AND IRRITATING SUBSTANCES A DO NOT use air from this compressor for respi ration breathing except in full compliance with OSHA Standards 29 CFR 1920 and any other Federal State or Local codes or regulations B DO NOT use air line anti ic...

Page 12: ...her portion of the compressor when making adjustments or repairs to exposed live parts of the electrical system C Attempt repairs only in clean dry and well lighted and ventilated areas D Stay clear of the compressor during electrical storms It can attract lightning 1 9 LIFTING A If the compressor is provided with a lifting bail then lift by the bail provided If no bail is provided then lift by sl...

Page 13: ...ting vehicle alongside the compres sor but DO NOT permit metal to metal contact between the compressor and the starting vehicle J Set the parking brakes of both the compressor if provided and the starting vehicle or otherwise block both sides of all wheels K Place the starting vehicle in neutral or park turn off all non essential accessory electrical loads and start its engine L Use only jumper ca...

Page 14: ...ich machine is to be worked on and that power and utilities will be turned off 3 Check to make certain no one is operating the machine before turning off the power 4 Turn off the equipment using normal shutdown procedure 5 Disconnect the energy sources a Air and hydraulic lines should be bled drained and cleaned out There should be no pressure in these lines or in the reservoir tanks Lockout or ta...

Page 15: ...arning devices affixed at points of power disconnect and are not to be removed by anyone other that the person placing tag on power lockout Tags shall never be by passed ignored or otherwise defeated 1 13 CALIFORNIA PROPOSITION 65 WARNING CALIFORNIA PROPOSITION 65 WARNING Diesel engine exhaust and some of its con stituents are known to the State of Califor nia to cause cancer birth defects and oth...

Page 16: ...bols below may or may not be used Please refer to the decals set forth on the machine for applicable symbols Safety Symbols 1 T4 DIESEL PARTICULATE FILTER REGENERATION INHIBIT HIGH EXHAUST SYS TEMP WAIT TO START REMOTE START CABIN LIGHTS iT4 iT4 iT4 ...

Page 17: ...SECTION 1 15 Safety Symbols 2 ...

Page 18: ...SECTION 1 16 Safety Symbols 3 ...

Page 19: ...re no routine maintenance inspections 2 2 DESCRIPTION OF COMPONENTS Figure 2 1 shows the main components and subassemblies of the Sullair 300HH 375 375H 375HH 425 and 425H Standard and Aftercooled Portable Air Compressors These packages include a heavy duty rotary screw air compressor a diesel engine fuel tank compressor inlet system compressor cooling and lubrication system compressor discharge s...

Page 20: ...Lifting Bail 4 Engine Air Filter 5 Compressor Air Filter 6 Fuel Tank 7 Battery Shutoff Switch 8 Service Valves 9 Serial Number Plate Location 10 Receiver Tank 11 Minimum Pressure Check Valve 12 Engine Exhaust Muffler 13 Moisture Separator 14 Optional Discharge Air Filters Figure 2 1 Sullair Rotary Screw Portable Air Compressor John Deere Standard and Aftercooled Models ...

Page 21: ...me the air flows to the service line and the fluid is cooled in preparation for re injection 2 4 COMPRESSOR COOLING AND LUBRICATION SYSTEM FUNCTIONAL DESCRIPTION Refer to Figure 2 2 The compressor cooling and lubrication system is designed to provide adequate lubrication as well as maintain the proper operating temperature of the compressor In addition to the fluid cooler and interconnecting pipin...

Page 22: ...minimum pressure device located downstream from the separator ensures a minimum receiver pressure of 80 psig 5 5 bar during all conditions Keeping this pressure level stable is necessary for proper air fluid separation and proper fluid circulation A pressure relief valve located on the wet side of the separator is set to open if the sump pressure exceeds 250 psig 17 1 bar Fluid is added to the rec...

Page 23: ...to inlet pressure and the compressor operates at full capacity When the compressor operates at full capacity the engine runs at full speed STANDARD MODEL AFTERCOOLED MODEL 1 2 3 4 5 6 7 8 9 10 11 12 SU_0000665 13 14 1 Engine 2 Strainer 3 Minimum Pressure Check Valve 4 Service Air Outlet 5 Receiver Tank 6 Separator Element 7 Non Aftercooled Aftercooled Service Air Valve 8 Service Air Outlet 9 Recei...

Page 24: ...inimum Pressure Check Valve 8 Pressure Relief Valve 9 Fuid Fill Fluid Level Sight Glass 10 Optional Discharge Air Filters 11 Optional Moisture Separator 12 Optional Aftercooler 13 Aftercooled Machines ONLY 14 Fluid Filter 15 Thermal Valve 16 Compressor Unit 17 Fluid Cooler 18 Air 19 Fluid Air 20 Fluid 21 Strainer Figure 2 4 Control System with Piping and Instrumentation 375 and 425 Models ...

Page 25: ... Air Filter 8 Orifice 9 Silencer 10 Inlet Valve 11 Strainer 12 Minimum Pressure Check Valve 13 Pressure Relief Valve 14 Compressor Unit 15 Fluid Fill Fluid Level Sight Glass 16 Optional Discharge Air Filters 17 Optional Moisture Separator 18 Optional Aftercooler 19 Aftercooled Machines ONLY 20 Fluid Filter 21 Thermal Valve 22 Fluid Cooler 23 Air 24 Fluid Air 25 Fluid Figure 2 5 Control System with...

Page 26: ...300HH 375 375H 375HH 425 AND 425H USER MANUAL R00 SECTION 2 24 Figure 2 6 Piping and Instrumentation ...

Page 27: ...iver Air Oil 10 Glass Sight Oil Level 11 Indicator Delta P 12 Valve Minimum Pressure Check 13 Valve Ball 14 Cooler Air 15 Separator Moisture 16 Trap Drain 17 Orifice 18 Valve Blowdown N C 19 Strainer 21 Valve Thermal Bypass 22 Cooler Oil 23 Filter Oil 27 Gauge Pressure 28 Valve Pressure Regulator 29 Valve 3 Way Selector 31 Valve Check 32 Transducer Pressure T1 Compressor Discharge Temperature Swit...

Page 28: ...300HH 375 375H 375HH 425 AND 425H USER MANUAL R00 SECTION 2 26 Figure 2 7 Piping and Instrumentation ...

Page 29: ...Internal To Engine 17 Filter Oil 18 Water Pump Integral To Engine 19 Radiator Engine 20 Engine Thermostat Integral To Engine 21 Inlet Manifold Air Press Sensor Turbo Boost 23 Sensor Fuel Pressure 24 Sensor Fuel Temperature 25 Sensor Coolant Temperature 26 Sensor Engine Oil Pressure 27 Sensor Cam Speed Timing 28 Sensor Crank Speed Timing 29 Jacket Water Heater Optional 30 Oil Level Dipstick 31 Filt...

Page 30: ...w 110 psig 7 6 bar or 165 psig 11 4 bar for H machines or 220 psig 15 2 bar for HH ones The pressure regulating valve closes the air inlet valve opens fully and the engine speed increases to its preset full load rating Between the pressure regulating valve and the inlet valve there is a small orifice that vents a small amount of air into the atmosphere when the pressure regulating valve is open Th...

Page 31: ...emperature Gauge 2 System Air Pressure Gauge 3 Start Stop Switch 4 Warm up Control Switch 5 High Low Pressure Selector Switch 6 Shutdown Indicator 7 Engine Warning Lamp 8 Engine Wait to Start Lamp 9 Engine Stop Lamp 10 Fuel Level optional 11 Engine PowerView Monitor Figure 2 9 Instrument Panel Group ...

Page 32: ... valve on H com pressors allows the selection of the com pressor operating pressure range 80 to 110 psig 5 6 to 7 6 bar or 80 to 165 psig 5 6 to 11 4 bar for H models or 80 to 220 psig 5 6 to 15 2 bar for HH models 6 The shutdown indicator light indicates engine and compressor safety shutdown status 7 The engine warning lamp indicates when an abnormal condition exists It is not neces sary to shutd...

Page 33: ...vice diagnostic codes Stored service diagnostic codes from the engine Set units for display View the engine configuration parameters NOTE Engine parameters that can be displayed depend upon the engine application Six readout languages are available and can be selected during gauge setup The diagnos tic gauge has a graphical backlit Liquid Crystal Display LCD screen The display can show a single pa...

Page 34: ... but they will not show any operating or performance data Once the engine is started the screens will display the enegine s operating information 1000 RPM ENG RPM 57 PSI 1800 RPM ENG RPM 57 F COOL TEMP 12 4 VDC BAT VOLT OIL PRES Menu Key PV101 SU_0000492 COOL TEMP Figure 2 11 MENU DISPLAY PV101 SU_0000493 GO TO 1 UP DISPLAY EXHAUST FILTER ENGINE SPEED CONTROL LANGUAGES STORED CODES ENGINE CONFIGUR...

Page 35: ...splay NOTE The engine configuration data is a read only function 1800 RPM ENG RPM Menu Key PV101 SU_0000497 COOL TEMP 1000 RPM ENG RPM 57 PSI 57 F COOL TEMP 12 4 VDC BAT VOLT OIL PRES Figure 2 16 SELECT ENGINE CONFIGURATION PV101 SU_0000498 GO TO 1 UP DISPLAY EXHAUST FILTER ENGINE SPEED CONTROL LANGUAGES STORED CODES ENGINE CONFIGURATION SETUP 1 UP DISPLAY Figure 2 17 Enter Key PV101 SU_0000499 GO...

Page 36: ...ing The Engine All of the engine values shown on the diagnostic gauge indicate the engine is running For a description of trouble codes see the chart in the Troubleshooting Section 1800 RPM ENG RPM Main Menu PV101 SU_0000503 COOL TEMP 1000 RPM ENG RPM 57 PSI 57 F COOL TEMP 12 4 VDC BAT VOLT OIL PRES Figure 2 22 PV101 SU_0000504 Select Stored Codes GO TO 1 UP DISPLAY EXHAUST FILTER ENGINE SPEED CON...

Page 37: ...ere engine damage 4 To acknowledge and hide the code and return to the single or four parameter display press the ENTER key NOTE The engine does not need to be running to navigate the diagnostic gauge screens If engine start up is desired See Starting The Engine All of the engine values shown on the diagnostic gauge indicate the engine is running For a description of trouble codes see the chart in...

Page 38: ...ge The SPN and FMI number will be displayed along with a description of the problem and the required corrective action If the word NEXT appears above the arrow keys there are more trouble codes that can be viewed by using the arrow keys to scroll to the next trouble code PV101 SU_0000511 FAULT FUEL DELIVERY PRESSURE CORRECTIVE ACTION CHECK FUEL FILTER AND LINES NEXT Hide Trouble Codes SPN 94 WARNI...

Page 39: ...he shutdown icon until the trouble code is corrected IMPORTANT Ignoring active trouble codes can result in severe engine dam age PV101 SU_0000515 FAULT FUEL DELIVERY PRESSURE CORRECTIVE ACTION CHECK FUEL FILTER AND LINES NEXT Shutdown Message SPN 100 SHUTDOWN FMI 1 1 of x Figure 2 36 PV101 SU_0000516 FAULT FUEL DELIVERY PRESSURE CORRECTIVE ACTION CHECK FUEL FILTER AND LINES NEXT Hide Trouble Code ...

Page 40: ...enu key to exit the Main Menu and return to the engine parameter display Menu Key PV101 SU_0000520 1800 RPM ENG RPM COOL TEMP 1000 RPM ENG RPM 57 PSI 57 F COOL TEMP 12 4 VDC BAT VOLT OIL PRES Figure 2 41 PV101 SU 0000521 Select Adjust Backlight ADJUST BACKLIGHT SETUP 1 UP DISPLAY SETUP 4 UP DISPLAY SELECT UNITS ADJUST CONTRAST UTILITIES Figure 2 42 PV101 SU 0000522 Press Enter Key ADJUST BACKLIGHT...

Page 41: ...he Main Menu and return to the engine parameter display Menu Key PV101 SU_0000525 1000 RPM ENG RPM 57 PSI 1800 RPM ENG RPM 57 F COOL TEMP 12 4 VDC BAT VOLT OIL PRES COOL TEMP Figure 2 47 Select Adjust Contrast PV101 SU_0000526 LANGUAGES GO TO 1 UP DISPLAY SETUP 1 UP DISPLAY EXHAUST FILTER ENGINE SPEED CONTROL STORED CODES ENGINE CONFIGURATION Figure 2 48 PV101 SU 0000527 Select Adjust Contrast ADJ...

Page 42: ...ed in kPa and bar respec tively and temperatures in C Use the arrow keys to highlight the desired units of measurement 5 Press the ENTER key to select the high lighted units 6 Press the Menu key to return to the Main Menu Menu Key PV101 SU_0000531 1000 RPM ENG RPM 57 PSI 1800 RPM ENG RPM 57 F COOL TEMP 12 4 VDC BAT VOLT OIL PRES COOL TEMP Figure 2 53 Selected Units PV101 SU_0000532 ADJUST BACKLIGH...

Page 43: ...s from this list can be selected to replace any or all of the default parameters This option can be used to add parameters available for scrolling in the Setup 1 Up Display c Automatic Scan Selecting the scan func tion will allow the Setup 1 Up Display to scroll through the selected set of parameters one at a time momentarily pausing at each Press Menu Key PV101 SU_0000537 1800 RPM ENG RPM COOL TE...

Page 44: ...ess the ENTER key to deselect the selected parameter removing it from the list PV101 SU_0000542 USE DEFAULTS CUSTOM SETUP AUTOMATIC SCAN OFF Select Defaults Figure 2 64 PV101 SU_0000543 USE DEFAULTS CUSTOM SETUP AUTOMATIC SCAN OFF Defaults Selected Figure 2 65 PV101 SU_0000544 RESTORED TO DEFAULTS Restored to Defaults Figure 2 66 PV101 SU_0000545 USE DEFAULTS CUSTOM SETUP AUTOMATIC SCAN OFF Select...

Page 45: ...IC SCAN functions Deselect Parameters PV101 SU_0000548 ACCELERATOR PEDAL POSITION PERCENT LOAD AT CURRENT RPM ACTUAL ENGINE TORQUE ENGINE SPEED TOTAL ENGINE HOURS TOTAL FUEL USED ENGINE COOLANT TEMPERATURE FUEL TEMPERATURE ENGINE OIL PRESSURE 1 5 1 6 2 3 Figure 2 70 Select Desired Parameters PV101 SU_0000549 This number now indicates the new order of display for the parameters ACCELERATOR PEDAL PO...

Page 46: ...UP 4 UP DISPLAY a Use Defaults This option contains the fol lowing engine parameters for display Engine Speed Battery Voltage Coolant Tempera ture and Oil Pressure b Custom Setup This option contains a list of engine parameters Engine parameters PV101 SU_0000553 USE DEFAULTS CUSTOM SETUP AUTOMATIC SCAN ON Menu Key Figure 2 76 PV101 SU_0000552 USE DEFAULTS CUSTOM SETUP AUTOMATIC SCAN ON Automatic S...

Page 47: ... parameters will be displayed 9 The parameter that is highlighted is the selected parameter for the screen Use the arrow keys to highlight the new parameter to be placed in the SETUP 4 UP DISPLAY PV101 SU_0000558 USE DEFAULTS CUSTOM SETUP Select Factory Defaults Figure 2 81 PV101 SU_0000559 RESTORED TO DEFAULTS Restored to Defaults Figure 2 82 PV101 SU_0000560 USE DEFAULTS CUSTOM SETUP Custom Setu...

Page 48: ...ENTIAL VOLTAGE ENGINE DESIRED OP SPEED MACHINE HOURS Figure 2 87 Return to 4 Up Custom Setup PV101 SU_0000565 Note the number to the right of the selected parameter indicating that the parameter is now assigned to that display location ENGINE OIL PRESSURE 3 4 FUEL RATE INTAKE TEMPERATURE BATTERY POTENTIAL VOLTAGE ENGINE DESIRED OP SPEED MACHINE HOURS Figure 2 88 4 Up Display PV101 SU_0000566 1000 ...

Page 49: ...SECTION 2 300HH 375 375H 375HH 425 AND 425H USER MANUAL R00 47 2 9 WIRING DIAGRAM ...

Page 50: ...m runs all safety checks including low fuel level The engine is equipped with an electronic speed control and has a shutdown protection diagnostic capability A variety of sensors and a speed control module interface with the ECM These sensors include the following oil pressure coolant temperature intake manifold fuel temperature timing cranking and a remote shutdown switch The engine speed control...

Page 51: ... Signal Erratic Check Sensor and Wiring 94 3 27 Low Pressure Fuel Signal Out of Range High Check Sensor and Wiring 4 28 Low Pressure Fuel Signal Out of Range Low Check Sensor and Wiring 10 88 Low Pressure Fuel Rate of Change Abnormal Contact Servicing Dealer 13 Low Pressure Fuel Out of Calibration Contact Servicing Dealer 17 85 High Pressure Fuel System Pressure Slightly Low Contact Servicing Deal...

Page 52: ...reliable Contact Servicing Dealer 174 0 Fuel Temp Signal Extremely High Add Fuel or Switch Fuel Tanks 3 37 Fuel Temp Signal Out of Range High Check Sensor and Wiring 4 38 Fuel Temp Signal Out of Range Low Check Sensor and Wiring 16 71 Fuel Temp Signal Moderately High Add Fuel or Switch Fuel Tanks 189 0 Engine Speed Derate Condition Exists Check Fault Codes Contact Servicing Dealer 190 0 42 Engine ...

Page 53: ...cuit Has Low Resistance Check Injector Wiring or Injector Sole noid 7 65 Injector Number 3 Not Responding Injector Failed or Flow Limiter Closed 654 5 34 Injector Number 4 Circuit Has High Resistance Check Injector Wiring or Injector Sole noid 6 94 Injector Number 4 Circuit Has Low Resistance Check Injector Wiring or Injector Sole noid 7 59 Injector Number 4 Not Responding Injector Failed or Flow ...

Page 54: ... Fault Codes 1347 3 79 High Pres Fuel Pump Control Valve Signal Out of Range High Contact Servicing Dealer 5 77 High Pres Fuel Solenoid 1 Circuit Has High Resis tance Check Pump Wiring 7 78 High Pres Fuel Pump Not Able to Meet Required Rail Pres Check Fuel Filter and Lines 1568 2 Requested Torque Curve Signal Unreliable Contact Servicing Dealer 1569 31 Engine in Derate Condition Check Fault Codes ...

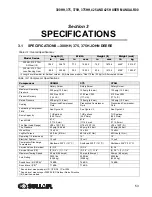
Page 55: ...or Fluid Pressurized Compressor Fluid Lubricating Compressor Fluid See Figure 3 3 See Figure 3 3 See Figure 3 3 Sump Capacity 7 US gallons 26 5 liters 7 US gallons 26 5 liters 7 US gallons 26 5 liters Track Width 67 5 1714 5 mm 67 5 1714 5 mm 67 5 1714 5 mm Tire Size Load Range H78 x 15ST D H78 x 15ST D H78 x 15ST D Tire Pressure 65 psig 4 4 bar 65 psig 4 4 bar 65 psig 4 4 bar Wheel Size 15 x 6JJ ...

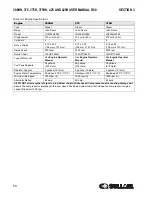
Page 56: ...ype of Motor Oil See Engine Operator Manual See Engine Operator Manual See Engine Operator Manual Fuel Tank Capacity 56 gallons 212 liters 56 gallons 212 liters 56 gallons 212 liters Radiator Capacity 4 gallons 15 liters 4 gallons 15 liters 4 gallons 15 liters Engine Water Temperature Shutdown 230 F 110 C Shutdown 230 F 110 C Shutdown 230 F 110 C Minimum Idle Speed 1600 rpm II 1600 rpm II 1600 rpm...

Page 57: ...mpressor Fluid Lubricating Compressor Fluid See Figure 3 3 See Figure 3 3 See Figure 3 3 Sump Capacity 7 US gallons 26 5 liters 7 US gallons 26 5 liters 7 US gallons 26 5 liters Track Width 67 5 1714 5 mm 67 5 1714 5 mm 67 5 1714 5 mm Tire Size Load Range H78 x 15ST D H78 x 15ST D H78 x 15ST D Tire Pressure 65 psig 4 4 bar 65 psig 4 4 bar 65 psig 4 4 bar Wheel Size 15 x 6JJ 15 x 6JJ 15 x 6JJ Lug N...

Page 58: ... details D A Lubricant Company Inc offers an analysis for users of Sullair AWF Contact your Sullair representative for details Table 3 6 Engine Specifcations Engine 375HH 425 425H Type Diesel Diesel Diesel Make John Deere John Deere John Deere Model JD4045HF285 JD4045HF285 JD4045HF285 Displacement 275 cu in 4 5L 275 cu in 4 5L 275 cu in 4 5L Cylinders 4 4 4 Bore x Stroke 4 19 x 5 00 106 mm x 127 m...

Page 59: ...GUIDE ENGINE Refer to the Engine Operator s Manual for oil specifications 1 Fluid Fill Port 2 Sight Glass 3 Receiver Tank Figure 3 1 NOTE Proper Compressor Fluid Level Visible halfway in fluid sight glass when checked on a level surface with the com pressor not running SU_0000699 ...

Page 60: ...NOTES 58 ...

Page 61: ...L GLASS Indicates the fluid level in the receiver tank Proper level is marked halfway up the sight glass Check the level when the compressor is shutdown and on level ground COMPRESSOR DISCHARGE TEMPERATURE SWITCH Opens the electrical circuit to shut down the compressor when the discharge temperature reaches a specific value See Specifications on page 53 and on page 55 THERMAL VALVE Functions as a ...

Page 62: ...lose all doors to maintain proper noise level I See Section 5 2 for proper engine coolant SHUTDOWN 1 Close the service valves and run the com pressor for approximately five minutes to allow the compressor to cool down 2 Place the pressure selector switch in the low position H and HH models 3 Press the ENGINE SWITCH to the OFF position after five minutes When an emergency shutdown is required IMMED...

Page 63: ...uld never be mixed with a different coolant type color or brand If radiator coolant is to be added for any reason be sure that the coolant added is the same as what is in the cooling system as well as what is recommended The Engine Coolant type should follow these recommended specifications Organic acid technology OAT Premixed coolant pH range of 8 0 to 9 5 Contains no silicates phosphates borates...

Page 64: ...E AFTER INITIAL 50 HOURS OF OPERATION After the initial 50 hours of operation the following maintenance actions are required to eliminate contaminants from the system 1 Clean the return line orifice and change the strainer 2 Change the compressor fluid filter 3 Check the Engine Operator s Manual for ser vice requirements 4 Check the fuel filter for water 5 Confirm that the sump cover bolts are tig...

Page 65: ...ounted units 5 8 PART REPLACEMENT AND ADJUSTMENT PROCEDURES COMPRESSOR FLUID CHANGE PROCEDURE 1 Run the compressor five to ten minutes to warm the fluid 2 Shut the compressor down and relieve all internal pressure 3 Drain the fluid sump by removing the plug or opening the valve at the bottom of the sump tank 4 Change the compressor fluid and replace the fluid filter element For element replacement...

Page 66: ...d cover 2 Remove the primary and secondary ele ments 3 Clean the body inside and out with a damp cloth 4 Reinstall if clean or replace the secondary element 5 Replace the new primary filter element 6 Reposition the cover and lock it into the posi tion 7 Reset the filter restriction indicator if equipped 2 1 SU_0000669 1 Filter Head 2 Fluid Filter Figure 5 1 Fluid Filter SU_0000678 1 Filter Body 2 ...

Page 67: ...ft the cover off the sump 4 Remove the separator element 5 Scrape the old gasket material from the cover and the flange on the sump Do not allow the scrapings to fall into the tank 6 Install the new element 7 Replace the sump cover and bolts Lightly tighten all the bolts and then gradually tighten them alternating between bolts which are diagonally opposite each other Torque the bolts to 160 ft lb...

Page 68: ...l the engine speed increases and the receiver tank pressure stabilizes at 100 psig 6 9 bar Adjust the engine high idle speed to its specified setting with the HI or HI buttons on the speed control mod ule Holding the HI button will increase the high idle speed holding the HI butting decreases the high idle speed setting 6 Open the service valve to 100 psig 6 9 rated full load pressure and recheck ...

Page 69: ...re Gauge 3 Warm Up Control Valve 4 High Low Pressure Valve 5 Receiver Sump Tank 6 Pressure Regulator Blowdown Manifold 7 Oil Return Line 8 Blowdown Line To Fitting At Filter Hose Note For additional clarification see page 30 of the Parts Manual Figure 5 5 Control System Adjustment Dual Pressure ...

Page 70: ...r s bearing axle is critical to its proper function and reduction of wear on this part Wheel bearings should be lubricated at least every 12 months or more to ensure proper performance and minimize wear Use a wheel bearing grease that conforms to MILSPEC MIL G 10924 or a high temperature one such as lithium complex NLGI consistency 2 Axles with the E Z Lube feature can be periodically lubricated w...

Page 71: ...ord the initial pressure drop when the compressor is started SAFETY TOXIC AND IRRITATING SUBSTANCES DO NOT use air from this filter as a source for respiration breathing air except when in compliance with OSHA STANDARDS 29 CFR 1910 and all other applicable Federal state or local codes or regulations 1 O Ring 2 Filter Element 3 Filter Housing Figure 5 7 First and Second Stage Discharge Air Filter O...

Page 72: ...S NOT CRANK OR CRANKS BUT DOES NOT START SYMPTOM PROBABLE CAUSE REMEDY NO SSAM FLASH CODE Low voltage or battery disconnected Check battery cables and tighten if loose Check ground wire for proper attachment to frame Tighten if required Recharge or replace battery if required Blown fuse in wiring harness Remove and inspect fuse Replace if necessary Instrument panel connectors loose or disconnected...

Page 73: ...FLASHES Did not start compressor within the 30 seconds from turning the ignition switch to the ON position After turning the ignition switch to the ON position press the switch to the START position within 30 seconds Low battery voltage Check the battery cables and tighten if necessary Recharge or replace battery if necessary No fuel Refuel Water or dirt in the fuel and or filter Drain water from ...

Page 74: ...nlet valve jammed Free or replace valve Restriction in the control system Check all control lines and components ice and or other contaminants could be the cause Defective pressure relief valve opens when pressure is too low Replace the pressure relief valve Defective pressure regulator Check the diaphragm and replace with Kit if necessary Insufficient air delivery Run start switch not in run posi...

Page 75: ... the causing thereof 1 The removal or rendering inoperative by any persons other than for purposes of mainte nance repair or replacement of any device or element of design incorporated into any new compressor for the purpose of noise control prior to its sale or delivery to the ulti mate purchaser or while it is in use 2 The use of the compressor after such device or element of design has been rem...

Page 76: ...fective exhaust system Remove and replace any defective parts by ordering with part numbers indicated in the Parts List Maintenance Performed By Location Date Maintenance Performed By Location Date 2 ANNUAL AIR FILTER S AND AIR INLET SYSTEM INSPECTION In addition to the instructions in the Maintenance section of the Operator s Manual the air filter s and entire air inlet system should be inspected...

Page 77: ...re not any missing or deformed members including all hinged doors covers and their fastening devices DO NOT operate compressor with defective frame canopy and parts Remove and replace defective parts by ordering with part numbers indicated in Parts List Maintenance Performed By Location Date Maintenance Performed By Location Date 5 ANNUAL ACOUSTICAL MATERIALS INSPECTION At least annually inspect a...

Page 78: ...tor s Manual at least annually operate compressor and inspect to make sure all systems are operating properly and that engine runs at rated speed and pressure DO NOT operate malfunctioning or improperly adjusted compressor Repair or adjust per instructions in Operator s Manual as required Maintenance Performed By Location Date Maintenance Performed By Location Date ...

Page 79: ...NOTES ...
Page 80: ...e U S A Specifications subject to change without prior notice E12EP Always air Always there SULLAIR CORPORATION 3700 East Michigan Boulevard Michigan City Indiana 46360 U S A Telephone 1 219 879 5451 WWW SULLAIR COM ...

Reviews: