Section 6
COMPRESSOR OPERATION
24
6.3 SUPERVISOR
II
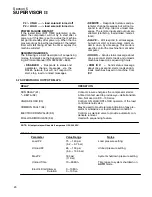
OPERATING PARAMETERS --
SET UP
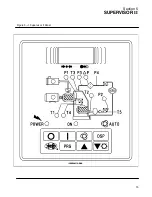
Refer to Figure
in Section 5, Supervisor
II.
S
To change operating parameters you must go
into
“PROGRAM”
mode. PROGRAM mode can
only be accessed from the default display mode. To
enter PROGRAM mode press
“PRG”.
S
When in PROGRAM mode you will be prompted
with the name of the parameter, its current value
and its units. To increase the value press “
Y
”.
S
If you desire a lower value, you must increase
until you reach the maximum allowable value; at
this point the next increase will set the value to the
minimum.
S
To confirm the new value, or to go to the next item
on the list, press
“PRG”
.
S
While modifying a setpoint, you may want to re-
store the original value. To do so, press the Sullair
logo.
S
To return to the default display, cancelling any
changes to the current parameter, press
“DSP”.
6.4 INITIAL START--UP PROCEDURE
The following procedure should be followed for the
initial start---up of the package:
1. Read the preceding pages of this material thor-
oughly.
2. Be sure that all preparations and checks de-
scribed in
, have been
made.
3. Close manual condensate drain valves and re-
place any cooler drain plugs which may have
been removed for shipment to prevent freezing.
4. Open service valve to the air net system.
5. Check that the Emergency Stop switch is armed
(pulled out), reset faults (if any) by pressing the
“O”
pad. Energize the starter by pressing the
“I”
pad. Compressor will start unloaded, then load.
6. Check for possible leaks in the pipework.
7. Slowly close and open the shut---off valve to
check that the Full Load and Unload set pressur-
es programmed in the Supervisor
II
are ade-
quate for the application.
8. Observe the operating temperatures T4 (inter-
stage) and T5 (final package air outlet). These
should be no higher than 135
˚
F (57
˚
C) or 20
˚
F
(11
˚
C) above the ambient temperature. Ob-
serve the operating temperature T3 and press
P3 (tube oil filter discharge). When T3 reaches
approximately 100
˚
F (38
˚
C), P3 should be
approximately 40 psig (2.8 bar). This is con-
trolled by the constant bypass pressure relief
valve setting.
9. Close service valve to air net system.
10. Check the buffer supply pressure. The buffer
supply regulator should be set at minimum 10
psi (0.69), maximum 14 psi (0.95 bar).
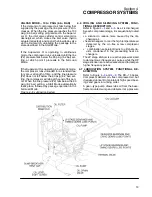
11. Check the setting of the inlet control valve flapper
for unloaded operation --- a vacuum level of 24
in. (61 cm) Hg should be measurable at the inlet
flange of the LP stage.
If necessary adjustment of the valve flapper may
be done as follows:
S
Connect a 30 in. Hg manometer to the NPT
connection provided at the inlet flange of the LP
stage.
S
Unload the package by a suitable method. For
example, reprogram the Supervisor
II
to unload
at system line pressure, if such is available. If no
system air pressure is yet available, locate and
disengage the pressure transducer connection
(P2), plug the open hole, and feed a separate air
pressure signal which exceeds the unload level
set in the Supervisor
II
.
S
Loosen the set screw locking the actuator arm
to the air control valve flapper shaft and while
firmly grasping the shaft with a suitable tool, ro-
tate slowly back---and---forth until 24 in. (61 cm)
shows on the manometer (when operating the
unit at sea level --- approximately. 14.5 psia [1
bar]). For higher elevations, derate the desired
vacuum in direct proportion to the local baromet-
ric pressure.
S
Refasten the flapper shaft to the actuator arm
with the set screw.
S
Cycle load and unload the package a few times
to insure that the flapper setting has been prop-
erly achieved --- this may be done by feeding and
removing the unloading pressure signal from the
P2 sensor connection.
S
Replace the P2 sensor connection back in the
condensate separator vessel.
12. Check adjustment of limit switch actuation--- see
limit switch maintenance in Section 7, Mainte-
nance.
Summary of Contents for DR-13 Series
Page 6: ...NOTES ...
Page 14: ...8 NOTES ...
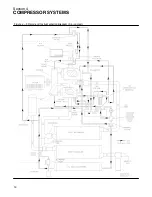
Page 18: ...Section 4 COMPRESSOR SYSTEMS 12 Figure 4 5 Piping and Instrumentation Diagram Air cooled ...
Page 21: ...Section 5 SUPERVISOR II 15 Figure 5 1 Supervisor II Panel ...
Page 28: ...22 NOTES ...
Page 32: ...26 NOTES ...
Page 42: ...Section 7 MAINTENANCE 36 Table 1 Installation Data ...
Page 46: ...40 NOTES ...
Page 48: ...Section 9 ILLUSTRATIONS AND PARTS LIST 42 9 3 COMPRESSOR MOTOR AND FRAME ...
Page 50: ...Section 9 ILLUSTRATIONS AND PARTS LIST 44 9 4 AIR INLET SYSTEM ...
Page 52: ...Section 9 ILLUSTRATIONS AND PARTS LIST 46 9 5 COOLER ASSEMBLY ...
Page 54: ...Section 9 ILLUSTRATIONS AND PARTS LIST 48 9 6 LP HOT LP COLD ...
Page 56: ...Section 9 ILLUSTRATIONS AND PARTS LIST 50 9 7 HP DISCHARGE ...
Page 58: ...Section 9 ILLUSTRATIONS AND PARTS LIST 52 9 8 LUBE SYSTEM ...
Page 60: ...Section 9 ILLUSTRATIONS AND PARTS LIST 54 9 9 ELECTRICAL BOX ...
Page 62: ...Section 9 ILLUSTRATIONS AND PARTS LIST 56 9 10 CONTROL SYSTEM CONDENSATE DRAIN ...
Page 64: ...Section 9 ILLUSTRATIONS AND PARTS LIST 58 9 11 CANOPY ...
Page 66: ...Section 9 ILLUSTRATIONS AND PARTS LIST 60 9 12 DECALS ...
Page 68: ...Section 9 ILLUSTRATIONS AND PARTS LIST 62 9 12 DECALS ...
Page 70: ...Section 9 ILLUSTRATIONS AND PARTS LIST 64 9 12 DECALS ...
Page 72: ...Section 9 ILLUSTRATIONS AND PARTS LIST 66 9 13 DECAL LOCATIONS ...
Page 74: ...Section 9 ILLUSTRATIONS AND PARTS LIST 68 9 13 DECAL LOCATIONS ...
Page 76: ...Section 9 ILLUSTRATIONS AND PARTS LIST 70 9 13 DECAL LOCATIONS ...
Page 78: ...Section 9 ILLUSTRATIONS AND PARTS LIST 72 9 14 WIRING DIAGRAM ...
Page 79: ...NOTES ...


