Section 6
MAINTENANCE
16
6.6 PARTS REPLACEMENT AND ADJUSTMENT
PROCEDURES
WARNING
!
Before doing compressor maintenance, discon-
nect compressor from power source and lock out
power source. Isolate compressor from line pres-
sure by closing recommended discharge shut--
off valve and releasing all internal pressure from
compressor.
FLUID FILTER REPLACEMENT
1. To prevent spillage and loss of reusable fluid,
place a contaminate--free fluid receptacle be-
neath fluid drain valve and fluid filter.
2. Drain fluid by removing fluid drain valve cap at tee
located beneath compressor (for complete fluid
change, drain fluid from cooler).
3. Using a strap wrench, remove the old element
and gasket.
4. Clean gasket seating surface.
5. Apply a light film of fluid to the new gasket.
6. Hand tighten new element until gasket is seated.
7. Continue tightening element an additional 1/2 to
3/4 turn.
8. Replace fluid.
DO NOT OVERFILL.
9. Restart compressor and check for leaks.
AIR FILTER MAINTENANCE
. A ir f ilt er ( P / N 250025 -- 421)
maintenance should be performed every six months
or more frequent if conditions so require.
WARNING
!
Before doing compressor maintenance, discon-
nect compressor from power source and lock out
power source. Isolate compressor from line pres-
sure by closing recommended discharge shut--
off valve and releasing all internal pressure from
compressor.
AIR FILTER ELEMENT MAINTENANCE
1. When performing maintenance, care must be
taken that no dirt or foreign matter enters intake
housing.
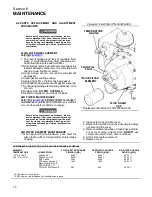
Figure 6-1 Fluid Filter (P/N 250026-982)
* Replacement Element Kit P/N 250028--032
FLUID DRAIN
CAP
TEMPERATURE
GAUGE
FLUID FILL
PLUG
*FLUID FILTER
ELEMENT
2. Clean exterior of air filter cover.
3. Remove the air filter cover by loosening the wing-
nut securing the cover.
4. Remove element and base. Clean base and inte-
rior of cover using a damp cloth.
DO NOT
use
compressed air to clean cover and base.
5. At this time replace element.
6. Replace cover.
COMPRESSOR LUBRICATION GUIDE AND MAINTENANCE SCHEDULE
AMBIENT
TEMPERATURE
LUBRICATION
FLUID & FILTER CHANGE
PERIOD (HRS.)
--10
q
F to +90
q
F
Sullube 32
8000
*
8000
*
4000
**
(--23
q
C to +32
q
C)
Sullair LLL--4--32
8000
*
8000
*
4000
**
SRF 1/4000
4000
4000
4000
**
ATF as per Dextron II
1000
1000
4000
**
Motor Oil MIL--2104E,
SPEC API SF CC,
CD SAE 10W Class SE
600
600
4000 **
* 8,000 Hours or once a year.
SEPARATOR CHANGE
PERIOD (HRS.)
AIR FILTER CHANGE
PERIOD (HRS.)
** 4,000 Hours or more frequently if conditions so require.
Summary of Contents for ES-6 series
Page 6: ...NOTES...
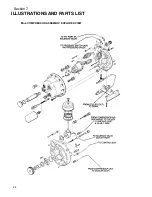
Page 30: ...Section 7 ILLUSTRATIONS AND PARTS LIST 24 ES 6 COMPRESSOR ASSEMBLY EXPLODED VIEW 5 5 AND 7 5KW...
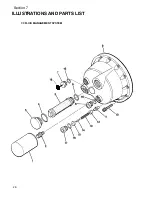
Page 32: ...Section 7 ILLUSTRATIONS AND PARTS LIST 26 7 3 FLUID MANAGEMENT SYSTEM...
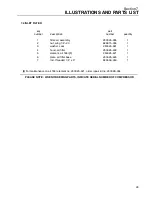
Page 34: ...Section 7 ILLUSTRATIONS AND PARTS LIST 28 7 4 INLET FILTER...
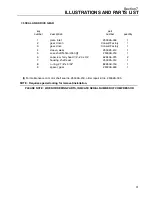
Page 36: ...Section 7 ILLUSTRATIONS AND PARTS LIST 30 7 5 SEAL AND DRIVE GEAR...
Page 38: ...Section 7 ILLUSTRATIONS AND PARTS LIST 32 7 6 MOTOR HOUSING AND PARTS 7 5 10HP 5 5 7 5KW ONLY...
Page 42: ...Section 7 ILLUSTRATIONS AND PARTS LIST 36 7 8 COMPRESSOR SYSTEM...
Page 44: ...Section 7 ILLUSTRATIONS AND PARTS LIST 38 7 9 INLET CONTROL...
Page 46: ...Section 7 ILLUSTRATIONS AND PARTS LIST 40 7 10 CONTROL BOX...
Page 48: ...Section 7 ILLUSTRATIONS AND PARTS LIST 42 7 10 CONTROL BOX...
Page 52: ...Section 7 ILLUSTRATIONS AND PARTS LIST 46 7 12 FRAME CANOPY AND PARTS...
Page 56: ...Section 7 ILLUSTRATIONS AND PARTS LIST 50 7 14 WYE DELTA ELECTRIC BOX ES 6...
Page 58: ...Section 7 ILLUSTRATIONS AND PARTS LIST 52 7 15 DECAL GROUP 7 8 9 11 12...
Page 60: ...Section 7 ILLUSTRATIONS AND PARTS LIST 54 7 15 DECAL GROUP 13...
Page 62: ...Section 7 ILLUSTRATIONS AND PARTS LIST 56 7 16 WIRING DIAGRAM SINGLE PHASE 60Hz...
Page 63: ...Section 7 ILLUSTRATIONS AND PARTS LIST 57 7 17 WIRING DIAGRAM THREE PHASE 60Hz...
Page 64: ...Section 7 ILLUSTRATIONS AND PARTS LIST 58 7 18 WIRING DIAGRAM 50 Hz...
Page 65: ...Section 7 ILLUSTRATIONS AND PARTS LIST 59 7 19 WIRING DIAGRAM 50 Hz WYE DELTA...
Page 66: ...NOTES...
Page 67: ...NOTES...

