Section 7
MAINTENANCE
45
DO NOT
strike the element against any hard sur-
face to dislodge dust. This will damage the sealing
surfaces and possibly rupture the element.
DO NOT
“blow” dirt out of the interior of the filter
housing. This may introduce dust downstream of
the filter. Instead, use a clean damp cloth.
DO NOT
oil the element.
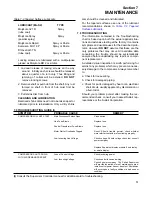
ELEMENT INSPECTION
1. Place a bright light inside the element to inspect
for damage or leak holes. Concentrated light will
shine through the element, revealing any holes.
2. Inspect all gaskets and gasket contact surfaces
of the housing. Should faulty gaskets be evident,
correct the condition immediately.
3. If the clean element is to be stored for later use,
it must be stored in a clean, closed container.
4. After the element has been installed, inspect and
tighten, if necessary, all air inlet connections
prior to resuming operation.
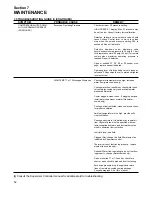
PRIMARY ELEMENT REPLACEMENT
1. Place the element in position over secondary ele-
ment. Replace the sealing washer and wingnut.
Tighten the wingnut so as to fully seat the ele-
ment gasket.
2. Install the cover/element assembly and replace
the wingnut.
SEPARATOR ELEMENTS REPLACEMENT
. The separator elements must
be changed when “Separator Maintenance
Required” message is displayed, or once a year
whichever occurs first. Follow the procedure
explained below for separator element replace-
ment.
PROCEDURE FOR ELEMENT REPLACEMENT
1. Relieve all pressure from the separator and all
compressor lines prior to disconnecting any
pipes, tubing, etc.
2. Disconnect all piping connected to the separator
cover to allow removal (return lines, service
lines, etc.).
3. Loosen and remove the twelve (12) 3/4” x 3” hex
head capscrews from the cover plate.
4. Lift the cover plate from the separator using a
3/4” jackscrew under the lifting arm post. The lid
can be pivoted to the side supported by the lift-
ing arm.
5. Remove the primary and secondary separator
elements.
6. Scrape the old gasket material from the cover
and flange on the sump being careful not to let
the scraps fall in the sump.
7. Inspect the separator tank for rust, dirt, etc.
8. Reinsert the separator elements with gaskets
attached into the sump taking care not to dent
them against the tank opening.
DO NOT
remove
grounding staples. Check between separator
element flange and tank for continuity after
torquing bolts.
DO NOT
use anti-seize com-
pound on gaskets.
9. Clean the underside of the separator tank cover
and remove any rust.
10. Replace the cover plate, washers and 3/4-10
capscrews. Lubricate and Torque to 200 ft.-lbs.
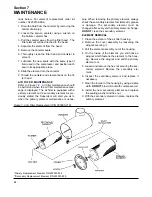
Figure 7-3 Separator Element Replacement
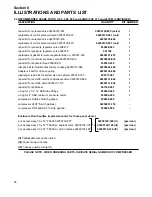
*Primary Replacement Element Kit P/N 02250126-352
**Secondary Replacement Element Kit P/N 02250126-355
Summary of Contents for TS-32S
Page 16: ...Section 2 DESCRIPTION 10 Figure 2 3A Compressor Cooling and Lubrication System Air cooled...
Page 17: ...Section 2 DESCRIPTION 11 Figure 2 3B Compressor Cooling and Lubrication System Water cooled...
Page 18: ...Section 2 DESCRIPTION 12 Figure 2 4A Compressor Discharge System Air cooled...
Page 19: ...Section 2 DESCRIPTION 13 Figure 2 4B Compressor Discharge System Water cooled...
Page 20: ...Section 2 DESCRIPTION 14 Figure 2 5A Control System START Typical...
Page 21: ...Section 2 DESCRIPTION 15 Figure 2 5B Control System MODULATION Typical...
Page 22: ...Section 2 DESCRIPTION 16 Figure 2 5C Control System UNLOAD Typical...
Page 23: ...Section 2 DESCRIPTION 17 Figure 2 5D Control System FULL LOAD Typical...
Page 27: ...Section 3 SPECIFICATIONS 21 NOTES...
Page 40: ...34 NOTES...
Page 48: ...42 NOTES...
Page 60: ...54 NOTES...
Page 63: ...57 NOTES...
Page 72: ...Section 8 ILLUSTRATIONS AND PARTS LIST 66 8 5 AIR INLET SYSTEM 02250135 499R01...
Page 114: ...Section 8 ILLUSTRATIONS AND PARTS LIST 108 02250135 534R03 8 20 SUMP AND PARTS...
Page 116: ...Section 8 ILLUSTRATIONS AND PARTS LIST 110 02250135 534R03 8 20 SUMP AND PARTS...
Page 118: ...Section 8 ILLUSTRATIONS AND PARTS LIST 112 02250134 158R00 8 21 SULLICON CONTROL...
Page 120: ...Section 8 ILLUSTRATIONS AND PARTS LIST 114 8 22 COMPRESSOR SPIRIAL VALVE ACTUATOR...
Page 124: ...Section 8 ILLUSTRATIONS AND PARTS LIST 118 02250135 643R05 8 24 PNEUMATIC CONTROLS...
Page 126: ...Section 8 ILLUSTRATIONS AND PARTS LIST 120 02250135 643R05 8 24 PNEUMATIC CONTROLS...
Page 128: ...Section 8 ILLUSTRATIONS AND PARTS LIST 122 02250135 643R05 8 24 PNEUMATIC CONTROLS...
Page 134: ...Section 8 ILLUSTRATIONS AND PARTS LIST 128 8 27 CONTROL BOX WYE DELTA TYPICAL 02250122 516R08...
Page 140: ...Section 8 ILLUSTRATIONS AND PARTS LIST 134 02250133 674R04 8 30 ENCLOSURE AIR COOLED...
Page 142: ...Section 8 ILLUSTRATIONS AND PARTS LIST 136 02250133 674R04 8 30 ENCLOSURE AIR COOLED...
Page 144: ...Section 8 ILLUSTRATIONS AND PARTS LIST 138 02250133 675R04 8 31 ENCLOSURE WATER COOLED...
Page 146: ...Section 8 ILLUSTRATIONS AND PARTS LIST 140 02250133 675R04 8 31 ENCLOSURE WATER COOLED...
Page 148: ...Section 8 ILLUSTRATIONS AND PARTS LIST 142 8 32 DECALS...
Page 150: ...Section 8 ILLUSTRATIONS AND PARTS LIST 144 8 32 DECALS...
Page 152: ...Section 8 ILLUSTRATIONS AND PARTS LIST 146 8 32 DECALS...
Page 154: ...Section 8 ILLUSTRATIONS AND PARTS LIST 148 8 33 DECAL LOCATIONS...
Page 156: ...Section 8 ILLUSTRATIONS AND PARTS LIST 150 8 34 DECAL LOCATIONS AIR COOLED ENCLOSURE TYPICAL...
Page 158: ...Section 8 ILLUSTRATIONS AND PARTS LIST 152 8 35 DECAL LOCATIONS WATER COOLED ENCLOSURE TYPICAL...
Page 160: ...Section 8 ILLUSTRATIONS AND PARTS LIST 154 8 36 DECAL LOCATIONS CONTROL BOX...
Page 162: ...Section 8 ILLUSTRATIONS AND PARTS LIST 156 8 37 DECAL LOCATIONS AFTER COOLER...
Page 171: ...NOTES...

