Section 7
MAINTENANCE
50
drive bolts provided, and dip threads of ALL
drive bolts with overload washers in SAE 30 or
equivalent oil. Insert drive bolts with overload
washers through alternate holes in each disc-
pack and through the small holes in each end of
the spacer, and install nuts until bolts protrude
through nut.
DO NOT FULLY TIGHTEN
.
3. Insert the remaining drive bolts from the counter-
bore side of each adapter through the three
small non-threaded holes, and through through
the remaining holes in each discpack. These
bolts should now be protruding through the large
holes in each flange of the spacer. Install the
remaining overload washers and nuts onto
these bolts. All nuts should be on the spacer
side and all bolts heads located in the adapter.
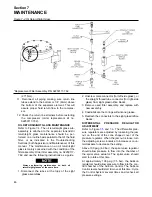
. Tightening of all drive bolts
should be done with the center component
assembly in a horizontal position. The most reli-
able method of tightening drive bolts is achieved
using Drive Bolt Elongation. Measure the length
of the #1 drive bolt with an outside micrometer
and record. Hold the drive bolt head and tighten
the nut to the tightening torque listed in
Subtract the first reading from the second read-
ing. Compare the difference to the elongation
listed in
increase or decrease tightening to achieve prop-
er elongation. Repeat this procedure for each
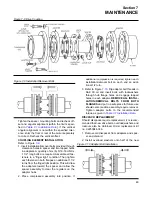
drive bolt in cylinder head fashion illustrated in
Figure
.
SHRINK DISC INSTALLATION
supplied ready for installation. Therefore, they
should not be disassembled prior to initial installa-
tion.
INSTALLATION SEQUENCE
1. Remove spacers placed between collars for pro-
tection during transportation.
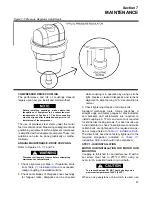
2. Take any three locking screws forming the points
of an equilateral triangle (e.g. screw 1, 5 and 9
in Figure
) and tighten them slightly until the
inner ring can still just be turned.
3. Slide shrink disc over the hub. The hub outside
surface can be greased.
Never tighten locking screws before shaft is inside
the hub.
4. Degrease the hub bore and shaft seat.
5. Insert shaft or slide hub over the shaft.
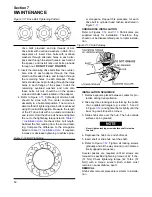
6. Refer to Figure
. Tighten all locking screws
gradually and all the way around (not in diamet-
rically opposite sequence).
Several passes are required until all screws are
torqued to specified tightening torque of 42 ft.-lbs.
(57 Nm). Check tightening torque (42 ft.-lbs. [57
Nm]) with a torque wrench. Both collars must
remain an equal distance apart.
REMOVAL
Shrink disc removal procedure is similar to installa-
tion.
Figure 7-11 Drive Bolt Tightening Pattern
Figure 7-12 Bolt Tightening
Figure 7-13 Hub Cutaway
Summary of Contents for TS-32S
Page 16: ...Section 2 DESCRIPTION 10 Figure 2 3A Compressor Cooling and Lubrication System Air cooled...
Page 17: ...Section 2 DESCRIPTION 11 Figure 2 3B Compressor Cooling and Lubrication System Water cooled...
Page 18: ...Section 2 DESCRIPTION 12 Figure 2 4A Compressor Discharge System Air cooled...
Page 19: ...Section 2 DESCRIPTION 13 Figure 2 4B Compressor Discharge System Water cooled...
Page 20: ...Section 2 DESCRIPTION 14 Figure 2 5A Control System START Typical...
Page 21: ...Section 2 DESCRIPTION 15 Figure 2 5B Control System MODULATION Typical...
Page 22: ...Section 2 DESCRIPTION 16 Figure 2 5C Control System UNLOAD Typical...
Page 23: ...Section 2 DESCRIPTION 17 Figure 2 5D Control System FULL LOAD Typical...
Page 27: ...Section 3 SPECIFICATIONS 21 NOTES...
Page 40: ...34 NOTES...
Page 48: ...42 NOTES...
Page 60: ...54 NOTES...
Page 63: ...57 NOTES...
Page 72: ...Section 8 ILLUSTRATIONS AND PARTS LIST 66 8 5 AIR INLET SYSTEM 02250135 499R01...
Page 114: ...Section 8 ILLUSTRATIONS AND PARTS LIST 108 02250135 534R03 8 20 SUMP AND PARTS...
Page 116: ...Section 8 ILLUSTRATIONS AND PARTS LIST 110 02250135 534R03 8 20 SUMP AND PARTS...
Page 118: ...Section 8 ILLUSTRATIONS AND PARTS LIST 112 02250134 158R00 8 21 SULLICON CONTROL...
Page 120: ...Section 8 ILLUSTRATIONS AND PARTS LIST 114 8 22 COMPRESSOR SPIRIAL VALVE ACTUATOR...
Page 124: ...Section 8 ILLUSTRATIONS AND PARTS LIST 118 02250135 643R05 8 24 PNEUMATIC CONTROLS...
Page 126: ...Section 8 ILLUSTRATIONS AND PARTS LIST 120 02250135 643R05 8 24 PNEUMATIC CONTROLS...
Page 128: ...Section 8 ILLUSTRATIONS AND PARTS LIST 122 02250135 643R05 8 24 PNEUMATIC CONTROLS...
Page 134: ...Section 8 ILLUSTRATIONS AND PARTS LIST 128 8 27 CONTROL BOX WYE DELTA TYPICAL 02250122 516R08...
Page 140: ...Section 8 ILLUSTRATIONS AND PARTS LIST 134 02250133 674R04 8 30 ENCLOSURE AIR COOLED...
Page 142: ...Section 8 ILLUSTRATIONS AND PARTS LIST 136 02250133 674R04 8 30 ENCLOSURE AIR COOLED...
Page 144: ...Section 8 ILLUSTRATIONS AND PARTS LIST 138 02250133 675R04 8 31 ENCLOSURE WATER COOLED...
Page 146: ...Section 8 ILLUSTRATIONS AND PARTS LIST 140 02250133 675R04 8 31 ENCLOSURE WATER COOLED...
Page 148: ...Section 8 ILLUSTRATIONS AND PARTS LIST 142 8 32 DECALS...
Page 150: ...Section 8 ILLUSTRATIONS AND PARTS LIST 144 8 32 DECALS...
Page 152: ...Section 8 ILLUSTRATIONS AND PARTS LIST 146 8 32 DECALS...
Page 154: ...Section 8 ILLUSTRATIONS AND PARTS LIST 148 8 33 DECAL LOCATIONS...
Page 156: ...Section 8 ILLUSTRATIONS AND PARTS LIST 150 8 34 DECAL LOCATIONS AIR COOLED ENCLOSURE TYPICAL...
Page 158: ...Section 8 ILLUSTRATIONS AND PARTS LIST 152 8 35 DECAL LOCATIONS WATER COOLED ENCLOSURE TYPICAL...
Page 160: ...Section 8 ILLUSTRATIONS AND PARTS LIST 154 8 36 DECAL LOCATIONS CONTROL BOX...
Page 162: ...Section 8 ILLUSTRATIONS AND PARTS LIST 156 8 37 DECAL LOCATIONS AFTER COOLER...
Page 171: ...NOTES...

