background image

SECTION 3

TS32 USER MANUAL


53

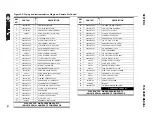
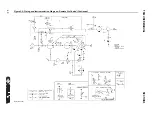
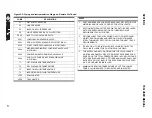
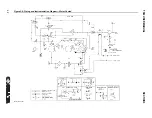
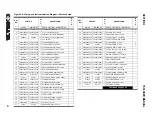
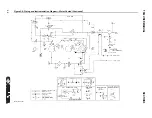
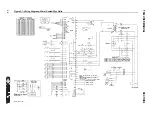
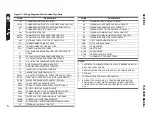
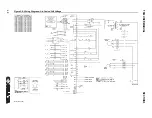
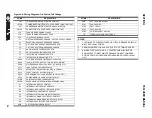
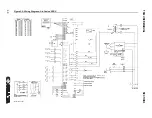
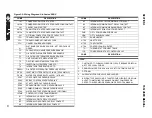
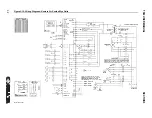
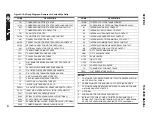
Figure 3-10: Wiring Diagram—Remote Air-Cooled Wye Delta

COMP

DESCRIPTION

1M

COMPRESSOR MOTOR STARTER

1MOL

COMPRESSOR MOTOR STARTER OVERLOAD CONTACT

2M

COMPRESSOR MOTOR STARTER RUN CONTACTOR

S

COMPRESSOR START CONTACTOR

3M

FAN MOTOR STARTER

3MOL

FAN MOTOR STARTER OVERLOAD CONTACT

4M

CANOPY FAN STARTER (OPT'L)

4MOL

CANOPY FAN MOTOR STARTER OVERLOAD CONTACT

5MOL

SECOND CANOPY FAN MOTOR OVERLOAD

6M

OPTIONAL CONTACTOR FOR PF CAPACITOR

1FU

TRANSFORMER PRIMARY FUSES

2FU

TRANSFORMER SECONDARY FUSE

3FU

COOLER FAN BRANCH FUSES

4FU

CANOPY FAN BRANCH FUSES

P1

WET SUMP PRESSURE SENSOR - SET PER FACE OF 
ORDER

P2

PACKAGE DISCHARGE PRESSURE SENSOR

P3

OIL FILTER DISCHARGE PRESSURE SENSOR

P4

OIL FILTER UPSTREAM PRESSURE SENSOR

T1

UNIT DISCHAGE TEMPERATURE RTD

T2

DRY DISCHARGE TEMPERATURE RTD

T3

INJECTION OIL TEMPERATURE RTD

T4

INTERSTAGE TEMPERATURE RTD

DPSW1

OIL FILTER DIFFERENTIAL PRESSURE SWITCH (OPT'L)

PSW1

INLET AIR FILTER SWITCH: 22 IN WC (558.9 MM WC)

SOL1

LOAD CONTROL SOLENOID VALVE

SOL2

SPIRAL CONTROL SOLENOID VALVE (OPTIONAL)

SOL3

START CONTROL SOLENOID VALVE

SOL4

SEQUENCING/FULL LOAD  SOLENOID VALVE (OPTIONAL)

SOL5

COMBO DRAIN/JZL DRAIN SOLENOID VALVE

1XFMR

CONTROL VOLTAGE TRANSFORMER

2XFMR

SUPERVISOR 3 STEPDOWN TRANSFORMER 24VAC

K1

INTERNAL RUN RELAY CONTACT

K2

INTERNAL Y-DELTA RELAY CONTACT

K3

INTERNAL LOAD CONTROL RELAY CONTACT

K4

INTERNAL SEQUENCE RELAY CONTACT

K5

INTERNAL ELECTRIC DRAIN RELAY CONTACT

K6

INTERNAL COMMON FAULT RELAY CONTACT

K7

INTERNAL COMMON WARNING RELAY CONTACT

K8

INTERNAL SPECIAL FUNCTION CONTACT

PMR

OPT'L POWER MONITOR RELAY

HRN

OPT'L AUDIBLE ALARM

HTR1

SUMP HEATER

HTR2

HEAT TRACE

HTR3

TRAP HEATER

HTR4

CONTROL PANEL HEATER

TH

THERMOSTAT FOR HEAT TRACE

TSW1

OIL TEMPERATURE SWITCH

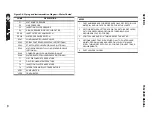
NOTES:

1.   CUSTOMER TO FURNISH FUSED OR CIRCUIT BREAKER DISCON-

NECT PER LOCAL CODES.

2.   REMOVE JUMPER FOR AUXILIARY E-STOP STRING DEVICES.
3.   CUSTOMER WIRING REQUIRED BETWEEN COOLER MOTOR AND 

MACHINE MOUNTED STARTER.

4.   OPTIONAL.
5.

2ND FAN MOTOR FOR 400HP AND LARGER.

6.

BELDEN TYPE 9842 4 COND. 2 TWISTED PAIR W/SHIELD OR 
EQUIVALENT. TO MATCHING TERMINALS ON NEXT COMPRESSOR. 
REFER TO SUPERVISOR SEQUENCING PROTOCOL MANUAL.

COMP

DESCRIPTION

Summary of Contents for TS32 AC

Page 1: ...BER KEEP FOR FUTURE REFERENCE USER MANUAL SULLAIR CORPORATION The information in this manual is current as of its publication date and applies to compressor serial number and all subsequent serial num...

Page 2: ...cated at Michigan City Indiana Instruction includes training on the function and installation of Sullair service parts troubleshooting common faults and malfunctions and actual equipment operation The...

Page 3: ...L DESCRIPTION 14 2 3 COMPRESSOR COOLING AND LUBRICATION SYSTEM FUNCTION AL DESCRIPTION 14 2 4 COMPRESSOR DISCHARGE SYSTEM FUNCTIONAL DESCRIPTION 24 2 5 CONTROL SYSTEM FUNCTIONAL DESCRIPTION 25 2 6 AIR...

Page 4: ...DUCTION 63 5 2 PURPOSE OF CONTROLS INTRODUCTION 65 5 3 INITIAL START UP PROCEDURE 65 5 4 SUBSEQUENT START UP PROCEDURE 65 5 5 SHUTDOWN PROCEDURE SECTION 6 MAINTENANCE 67 6 1 GENERAL 67 6 2 DAILY OPERA...

Page 5: ...rein are applicable to most compressors and the concepts behind these statements are generally applicable to all compressors 1 2 PERSONAL PROTECTIVE EQUIPMENT A Prior to installing or operating the co...

Page 6: ...including air line anti icer system antifreeze compound or fluid film to accumulate on under or around acoustical mate rial or on any external surfaces of the air com pressor Wipe down using an aqueo...

Page 7: ...codes or regula tions B DO NOT use air line anti icer systems in air lines supplying respirators or other breathing air utili zation equipment and DO NOT discharge air from these systems into unventi...

Page 8: ...andling any ungrounded conductors 1 9 LIFTING A If the compressor is provided with a lifting bail then lift by the bail provided If no bail is provided then lift by sling Compressors to be air lifted...

Page 9: ...a cles at floor level and transport and corner at minimum practical speeds N Make sure pallet mounted compressors are firmly bolted or otherwise secured to the pallet prior to attempting to forklift o...

Page 10: ...NOTES 10...

Page 11: ...e fluid A fan is used to supply sufficient ventilating air to the compressors equipped with a canopy Both air cooled and water cooled versions have easily accessible items such as the fluid filters an...

Page 12: ...TS32 USER MANUAL SECTION 2 12 Figure 2 1 Sullair Series TS32 Rotary Screw Compressor Air cooled Typical...

Page 13: ...SECTION 2 TS32 USER MANUAL 13 Figure 2 2 Sullair Series TS32 Rotary Screw Compressor Water cooled Typical...

Page 14: ...sure is reduced causing the fluid stop valve to close and isolate the compressor unit from the cooling system Water cooled models have a water pressure switch to prevent operation with inadequate wate...

Page 15: ...SECTION 2 TS32 USER MANUAL 15 Figure 2 3 Compressor Piping and Instrument Diagram Typical...

Page 16: ...TS32 USER MANUAL SECTION 2 16 Figure 2 4 Compressor Cooling and Lubrication System Air cooled...

Page 17: ...SECTION 2 TS32 USER MANUAL 17 Figure 2 5 Compressor Cooling and Lubrication System Water cooled...

Page 18: ...TS32 USER MANUAL SECTION 2 18 Figure 2 6 Compressor Discharge System Air cooled 200 350HP...

Page 19: ...SECTION 2 TS32 USER MANUAL 19 Figure 2 7 Compressor Discharge System Water cooled 200 350HP...

Page 20: ...TS32 USER MANUAL SECTION 2 20 Figure 2 8 Control System START Typical...

Page 21: ...SECTION 2 TS32 USER MANUAL 21 Figure 2 9 Control System MODULATION Typical...

Page 22: ...TS32 USER MANUAL SECTION 2 22 Figure 2 10 Control System UNLOAD Typical...

Page 23: ...SECTION 2 TS32 USER MANUAL 23 Figure 2 11 Control System FULL LOAD Typical...

Page 24: ...r the stated pressures START MODE 0 TO 50 PSIG 0 TO 3 4 BAR When the compressor ON pad is depressed the sump pressure will quickly rise from 0 to 50 psig 0 to 3 4 bar During this period both of the pr...

Page 25: ...e butterfly valve remain in the unload position When the line pressure drops back to 100 psig 6 9 bar due to an increase in the air demand Supervisor energizes the solenoid valve allowing the air pres...

Page 26: ...TS32 USER MANUAL SECTION 2 26 Figure 2 12 Compressor Air Inlet System...

Page 27: ...itive displacement fluid lubricated twin rotary screws Configuration Two stage tandem geared integral drive Bearing Type Anti friction Cooling See Section 2 3 Lubricant Pressurized fluid see sections...

Page 28: ...X 77541 To facilitate this a sample bottle is included with the compressor MOTOR 60 Hz Compressors STANDARD MODELS Size 200 350HP 150 261Kw Consult factory for specific voltages Type Open Dripproof en...

Page 29: ...changed more frequently under severe operating conditions such as high ambient temperatures coupled with high humidity or when high particulate level corrosive gases or strong oxidizing gases are pre...

Page 30: ...TS32 USER MANUAL SECTION 3 30 Figure 3 2 Identification Air Cooled 02250126 376 R02...

Page 31: ...ELED AND SECURED WITH FOUNDATION BOLTS AND FULL UNIFORM CONTACT MUST BE MAINTAINED BETWEEN THE FRAME AND FOUN DATION IT IS RECOMMENFED THAT THE FRAME BE GROUTED TO THE FOUNDATION THE COMPRESSOR UNIT A...

Page 32: ...TS32 USER MANUAL SECTION 3 32 Figure 3 2 Identification Water Cooled 02250126 378 R03...

Page 33: ...ELED AND SECURED WITH FOUNDATION BOLTS AND FULL UNIFORM CONTACT MUST BE MAINTAINED BETWEEN THE FRAME AND FOUN DATION IT IS RECOMMENFED THAT THE FRAME BE GROUTED TO THE FOUNDATION THE COMPRESSOR UNIT...

Page 34: ...TS32 USER MANUAL SECTION 3 34 Figure 3 3 Piping and Instrumentation Diagram Air Cooled 02250179 499 R01...

Page 35: ...5 24 02250179 431 02250179 431 4 P THERMISTOR 3000 OHM NTC 25 02250092 138 02250092 138 1 VLV PRESS RLF 1 2 NPT 150 PSIG 26 02250119 109 02250119 109 1 VLV RLF 1 1 2 150 1950CFM 27 02250120 350 022501...

Page 36: ...TS32 USER MANUAL SECTION 3 36 Figure 3 4 Piping and Instrumentation Diagram Air Cooled Continued 02250179 499 R01...

Page 37: ...ZLDRAINSOLENOIDVALVE T1 WET DISCHARGE TEMPERATURE T2 DRY DISCHARGE TEMPERATURE T3 INJECTION FLUID TEMPERATURE T4 INTERSTAGE AIR FLUID TEMPERATURE HTR1 SUMP HEATER HTR3 TRAP HEATER NOTES 1 PART NUMBERS...

Page 38: ...TS32 USER MANUAL SECTION 3 38 Figure 3 5 Piping and Instrumentation Diagram Remote Air Cooled 02250179 498 R01...

Page 39: ...RLF 1 1 2 150 1950CFM 27 02250120 612 1 TNK OIL SUMP 28 02250097 611 2 PLUG SIGHT GLASS 1 7 8 SAE 29 02250125 221 1 VLV BALL 3 4 SAE X 3 4 NPT 30 250029 330 1 VLV RLF 2 X 2 1 2 31 242221 1 RESERVOIR A...

Page 40: ...TS32 USER MANUAL SECTION 3 40 Figure 3 5 Piping and Instrumentation Diagram Remote Air Cooled Continued 02250179 498 R01...

Page 41: ...NUMBERS ARE FOR REFERENCE ONLY REFER TO BILL OF MATERIAL AND OR FACE OF ORDER FOR ACTUAL PARTS 2 SECTION BETWEEN LETTERED POINTS ARE TO BE REPLACED WITH CORRESPONDING OPTION PICTURED BELOW AS REQUIRE...

Page 42: ...TS32 USER MANUAL SECTION 3 42 Figure 3 6 Piping and Instrumentation Diagram Water Cooled 02250179 496 R01...

Page 43: ...50092 138 02250092 138 1 VLV PRESS RLF 1 2 NPT 150 PSIG 26 02250119 109 02250119 109 1 VLV RLF 1 1 2 150 1950CFM 27 02250120 612 02250120 612 1 TNK OIL SUMP 28 02250097 611 02250097 611 2 PLUG SIGHT G...

Page 44: ...TS32 USER MANUAL SECTION 3 44 Figure 3 6 Piping and Instrumentation Diagram Water Cooled Continued 02250179 496 R01...

Page 45: ...LVE SOL6 WATERSHUTOFFSOLENOIDVALVE OPTIONAL T1 WET DISCHARGE TEMPERATURE T2 DRY DISCHARGE TEMPERATURE T3 INJECTION FLUID TEMPERATURE T4 INTERSTAGE AIR FLUID TEMPERATURE HTR1 SUMP HEATER HTR3 TRAP HEAT...

Page 46: ...TS32 USER MANUAL SECTION 3 46 Figure 3 7 Wiring Diagram Water Cooled Wye Delta 02250178 841 R01...

Page 47: ...CONTROL SOLENOID VALVE SOL2 SPIRAL CONTROL SOLENOID VALVE OPTIONAL SOL3 START CONTROL SOLENOID VALVE SOL4 SEQUENCING FULL LOAD SOLENOID VALVE OPT SOL5 COMBO DRAIN JZL DRAIN SOLENOID VALVE SOL6 WATER S...

Page 48: ...TS32 USER MANUAL SECTION 3 48 Figure 3 8 Wiring Diagram Air Cooled Full Voltage 02250178 845 R01...

Page 49: ...D VALVE SOL2 SPIRAL CONTROL SOLENOID VALVE OPTIONAL SOL3 START CONTROL SOLENOID VALVE SOL4 SEQUENCING FULL LOAD SOLENOID VALVE OPT SOL5 COMBO DRAIN JZL DRAIN SOLENOID VALVE 1XFMR CONTROL VOLTAGE TRANS...

Page 50: ...TS32 USER MANUAL SECTION 3 50 Figure 3 9 Wiring Diagram Air Cooled SSRV 02250178 844 R03...

Page 51: ...ONTROL SOLENOID VALVE SOL3 START CONTROL SOLENOID VALVE SOL4 SEQUENCING FULL LOAD SOLENOID VALVE SOL5 COMBO DRAIN JZL DRAIN SOLENOID VALVE SOL6 WATER SHUTOFF SOLENOID VALVE OPTIONAL 1XFMR CONTROL VOLT...

Page 52: ...TS32 USER MANUAL SECTION 3 52 Figure 3 10 Wiring Diagram Remote Air Cooled Wye Delta 02250178 836 R01...

Page 53: ...D CONTROL SOLENOID VALVE SOL2 SPIRAL CONTROL SOLENOID VALVE OPTIONAL SOL3 START CONTROL SOLENOID VALVE SOL4 SEQUENCING FULL LOAD SOLENOID VALVE OPTIONAL SOL5 COMBO DRAIN JZL DRAIN SOLENOID VALVE 1XFMR...

Page 54: ...NOTES 54...

Page 55: ...arances around the compressor should permit easy access to all compres sor components Walls and ceilings with soft or porous sur faces absorb sound and reduce ambient noise levels Hard surfaces reflec...

Page 56: ...oper ventilation The heat rejection requirement applies the amount of heat generated by the compres sor which must be removed to maintain a normal operating temperature If the compressor has a water r...

Page 57: ...gers Scale can be a problem if the water supply has a high concentration of calcium carbonate It forms lime scale deposits which act as thermal insulators and restrict the water flow through the cooli...

Page 58: ...or when it is not in use The cooler s seawater outlet pipe should have an open path to the waste piping NOTE Seawater cooled systems must be installed with with the optional copper nickel coolers NOTE...

Page 59: ...ather hood should be installed to protect the compressor from precipitation If the compressor will exposed to blowing rain or snow it should be housed in a covered four walled enclosure Sheltered air...

Page 60: ...e base A vent to the piping should be installed downstream of the compressor outlet connection When two compressors are installed to operate in parallel with a common receiver tank an isolation valve...

Page 61: ...ed near the sump If the sump is properly filled the fluid level should be visible in the upper sight glass When the oil level falls below the center of the lower sight glass fluid must be added 4 6 MO...

Page 62: ...ssor component s maintenance Because of the variability in installations the fluid necessary to fill the supply and return piping for the fluid cooler is not part of the standard scope of supply for t...

Page 63: ...hermal overload element housing re closes the starter s contacts after a current overload takes place Please be aware that the elements must be allowed to cool sufficiently before resetting SULLICON A...

Page 64: ...d the cooler until the fluid reaches a temperature of 185 F 85 C 195 F for water cooled KT and 150 psi 10 3 bar Useful for fast warm up during start Maintains a minimum temperature during periods of l...

Page 65: ...plate pressure If adjustments are nec essary see Control System Adjustments 8 Observe the operating temperature Refer to Section 2 3 for proper operating temperature range If temperature exceeds this...

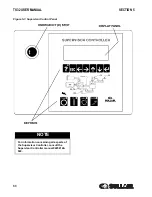
Page 66: ...TS32 USER MANUAL SECTION 5 66 Figure 5 1 Supervisor Control Panel NOTE For information concerning all aspects of the Supervisor Controller consult the Supervisor Controller manual 02250146 049...

Page 67: ...orrect readings for that particular phase of operation After the compressor has warmed up it is recommended that a general check of the overall compressor and Supervisor be made to assure that the com...

Page 68: ...m the filter head The filter element will be attached to the head 4 Separate the element from the head 5 Remove the canister seals 6 Thoroughly clean the filter head and canister in solvent 7 Lubricat...

Page 69: ...he housing by using a damp cloth DO NOT blow dirt out with com pressor air 7 Install the new secondary element and replace the sealing washer and hex nut 8 With the secondary element in place replace...

Page 70: ...rocedure explained below for separator element replacement PROCEDURE FOR ELEMENT REPLACEMENT 1 Relieve all pressure from the separator and all compressor lines prior to disconnecting any pipes tubing...

Page 71: ...on a routine basis parallel to that of the fluid filter or as indicated in the Troubleshooting Sections both Supervisor and Maintenance of this manual The maintenance on an oil return sight glass is m...

Page 72: ...amber of the Sullicon Control The Sullicon Control level should start to move at this time Cycle the Control System several times and recheck all pressure settings COMPRESSOR DRIVE COUPLING The perfor...

Page 73: ...STEP 2 OFFSET ALIGNMENT Clean any oil grease dirt or paint from coupling faces and the other surfaces of the drive flanges Rotate shafts so that a straight edge will rest squarely or within the 0 010...

Page 74: ...to correct Recheck the vertical offset STEP 4 INSTALL THE FLEXIBLE ELEMENT Refer to shaft coupling maintenance for installation of drive coupling element Figure 6 7 Drive Coupling Alignment Figure 6 8...

Page 75: ...ssor will not start Main disconnect switch open Close switch Line fuse blown Replace fuse Control Transformer Fuse Blown Replace fuse Motor Starter Overloads Tripped Reset Should trouble persist check...

Page 76: ...ng properly replace element air cooled only Optional Water flow regulating valve not functioning properly change water cooled only Open or shorted T1 or T2 sender check for a short or open circuit to...

Page 77: ...ly Check separator differential plugged dP1 Change separator Leak in the lubrication system Check all pipes connections and components Excess fluid foaming Drain and change Fluid level too high Drain...

Page 78: ...NOTES 78...

Page 79: ...NOTES 79...

Page 80: ...ors LTD 324 332 Frankston Dandenong Road Dandenong VIC Australia 3175 Ph 61397039000 Fx 61397039053 www championcompressors com au SULLAIR CORPORATION 3700 East Michigan Boulevard Michigan City Indian...

Reviews: