26
MAINTENANCE
2.
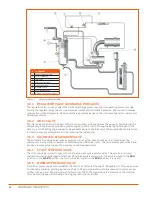
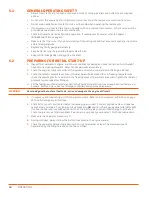
Wait two minutes after the compressor stops to allow the pressure to be relieved and the oil to settle.
3.
Observe the oil level in the fluid sight glass. The fluid sight glass should be no more than ⅔ full.
4.
While the compressor is running, the oil should be visible in the sight glass.
6.3.2 FILL
Before adding or changing compressor oil, completely relieve the sump of pressure. Venting the sump tank
pressure relief valve will do this.
6.3.3 LEVEL
The proper oil level, when unit is shut down and oil has had time to settle, is across the center of the oil level
sight glass. For oil sump capacity, see
WARNING!
Compressor must be shut down and pressure completely relieved from system before checking fluid levels.
Open pressure relief valve to ensure relief of system air pressure. Failure to comply with this warning may
cause property damage and serious bodily harm or death.
6.3.4 DRAIN
Always warm compressor thoroughly prior to changing the compressor oil. A drain valve is provided at
the bottom of the sump tank. When changing the oil, make sure system is completely drained to reduce
potential contamination. Oil is added at the fill plug on the side of the sump tank.
WARNING!
Do not attempt to drain water, remove the oil level fill plug, or break any connection in the air or oil system
until all the pressure has been relieved. Check by manually opening the sump pressure relief valve. Serious
injury or death may result if this warning is not followed.
6.4
OIL SAMPLE FOR ANALYSIS
The first oil sample should be drawn after the compressor has run for 2,000 hours or 3 months. Intervals for
following oil samples will be determined by the analysis results.
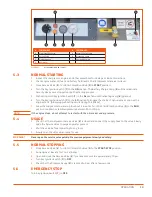
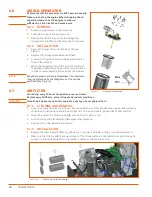
Figure 6-1.
OIL ANALYSIS KIT (P/N K00031-005)
(
1
)
(
2
)
(
3
)
SAMPLE OIL FROM SUMP TANK
1.
Run the compressor long enough to reach normal operating temperatures.
2.
Turn compressor
OFF
and allow pressure to blow down to 0 psi.
3.
Remove the drain plug from the end of the drain line at the bottom of the sump tank.
4.
Open the drain valve and drain any water from the sump tank. Discard in an approved manner.
5.
Fill the clear sample bottle (
2
) with oil. The sample bottle (
2
) must be at least one-third full.
6.
Close the drain valve and replace the plug in the drain line.
7.
Start the compressor according to
8.
Check the oil level during operation. Add oil if necessary according to
Summary of Contents for D110PKU
Page 4: ......
Page 6: ...vi About This Manual ...
Page 13: ...5 2 SPECIFICATIONS TOPICS IN THIS SECTION Technical Data 6 Dimensions 7 ...
Page 16: ...8 Specifications ...
Page 44: ...36 Troubleshooting ...
Page 48: ...40 Parts Catalog 8 6 ENGINE ASSEMBLY ...
Page 50: ...42 Parts Catalog 8 7 ENGINE MOUNTING ASSEMBLY ...
Page 52: ...44 Parts Catalog 8 8 ENGINE TO FRAME ASSEMBLY ...
Page 54: ...46 Parts Catalog 8 9 BATTERY ASSEMBLY ...
Page 56: ...48 Parts Catalog 8 10 EXHAUST ASSEMBLY ...
Page 58: ...50 Parts Catalog 8 11 COMPRESSOR ASSEMBLY ...
Page 60: ...52 Parts Catalog 8 12 INLET VALVE ASSEMBLY ...
Page 62: ...54 Parts Catalog 8 13 AIR FILTER ASSEMBLY ...
Page 64: ...56 Parts Catalog 8 14 RECEIVER ASSEMBLY ...
Page 66: ...58 Parts Catalog 8 15 RECEIVER ASSEMBLY TO FRAME ...
Page 68: ...60 Parts Catalog 8 16 CONTROL TUBING ASSEMBLY ...
Page 70: ...62 Parts Catalog 8 17 COOLING ASSEMBLY ...
Page 72: ...64 Parts Catalog 8 18 COOLING ASSEMBLY ATTACHMENT TO FRAME ...
Page 74: ...66 Parts Catalog 8 19 COOLING SYSTEM HOSES AND RECOVERY TANK INSTALLATION ...
Page 76: ...68 Parts Catalog 8 20 OIL FILTER AND DISCHARGE HOSE ASSEMBLY ...
Page 78: ...70 Parts Catalog 8 21 FUEL TANK ASSEMBLY ...
Page 80: ...72 Parts Catalog 8 22 INSTRUMENT PANEL ASSEMBLY ...
Page 82: ...74 Parts Catalog 8 23 CANOPY ASSEMBLY ...
Page 84: ...76 Parts Catalog 8 24 CANOPY INSTALLATION ...
Page 86: ...78 Parts Catalog 8 25 LIFTING BAIL ASSEMBLY ...
Page 88: ...80 Parts Catalog 8 26 FRONT CROSSMEMBER ASSEMBLY ...
Page 90: ...82 Parts Catalog 8 27 LIGHT PACKAGE ...
Page 92: ...84 Parts Catalog 8 28 FENDER INSTALLATION ...
Page 94: ...86 Parts Catalog 8 29 AXLE AND WHEEL ASSEMBLY ...
Page 98: ...NOTES ...
Page 99: ...NOTES ...

