33
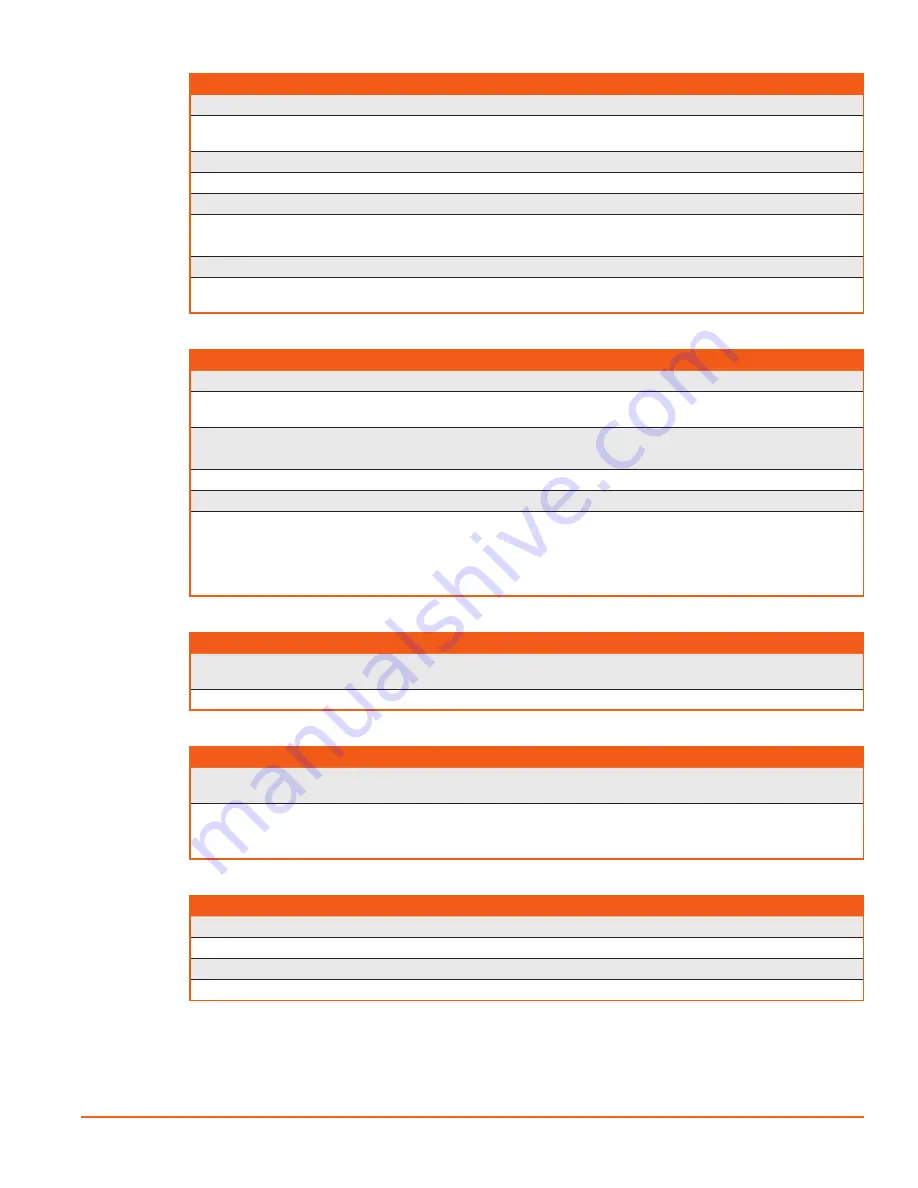
TROUBLESHOOTING
7.3
DISCHARGE PRESSURE IS TOO LOW
POSSIbLE CAUSE
ACTION
Start/Run valve in the START position
Move the Start/Run valve to the RUN position and retest.
Too much air demand
Add additional compressor to handle the demand or
decrease the air demand.
Service valve open
Close service valve and retest.
Service line leaks
Repair any leaks found and retest.
Compressor inlet air filter restricted
Replace the air filter and retest.
Regulator valve faulty or misadjusted
Properly adjust the regulator.
Replace the regulator valve if necessary.
Engine speed too low
Readjust engine speed.
Defective cylinder
Readjust engine speed; check and replace cylinder if
necessary.
7.4
DISCHARGE PRESSURE IS TOO HIGH OR RELIEF VALVE BLOWS
POSSIbLE CAUSE
ACTION
Discharge pressure gauge faulty
Replace the faulty gauge.
Regulator valve faulty or misadjusted
Properly adjust the regulator; replace the regulator if
necessary.
Oil separator plugged
Replace the oil separator.
Clean the scavenger tube.
Pressure relief valve faulty
Replace the faulty relief valve.
Compressor shaft seal leaking
Replace the compressor shaft seal and retest.
Ice or debris in control lines
Clean the control lines of debris.
Thaw out the control lines to remove the ice buildup.
Direct the lines so there is a low point to drain any
condensate. Optional Heater Kit available; consult
factory for information.
7.5
RELIEF VALVE BLOWS WITH THROTTLE LEVER IN IDLE POSITION
POSSIbLE CAUSE
ACTION
Regulator valve faulty or misadjusted
Properly adjust the regulator; replace the regulator if
necessary
Control system leaks
Repair any leaks and retest.
7.6
PRESSURE DOES NOT BLOW DOWN AFTER SHUTDOWN
POSSIbLE CAUSE
ACTION
Automatic blowdown valve may be faulty
Check operation of the automatic blowdown valve.
Replace if necessary.
Air line from inlet valve or sump to blowdown valve may
be restricted
Verify the pilot signal is reaching the automatic
blowdown valve.
Verify the blowdown valve is plumbed correctly.
7.7
COMPRESSOR OIL LEVEL IS DECREASING EXCESSIVELY
POSSIbLE CAUSE
ACTION
Oil line leaking
Repair or replace any leaking lines and retest.
Oil cooler leaking
Repair or replace the leaking oil cooler and retest.
Compressor shaft seal leaking
Replace the compressor shaft seal and retest.
Oil in service line
See
section.
Summary of Contents for D110PKU
Page 4: ......
Page 6: ...vi About This Manual ...
Page 13: ...5 2 SPECIFICATIONS TOPICS IN THIS SECTION Technical Data 6 Dimensions 7 ...
Page 16: ...8 Specifications ...
Page 44: ...36 Troubleshooting ...
Page 48: ...40 Parts Catalog 8 6 ENGINE ASSEMBLY ...
Page 50: ...42 Parts Catalog 8 7 ENGINE MOUNTING ASSEMBLY ...
Page 52: ...44 Parts Catalog 8 8 ENGINE TO FRAME ASSEMBLY ...
Page 54: ...46 Parts Catalog 8 9 BATTERY ASSEMBLY ...
Page 56: ...48 Parts Catalog 8 10 EXHAUST ASSEMBLY ...
Page 58: ...50 Parts Catalog 8 11 COMPRESSOR ASSEMBLY ...
Page 60: ...52 Parts Catalog 8 12 INLET VALVE ASSEMBLY ...
Page 62: ...54 Parts Catalog 8 13 AIR FILTER ASSEMBLY ...
Page 64: ...56 Parts Catalog 8 14 RECEIVER ASSEMBLY ...
Page 66: ...58 Parts Catalog 8 15 RECEIVER ASSEMBLY TO FRAME ...
Page 68: ...60 Parts Catalog 8 16 CONTROL TUBING ASSEMBLY ...
Page 70: ...62 Parts Catalog 8 17 COOLING ASSEMBLY ...
Page 72: ...64 Parts Catalog 8 18 COOLING ASSEMBLY ATTACHMENT TO FRAME ...
Page 74: ...66 Parts Catalog 8 19 COOLING SYSTEM HOSES AND RECOVERY TANK INSTALLATION ...
Page 76: ...68 Parts Catalog 8 20 OIL FILTER AND DISCHARGE HOSE ASSEMBLY ...
Page 78: ...70 Parts Catalog 8 21 FUEL TANK ASSEMBLY ...
Page 80: ...72 Parts Catalog 8 22 INSTRUMENT PANEL ASSEMBLY ...
Page 82: ...74 Parts Catalog 8 23 CANOPY ASSEMBLY ...
Page 84: ...76 Parts Catalog 8 24 CANOPY INSTALLATION ...
Page 86: ...78 Parts Catalog 8 25 LIFTING BAIL ASSEMBLY ...
Page 88: ...80 Parts Catalog 8 26 FRONT CROSSMEMBER ASSEMBLY ...
Page 90: ...82 Parts Catalog 8 27 LIGHT PACKAGE ...
Page 92: ...84 Parts Catalog 8 28 FENDER INSTALLATION ...
Page 94: ...86 Parts Catalog 8 29 AXLE AND WHEEL ASSEMBLY ...
Page 98: ...NOTES ...
Page 99: ...NOTES ...

