background image


5


Downforce Overload System 

The Sander has the ability to monitor and maintain the preset Maximum Speed as user downforce increases or decreases 

during use. During periods of overly high user downforce, the Sander will flash the LED on the back of the tool from Green 

to Red and cause the motor to slow slightly as a warning to the user.Continuous downforce should be no greater than 

approximately 5Kg (11 lb.). If the user continues with overly high downforce, the Sander will change the LED to solid Red 

and stop. To restart the sander immediately, released the lever and pressed down again and continue sanding. Repeated 

overloading will result in frequent motor stops and increased tool temperature. 


Temperature Overheat System 

The Sander has the ability to monitor temperature of the internal electronic systems, and can shut the tool down when 

temperature reach damaging levels. During periods that result in high internal temperature, the Sander will shut down if the 

temperature reaches a damaging level. The Sander will not be able to be restarted until the internal temperature cools to a 

level safe for the electronic systems. Cooling time depends on local conditions. An initial waiting period of 5 minutes is 

recommended. Repeated overheating will result in longer cool down times. 


ATTACHING DISC PADS 

1.


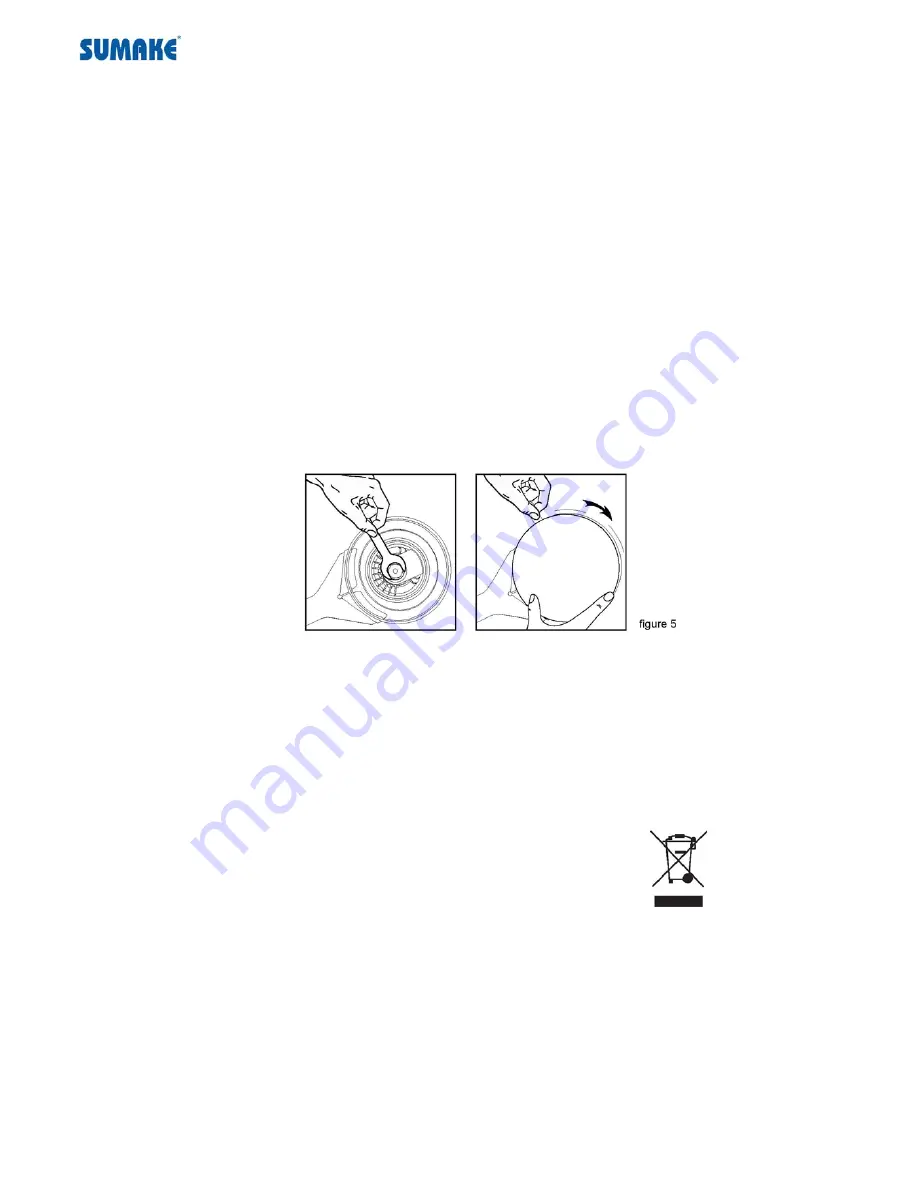
Secure the Spindle with the flat wrench provided with the tool, and screw the Disc pad on. Tighten to firm 

hand-tightness. Do not over tighten. 

2.


To remove the Disc Pad, insert the flat wrench between the Disc Pad and shroud. Secure the Spindle with the flat 

wrench and unscrew the Disc pad. - see figure 5. 


CLEANING 

1.


Periodically blow out all air passages and area above Disk Pad and under shroud with dry compressed air. All plastic 

parts should be cleaned with a soft damp cloth. NEVER use solvents to clean plastic parts. 

2.


Wear safety glasses while using compressed air. 


HEALTH AND SAFETY INFORMATION 

RoHS Compliant 

This product and the associated component parts are “RoHs Compliant” and do not contain any of the sub stances in 

excess of the maximum concentration values in EU Directive 2011/65/EU, as amended by Commission Decision 

2005/618/EC and other amendments issued as of the date code marked on the product. 


Waste Electrical & Electronic Equipment (WEEE) Compliant 


Do not dispose of electrical appliances as unsorted municipal waste, use separate collection facilities. 


Contact your local government for information regarding the collection systems available. 


If electrical appliances are disposed of in landfills or dumps, hazardous substances can leak into the groundwater and 

get into the food chain, damaging your health and well-being. 


When replacing old appliances with new ones, the retailer is legally obligated to take back your old appliance for 

disposal at least for free of charge 


Summary of Contents for ELSC-50H(V)

Page 1: ...AL VACUUM SANDER POLISHER W 5 6 HOOK VINYL PAD ITEM NO ELSC 50HM ELSC 60HM 2 IN 1 ELECTRIC CENTRAL VACUUM SANDER POLISHER W 5 6 MULTIHOLE HOOK VINYL PAD ITEM NO ELSN 50H V ELSN 60H V 2 IN 1 ELECTRIC NON VACUUM SANDER POLISHER W 5 6 HOOK VINYL PAD ELSC N B50 60 I 1604A X2 ...

Page 2: ...any way Do not use any adapter plugs with earthed grounded power tools Unmodifi ed plugs and matching outlets will reduce risk of electric shock b Avoid body contact with earthed or grounded surfaces such as pipes radiators ranges and refrigerators There is an increased risk of electric shock if your body is earthed or grounded c Do not expose power tools to rain or wet conditions Water entering a...

Page 3: ...ied repair person using only identical replacement parts This will ensure that the safety of the power tool is maintained WARNING To reduce the risks associated with impact from abrasive product disc pad or tool breakup sharp edges hazardous downforce rupture vibration and noise Only personnel who are properly trained should be allowed to service this tool If you notice any abnormal noise or vibra...

Page 4: ...and disc pad following the instructions to ensure that they are securely attached to the tool before use Never free spin the tool or otherwise allow it to be started unintentionally Never point this product in the direction of yourself or another person or start tool unintentionally Never over tighten accessory fasteners Specification Orbit Pad Size Free Speed Motor Hp Length Weight Model No Sande...

Page 5: ...n plate Press is to raise up to higher speed setting is to lower the speed setting see figure 3 4 Press the lever to start running the tool Release the Lever to stop the tool Power Cord H05RN F 1 0mm 3C MAXIMUM SPEED FUNCTION The Electric Random Orbital Sander has four preset Maximum Speeds 4 000 7 000 9 000 and 10 000 min RPM The Maximum Speed can be changed at any time while the Sander is runnin...

Page 6: ...SC PADS 1 Secure the Spindle with the flat wrench provided with the tool and screw the Disc pad on Tighten to firm hand tightness Do not over tighten 2 To remove the Disc Pad insert the flat wrench between the Disc Pad and shroud Secure the Spindle with the flat wrench and unscrew the Disc pad see figure 5 CLEANING 1 Periodically blow out all air passages and area above Disk Pad and under shroud w...

Page 7: ... if not installed and used in accordance with the instruction manual may cause harmful interference to radio communications Operation of this equipment in a residential area is likely to cause harmful interference in which case the user will be required to correct the interference at his own expense NOTICE Changes or modifications not expressly approved by the party responsible for compliance coul...

Reviews: