


E N G L I S H
Nome file:
File name:
LIBRETTO ISTRUZIONI - MGR10009 - Angolo relax.doc
Rev. 0 28/12/2010
Pagina 11-di 26
If taking drugs that induce drowsiness (i.e.: tranquillizers, antihistamines or anticoagulants), avoid swimming in heated
pools
.
Prolonged immersion in hot water may cause hyperthermia
4,
while immersion in cold water may cause hypothermia
5
, with symptoms such as: Dizziness,
fainting, drowsiness, lethargy
6
. Consequences of hyperthermia and hypothermia may be: Unawareness of imminent danger, lack of heat or cold perception,
failure to recognise the need to exit the
pool
, physical inability to exit the
pool
, damages to foetus for pregnant women, unconsciousness with consequent
drowning risks.
3. Product presentation.
3.1. Product scope.
The product was designed to be able to transform your
pool
into a
"spa" pool
. It is easily adaptable to all
pools
.
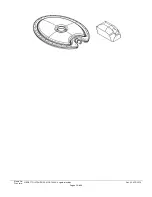
3.2. Composition.
See
Fig. 3
.
#
#
1
Air hose (
hydraulic component
)
from the
blower
to the
check valve
(length X [m])
7
Check valve
2
Hose clamp
8
Air hose support
3
Bayonet connector
9
Air flow plug
4
Bayonet adapter
10
Air diffuser
5
O-ring
11
Air hose (
hydraulic component
)
from the
check valve
to the air diffuser
(length X [m])
6
Blower
12
Pool
(not supplied with the product)
Tab. 3.
4. Technical specifications and features.
See Tab. 1 in
Fig. 1
.
5. Installation.
5.1. Necessary tools.
See
Fig. 4
.
5.2. Storage features and conditions.
Store the product in a dry place and keep away from the elements.
Storage temperature: -20 [°C] to +40 [°C].
5.3. Transport.
The product is delivered suitably protected against transport damages. However, handle with care to avoid damages.
5.4. Handling.
Be careful when handling the product (air diffuser –
Fig. 3
, # 10 - full of sand) since extremely heavy.
5.5. Positioning.
The product (
blower,
Fig. 3
, # 10)
must
always be at least 3,5 [m] from the edge of the
pool
(
Fig. 5
), and out of the
pool
.
The product (air diffuser,
Fig. 3
, # 10) must be placed on the bottom of the
pool
.
Considering the following aspects is recommended:
•
Dimensions and position of
hydraulic components
.
•
Necessary clearance.
•
Power cord position (
blower
).
•
Location of the power supply (
electrical socket
).
•
Support and its location.
Make sure the product is positioned in a place where noise generated during normal operations does not create disturbances.
Position the product is a shady area to avoid overheating the
blower
.
5.6. Connections and start-up.
The product must be installed and operated by individuals with appropriate training.
The electrical system must meet current international and/or national regulations.
The product must be connected to an
power outlet
equipped with a
residual current device
with sensitivity over 30 [mA]. Before starting the product make
sure this device is installed in your electrical system. Contact a technician if necessary.
Make sure the product complies with your electrical system.
The
power outlet
must be at a suitable distance from the water but easily accessible in order to be able to easily turn off the product in the event of fault.
Cutting the power cord and/or replacing the
power plug
is strictly prohibited.
The power cord must be positioned to avoid possible damages such as bends and/or cuts.
5.6.1. Filling the air diffuser.
Proceed as follows:
1. Fill the air diffuser (
Fig. 3
, # 10) with sand (not included, about 13.5 [kg]), as illustrated in
Fig. 6.
2. Submerge the air diffuser under the water surface and drain air.
3. Keeping the diffuser submerged, close with plugs (
Fig. 3
, # 9).
5.6.2. Hose connection.
Proceed as follows:
1. Place the o-ring (
Fig. 3
, # 5) on the
blower
air outlet (
Fig. 3
, # 6).
2. Screw in the bayonet adapter (
Fig. 3
, # 4) on the
blower
air outlet (
Fig. 3
, # 6).
3. Connect the bayonet connector (
Fig. 3
, # 3) to the air hose (
Fig. 3
, # 1) and secure it with the hose clamp (
Fig. 3
, # 2).
4. Place the air hose (
Fig. 3
, # 1) in the air hose support (
Fig. 3
, # 8) as indicated in
Fig. 7
.
5. Connect the air hose (
Fig. 3
, # 1) to the
check valve
(
Fig. 3
, # 7) and secure it with the hose clamp (
Fig. 3
, # 2), making sure it permits air flow in the correct
direction,
Fig. 8
.
6. Connect the air hose (
Fig. 3
, # 11) to the
check valve
(
Fig. 3
, # 7) and secure it with the hose clamp (
Fig. 3
, # 2).
7. Connect the air hose (
Fig. 3
, # 11) to the air diffuser (
Fig. 3
, # 10) and secure it with the hose clamp (
Fig. 3
, # 2), see
Fig. 10
.
8. Position the air hose as indicated in
Fig. 9
.
9. Position the air diffuser inside the
pool
(
Fig. 3
, # 12).
The
check valves
should be placed outside the
pool
and over the water level (
Fig. 2)
.
4
Increase in body temperature over physiological limits, maximum limit 37 [°C].
5
Decrease in body temperature over physiological limits, minimum limit 35 [°C].
6
State of inactivity or lack of reactivity that nears unconsciousness.


