background image


overloading  house  wiring  circuits  that  could  cause  a  fire  hazard  from  overheating.  Never  unplug  the 
appliance  by  pulling  on  the  power  cord.    Always  grip  the  plug  firmly  and  pull  straight  out  from  the 
receptacle.  Repair  or  replace  immediately  all  power  cords  that  have  become  frayed  or  otherwise 
damaged.  Do  not  use  a  cord  that  shows  cracks  or  abrasion  damage  along  its  length  or  at  either  end. 
When moving the appliance, be careful not to damage the power cord. 
 

EXTENSION CORD 

Because of potential safety hazards under certain conditions, it is strongly recommended that you do not 
use an extension cord with this appliance. However, if you must use an extension cord, it is absolutely 
necessary that it be a UL/CUL-Listed, 3-wire grounding type appliance extension cord having a grounding 
type plug and outlet and that the electrical rating of the cord be 115 volts and at least 10 amperes. 
 

REVERSING THE DOOR SWING OF YOUR APPLIANCE (ONLY for ACR612) 

This unit has the capability of the door opening from either the left or right side.  The unit is delivered to 
you with the door opening from the left side.  Should you desire to reverse the opening direction, please 
follow the reversal instructions shown below. 


NOTE:

 All parts removed must be saved to allow the door swing to be reversed. 

 
1.  Remove the bottom hinge 

2

 by unscrewing the four lock screws 

1

. Be careful to hold the door firmly 

after removing the screws. (Fig. 1) 
 

2.  Gently  pull  down  to  remove  the  door  from  the  right  top  hinge  and  place  it  on  a  padded  surface  to 

avoid the risk of damage. Then remove the right top hinge 

7

. (Fig. 2 & 3) 


3.  Unscrew and transfer pins 

4

 and 

of the hinge plate to the opposite side. (Fig. 1) 

 
4.  Pop out the cover caps on the left side of cabinet and use them to 

cover the screw holes on the right 

hand side.


5.  Screw the alternative left top hinge 

8

, included in the fittings, 

on the left hand side of cabinet. (Fig. 3)


6.  Relocate  the  door  to  the  designated  position.  Then  screw  the  bottom  hinge  assembly  on  the  left 

designated position and tighten it after the door is leveled. (Fig. 1) 


7.  Remove the handle from the left side of the door and install it on the right side. (

See next section

.) 


Summary of Contents for Accucold ACR1151

Page 1: ...151 ACR1403 INSTRUCTION MANUAL BEFORE USE PLEASE READ AND FOLLOW ALL SAFETY RULES AND OPERATING INSTRUCTIONS Write Model and Serial Nos on lower left corner of inside cabinet here Model No ___________...

Page 2: ...sion Cord 8 Reversing the Door Swing of Your Appliance 8 Installing the Stainless Steel Handle 9 Operating Your Appliance 9 11 Control Panel 9 10 Sabbath Mode 10 Temperature Memory Function 10 Defrost...

Page 3: ...let do not remove grounding prong do not use an adapter and do not use an extension cord Replace all panels before operating It is recommended that a separate circuit serving only your appliance be pr...

Page 4: ...liance should not be located next to ovens grills or other sources of high heat The appliance must be installed with all electrical water and drain connections in accordance with state and local codes...

Page 5: ...ACR612 Door Shelves 3 Handle Security Lock Ventilation Grille Adjustable Legs Digital Control Panel Cabinet MODEL ACR1151 Door Shelves 6 Handle Security Lock Ventilation Grille Adjustable Legs Cabine...

Page 6: ...andle Security Lock Ventilation Grille Adjustable Legs Cabinet Digital Control Panel Note This appliance may be used for the storage of medicine and other medical products It features a hospital grade...

Page 7: ...l fall below 44 F 7 C For best performance do not install the appliance behind a cabinet door or block the base grille Avoid locating the unit in moist areas Plug the appliance into an exclusive prope...

Page 8: ...of the door opening from either the left or right side The unit is delivered to you with the door opening from the left side Should you desire to reverse the opening direction please follow the rever...

Page 9: ...ambient temperature is above or below the recommended temperatures the performance of the unit may be affected For example placing your unit in extremely cold or hot conditions may cause interior temp...

Page 10: ...cooling operations will still take place To initiate Sabbath mode press the POWER and LIGHT keys at the same time for at least 5 seconds The indicator light will flash four times and confirm that the...

Page 11: ...han 60 seconds the alarm will sound Pressing the Power key once can switch off the audible alarm DOOR LOCK Your unit is provided with a lock and key combination The keys are located inside the plastic...

Page 12: ...If the appliance will not be used for several months remove all items and turn off the appliance Clean and dry the interior thoroughly To prevent odor and mold growth leave the door open slightly blo...

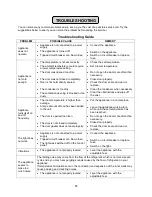
Page 13: ...iance turns itself on and off frequently The room temperature is higher than average A large amount of food has been added to the unit The door is opened too often The door is not closed completely Th...

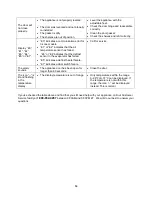
Page 14: ...the defrost sensor in the evaporator has failed E5 indicates a defrost heater failure E7 indicates a door switch failure Call for service The alarm sounds The appliance door has been open for longer t...

Page 15: ...15 NOTES...

Page 16: ...ts not approved by warrantor 4 Replacement parts or repair labor costs for units operated outside the United States 5 Repairs to parts or systems resulting from unauthorized modifications made to the...

Reviews: