background image


Your refrigerator contains 6 polycarbonate plastic shelves and 24 shelf clips. 

INSTALLING SHELVES 

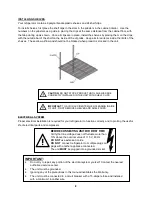
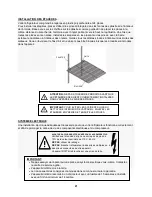
To install shelves, first place the shelf clips in the slots in the pilasters in the cabinet interior.  Use the 
numbers on the pilasters as a guide in placing the clips at the same distance from the cabinet floor, with 
the tab pointing up as shown.  Once all clips are in place, install the shelves by placing them on the clips, 
with the outside bar of the shelf on the inside of the clip tabs.  Keep all stored items inside the limits of the 
shelves.  These allow airflow and should not be blocked when product is stocked in the unit. 


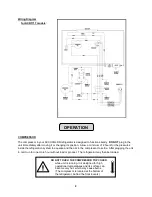
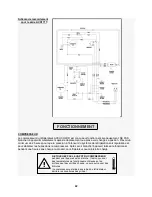
Proper electrical installation is required for your refrigerator to function correctly and to prolong the useful 
life of electrical parts and compressor. 

ELECTRICAL SYSTEM 


CAUTION:

 DO NOT STOCK PRODUCT UNTIL SHELVES ARE 

CORRECTLY INSTALLED IN THE UNIT WITH SHELF CLIPS. 

IMPORTANT:

 TO AVOID ACCIDENTS WHEN CLEANING INSIDE 

OF UNIT, FIRST REMOVE SHELVES AND SHELF CLIPS. 

BEFORE CONNECTING UNIT FOR FIRST TIME: 

Verify that line voltage does not fluctuate more than 
10% above the nominal value of 115 V, 60 Hz. 

DO NOT 

use extension cords. 

DO NOT 

connect refrigerator to multiple plugs or 

plugs with another appliance connected. 
The unit 

MUST

 be plugged into a grounded socket. 

IMPORTANT: 


Do not try to repair any portion of the electrical system yourself.  Contact the nearest 
authorized service center. 


The unit must be grounded. 


Ignoring any of the precautions in this manual invalidates the Warranty. 


The unit must be connected to a circuit breaker with a 15-ampere fuse and installed 
with a minimum 14-caliber wire. 


Summary of Contents for Accucold ACR1717 Series

Page 1: ...UILLEZ S IL VOUS PLA T LIRE ET SUIVRE TOUTES LES R GLES DE S CURIT ET LES INSTRUCTIONS DE FONCTIONNEMENT FELIX STORCH INC Summit Appliance Division 770 Garrison Avenue Bronx NY 10474 www summitapplian...

Page 2: ...Shelves 8 Electrical System 8 9 Operation 9 10 Compressor 9 Temperature Control 10 Alarm Settings 10 Energy Saving Mode Lighting 10 User Maintenance 11 12 Cabinet Cleaning 11 Condenser Cleaning 11 Car...

Page 3: ...SAFEGUARDS Before the appliance is used it must be properly positioned and installed as described in this manual so read the manual carefully To reduce the risk of fire electrical shock or injury whe...

Page 4: ...in this refrigerator This equipment is intended for the storage and display of vaccines pharmaceuticals and other specimens requiring refrigeration at precise temperatures Do not kink or pinch the po...

Page 5: ...KEEP HANDS AWAY from door pivot when door is open Before loading refrigerator CHECK that shelves are fixed and have the number of supports indicated for your model in the Instruction Manual CHECK tha...

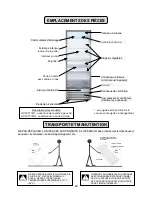
Page 6: ...ht switch Handle Internal fan DO NOT TIP UNIT AT MORE THAN A 45 ANGLE DO NOT EXPOSE TO SUNLIGHT OR STORE AT TEMPERATURES HIGHER THAN 131 F 55 C WHEN HANDLING STATIC CONDENSER MODELS SUCH AS THIS MAKE...

Page 7: ...etc and do not place in areas where direct sunlight may reach the unit It is recommended that the rear portion and both sides of your refrigerator be at least 8 inches and 6 inches from the wall respe...

Page 8: ...and to prolong the useful life of electrical parts and compressor ELECTRICAL SYSTEM CAUTION DO NOT STOCK PRODUCT UNTIL SHELVES ARE CORRECTLY INSTALLED IN THE UNIT WITH SHELF CLIPS IMPORTANT TO AVOID...

Page 9: ...e refrigeration system to equalize and the oils in the compressor to settle After plugging the unit in let it run for one more hour without load or product The refrigerator may then be loaded COMPRESS...

Page 10: ...ge these settings call our Customer Service Line at 1 800 932 4267 ALARM SETTINGS An alarm will also sound if the door is left open for more than 2 minutes To stop an alarm when it is sounding press t...

Page 11: ...then dry them Wring excess water out of the sponge or cloth when cleaning the area where the controls are located or any electrical parts Clean the outside of the unit with an approved stainless steel...

Page 12: ...inside the plastic bag that contains the Instruction Manual After a key has been used remove it and put it in a secure place for safekeeping SECURITY LOCK DO NOT DISCONNECT UNIT AT NIGHT Not only will...

Page 13: ...et does not seal properly Condenser needs cleaning The light does not work Not plugged in Tripped circuit breaker or blown fuse The light switch is OFF Ice forms on evaporator High relative humidity i...

Page 14: ...approved by warrantor 4 Replacement parts or repair labor costs for units operated outside the United States 5 Repairs to parts or systems resulting from unauthorized modifications made to the applian...

Page 15: ...20 Installation des tag res 21 Syst me lectrique 21 22 Fonctionnement 22 23 Compresseur 22 Contr le de la temp rature 23 Mode d conomie d nergie 23 clairage 23 Entretien par l utilisateur 24 26 Netto...

Page 16: ...e de choc lectrique ou de blessure lors de l utilisation de l appareil suivrez les pr cautions de base y compris ce qui suit Branchez sur une prise 3 broches de sortie ne retirez pas la broche de terr...

Page 17: ...et l affichage des vaccins des m dicaments et d autres sp cimens qui doivent tre r frig r s des temp ratures pr cises Ne pas plier ou pincer le cordon d alimentation de l appareil L intensit du fusib...

Page 18: ...es mains loign es du pivot de la porte lorsque la porte est ouverte Avant de charger le r frig rateur v rifiez que les tag res soient fixes et qu elles contiennent le nombre de supports indiqu s pour...

Page 19: ...appareil Compresseur et ventilateur derri re les panneaux Int rieur en inox NE PAS PENCHER L UNIT UN ANGLE DE PLUS DE 45 NE PAS EXPOSER AU SOLEIL NE PAS STOCKER DES TEMP RATURES SUP RIEURES 131 F 55...

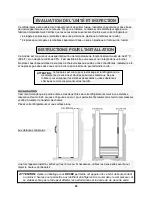
Page 20: ...des zones o la lumi re du soleil directe peut atteindre l unit Il est recommand que la partie arri re et les deux c t s de votre r frig rateur soient une distance respective d au moins 8 pouces et 6...

Page 21: ...nt et afin de prolonger la dur e de vie des composants lectriques et du compresseur SYST ME LECTRIQUE PILASTRE TAG RE ATTENTION NE PAS STOCKER DE PRODUITS AVANT QUE LES TAG RES NE SOIENT CORRECTEMENT...

Page 22: ...r frig ration soit r gularis e et pour stabiliser les huiles dans le compresseur Apr s avoir branch l appareil laissez le fonctionner pendant une heure sans charge ou produit Le r frig rateur peut alo...

Page 23: ...ce la client le au 1 800 932 4267 entre 9h00 17h00 heure de l Est Pour conomiser de l nergie en limitant la dur e du temps de fonctionnement des moteurs de ventilateur et du compresseur et en teignant...

Page 24: ...puis s chez les Essorez l ponge ou du chiffon pour nettoyer la zone o les commandes et les pi ces lectriques sont situ es Nettoyez l ext rieur de l appareil avec un produit approuv pour le nettoyage...

Page 25: ...st me air puls D GIVRAGE Il y a un bac d vaporation d eau pour le d givrage situ dans le compartiment au dessous de l armoire principale Une conduite de gaz chaud du compresseur passe travers ce bac e...

Page 26: ...oquer la circulation de l air l int rieur du r frig rateur Rappelez vous qu il est con u exclusivement pour le refroidissement des vaccins les produits pharmaceutiques et d autres sp cimens m dicaux L...

Page 27: ...ur doit tre nettoy La lumi re ne fonctionne pas L appareil n est pas branch Probl me avec le disjoncteur ou fusible grill Le commutateur d clairage est teint De la glace se forme sur l vaporateur Humi...

Page 28: ...areils utilis s hors des tats Unis 5 Les r parations aux pi ces ou syst mes r sultant de modifications non autoris es apport es l appareil 6 Les frais de d placement et de transport pour le service pr...

Reviews: