background image


Improper use of the grounded plug can result in the risk of electrical shock. If the power 
cord is damaged, have it replaced by the manufacturer, its service agent or similarly 
qualified persons in order to avoid a hazard. 


Plug the unit into an exclusive, properly installed and grounded wall outlet. Do not 
under any circumstances cut or remove the third (ground) prong from the power cord. 
Any questions concerning power and/or grounding should be directed toward a 
certified electrician or authorized service center. 


Electrical Connection: 


This unit should be properly grounded for your safety. The power cord of this unit is 
equipped with a three-prong plug which mates with a standard three-prong wall outlet to 
minimize the possibility of electrical shock. 

Do not under any circumstances cut or remove the third ground prong from the power 
cord supplied. For personal safety, this appliance must be properly grounded. 

This unit requires a standard 115-volt AC/60Hz electrical outlet with three-prong ground. 
Have the wall outlet and circuit checked by a qualified electrician to make sure the outlet 
is properly grounded. When a standard 2-prong wall outlet is encountered, it is your 
responsibility and obligation to have it replaced with a properly grounded 3-prong wall 
outlet. 

To prevent accidental injury, the cord should be secured behind the unit and not left 
exposed or dangling. 

The unit should always be plugged into its own individual electrical outlet which has a 
voltage rating that matches the rating label on the appliance. This provides the best 
performance and also prevents overloading house wiring circuits that could cause a fire 
hazard from overheated wires. Never unplug the unit by pulling on the power cord. 
Always grip the plug firmly and pull straight out from the receptacle. Repair or replace 
immediately any power cord that has become frayed or otherwise damaged. Do not use 
a cord that shows cracks or abrasion damage along its length or at either end. When 
moving the unit, be careful not to damage the power cord. 


Extension Cord: 

Do not use an extension cord with this appliance. If the power cord is too short, have a 
qualified electrician or service technician install an outlet near the appliance.


Reversing the Door Swing: 

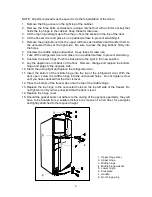
If you find the direction of opening the doors of the appliance inconvenient, you can 
change it.  Holes on the opposite side have already been prepared at the factory. 

This appliance can be opened from either the right side or the left. By default, the door 
hinges are on the right side. If you prefer them on the left, please follow these 
instructions and refer to the illustration on the following page. 

Summary of Contents for Accucold CP133

Page 1: ...IGERATOR FREEZER with MANUAL DEFROST FREEZER COMPARTMENT CYCLE DEFROST REFRIGERATOR COMPARTMENT Model No CP133 M405 CM411L Instruction Manual BEFORE USE PLEASE READ AND FOLLOW ALL SAFETY RULES AND OPERATING INSTRUCTIONS FELIX STORCH INC 770 Garrison Avenue Bronx NY 10474 www summitappliance com ...

Page 2: ...reduce the risk of fire electrical shock or injury when using the appliance follow basic precautions including the following Plug into a grounded 3 prong outlet Do not remove grounding prong do not use an adapter and do not use an extension cord It is recommended that a separate circuit serving only your appliance be provided Use receptacles that cannot be turned off by a switch or pull chain Neve...

Page 3: ...ance to be leveled in order to work properly You may need to make several adjustments to level it Never allow children to operate play with or crawl inside the appliance Do not use solvent based cleaning agents or abrasives on the interior These cleaners may damage or discolor the interior Do not use this apparatus for other than its intended purpose Risk of child entrapment Child entrapment and s...

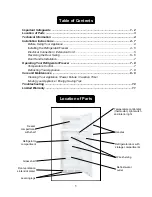
Page 4: ...r Freezer 7 8 Temperature Control 7 Defrosting Your Appliance 7 8 Care and Maintenance 8 9 Cleaning Your Appliance Power Failure Vacation Time Moving your Appliance Energy Saving Tips Troubleshooting 10 Limited Warranty 11 Location of Parts Temperature control dial thermostat light switch and interior light Refrigerator door with storage compartments Front ventilation slots kick plate Leveling leg...

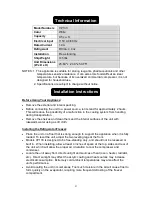
Page 5: ...ing transportation Remove the shelves and clean them and the interior surfaces of the unit with lukewarm water using a soft cloth Installing the Refrigerator Freezer Place the unit on a floor that is strong enough to support the appliance when it is fully loaded To level the unit adjust the two leveling legs at the front Models CP133 is designed to be free standing only and should not be recessed ...

Page 6: ...t replaced with a properly grounded 3 prong wall outlet To prevent accidental injury the cord should be secured behind the unit and not left exposed or dangling The unit should always be plugged into its own individual electrical outlet which has a voltage rating that matches the rating label on the appliance This provides the best performance and also prevents overloading house wiring circuits th...

Page 7: ...k plate to the right in the new position 9 Lay the appliance on its back on the floor Remove change and replace the bottom hinge and plugs to the opposite side 10 Stand the unit upright and replace the refrigerator door 11 Insert the bottom of the middle hinge into the top of the refrigerator door With the door open screw the middle hinge into the uncovered holes Do not tighten screw until you hav...

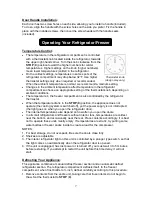
Page 8: ...0 position the appliance does not operate the cooling system is switched off yet the power supply is not interrupted the light goes on when you open the refrigerator door The internal temperatures also depend on how often you open the doors In all small refrigerators and freezers without interior fans temperatures are coldest near the bottom and occasionally near the rear Place contents accordingl...

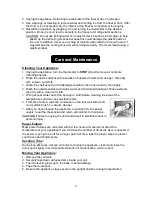
Page 9: ... the outside cabinet with warm water and mild liquid detergent Rinse well and wipe dry with a clean soft cloth 5 Wring excess water out of the sponge or cloth before cleaning the area of the temperature control or any electrical parts 6 From time to time wipe the condenser on the rear wall with a soft non metallic brush or vacuum cleaner 7 After you have cleaned the appliance reconnect it to the p...

Page 10: ...close it as soon as possible Occasionally check if the appliance is sufficiently ventilated adequate air circulation behind the appliance Set the thermostat from higher to lower settings as soon as possible depends on how loaded the appliance is ambient temperature etc Before loading items into the unit be sure they have cooled to ambient temperature A layer of frost and ice increases energy consu...

Page 11: ...uate air circulation behind the appliance and wipe the dust from the condenser Noise Cooling in refrigeration appliances is enabled by the refrigerating system with compressor which produces noise How noisy the appliance is depends on where it is placed how it is used and how old the appliance is During the operation of the compressor the noise of liquid is heard and when the compressor is not ope...

Page 12: ... approved by warrantor 4 Replacement parts or repair labor costs for units operated outside the United States 5 Repairs to parts or systems resulting from unauthorized modifications made to the appliance 6 Expenses for travel and transportation for product service in remote locations 7 The removal and reinstallation of your appliance if it is installed in an inaccessible location or is not install...

Reviews: