background image


For models FF6WBI, FF6LWBI, FF7LWBI, FF7LBLKBI, SCR600GLBI and 
SCR600BGLBI: 

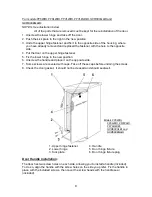
NOTES: See illustration below.  
               All of the parts that are removed must be kept for the reinstallation of the door. 

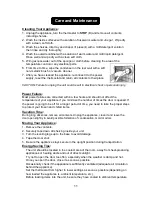
1.  Unscrew the lower hinge and take off the door. 

2.  Push the kick plate to the right in the new position. 

3.  Undo the upper hinge fastener and fix it to the opposite side of the housing, where 

you have already removed and replaced the fastener with the hole to the opposite 
side. 

4.  Put the door on the upper hinge fastener. 

5.  Fix the lower hinge in the new position. 

6.  Unscrew the handle and place it on the opposite side. 

7.  Some screws are covered with caps. Take off these caps before undoing the screws. 

8.  Check the door gasket.  It should not be creased and should seal well. 


1. Upper hinge fastener  

4. Handle 


2. Lower hinge  

5. Door hinge fixture 


3. Kick plate  

6. Door hinge fixture plug 


Door Handle Installation: 

The door has two screw holes on each side, allowing you to install a handle (included). 
To do so, align the handle with the screw holes on the side you prefer. Fix the handle in 
place with the included screws, then cover the screw heads with the handle seal 
(included). 


Models FF6WBI, 

FF6LWBI, FF7WLBI, 
FF7LBLKBI, 
SCR600GLBI and 
SCR600BGLBI 

Summary of Contents for accucold AL75 Series

Page 1: ...ls Mod les FF6WBI series ACCUCOLD FF7WBI AL75 series ACCUCOLD SCR600GLBI series ACCUCOLD SCR600BGLBI series SUMMIT Commercial CM411L Instruction Manual Mode d emploi BEFORE USE PLEASE READ AND FOLLOW...

Page 2: ...duce the risk of fire electrical shock or injury when using the appliance follow basic precautions including the following Plug into a grounded 3 prong outlet Do not remove grounding prong do not use...

Page 3: ...o operate play with or crawl inside the refrigerator Do not use solvent based cleaning agents or abrasives on the interior These cleaners may damage or discolor the interior Do not use this apparatus...

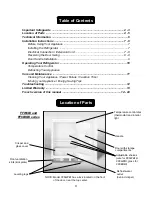
Page 4: ...tenance 11 Cleaning Your Appliance Power Failure Vacation Time Moving your Appliance Energy Saving Tips Troubleshooting 12 Limited Warranty 13 French version of this manual 14 28 Location of Parts Tem...

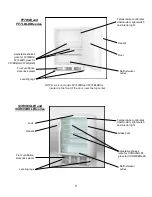
Page 5: ...water outlet NOTE Lock on models FF7LWBI and FF7LBLKBI is located on the front of the door near the top center Handle FF7WBI and FF7LBLKBI series Temperature control dial thermostat light switch and...

Page 6: ...Electrical Input 115V AC 60Hz Rated Current FF6WBI FF6LWBI FF6BKBI 1 4A FF7WBI FF7LWBI FF7BKBI 1 4A SCR600GLBI SCR600BGLBI 1 8A Refrigerant FF6WBI FF6LWBI FF6BKBI R600a 0 64oz FF7WBI FF7LWBI FF7BKBI...

Page 7: ...Even when built in the unit requires at least 2 of clearance at the back 1 8 3mm at both sides and 1 16 1 6mm at the top Take care that the air vents at the front of the appliance are never covered o...

Page 8: ...t have a qualified electrician or service technician install an outlet near the appliance Reversing the Door Swing select models only If you find the direction of opening the door of the appliance inc...

Page 9: ...ix the lower hinge in the new position 6 Unscrew the handle and place it on the opposite side 7 Some screws are covered with caps Take off these caps before undoing the screws 8 Check the door gasket...

Page 10: ...he compressor NOTES 1 Shelves are adjustable Certain models include glass shelves see Technical Information page 5 These shelves stop short an inch before the back wall which is essential for air flow...

Page 11: ...our appliance if you minimize the number of times the door is opened If the power is going to be off for a longer period of time you need to take the proper steps to protect your frozen and chilled it...

Page 12: ...air circulation behind the appliance and wipe the dust from the condenser Noise Cooling in refrigeration appliances is enabled by the refrigerating system with a compressor which produces noise How n...

Page 13: ...teration misuse abuse fire flood acts of God improper installation installation not in accordance with electrical or plumbing codes or use of products not approved by warrantor 4 Replacement parts or...

Page 14: ...e l appareil La taille du fusible ou disjoncteur doit tre de 15 amp res Ne pas utiliser une rallonge Veiller ne pas brancher dans les prises contr l es par des interrupteurs muraux Le r frig rateur do...

Page 15: ...le contenu de se g ter Si le service doit tre interrompu pendant plus de 24 heures retirer le contenu et stocker dans un casier r frig r ou autre r frig rateur DANGER Risque de pi geage d enfants Les...

Page 16: ...4 Entretien et maintenance 24 25 Nettoyage de votre appareil Panne de courant Vacances 24 D placement de votre appareil Conseil d conomie d nergie 25 D pannage 26 Garantie limit e 28 Emplacement des p...

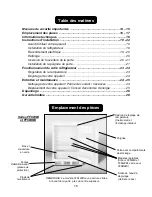
Page 17: ...erre pour FF7BKBI et FF7LBLKBI Sortie de l eau de d givrage NOTE La serrure des mod les FF7LWBI et FF7LBLKBI est situ e sur la face de la porte proximit de la partie centrale sup rieure Poign e Cadran...

Page 18: ...156 litres Entr e lectrique 115V CA 60Hz Amp rage FF6WBI FF6LWBI FF6BKBI 1 4A FF7WBI FF7LWBI FF7BKBI 1 4A SCR600GLBI SCR600BGLBI 1 8A R frig rant FF6WBI FF6LWBI FF6BKBI R600a 0 64oz 1 81g FF7WBI FF7L...

Page 19: ...oins 2 51mm d espace sur les c t s en haut et l arri re de l appareil pour permettre une bonne circulation d air pour refroidir le compresseur et le condenseur M me quand int gr l appareil n cessite a...

Page 20: ...tique de l appareil Cette offre les meilleures performances et emp che aussi la surcharge des circuits de c blage qui pourrait provoquer un risque d incendie par surchauffe des fils Ne d branchez jam...

Page 21: ...hons d coratifs 6 D placez la charni re inf rieure sur le c t oppos et serrer les vis Utilisez des rondelles de blocage et les crous s ils ont t install s dans l installation d origine 7 Replacez la p...

Page 22: ...elle position 6 D vissez la poign e et placez la sur le c t oppos 7 Certaines vis sont couvertes avec des capuchons Enlevez ces capuchons avant de d monter les vis 8 V rifiez le joint de la porte Il n...

Page 23: ...la lumi re fonctionne toujours La temp rature l int rieur du r frig rateur d pend aussi de combien de fois vous ouvrez la porte Dans tous les petits r frig rateurs sans ventilateur int rieur les temp...

Page 24: ...les tag res et bac si pr sent avec une solution de d tergent doux puis rincer et s cher soigneusement 4 Lavez l ext rieur avec une solution d eau chaude et un d tergent liquide doux Rincez bien et s...

Page 25: ...es appareils produisant de la chaleur ou des conduits de chauffage et des rayons du soleil Essayez de ne pas ouvrir la porte trop souvent surtout quand le temps est humide et chaud Une fois que vous o...

Page 26: ...circulation d air suffisante derri re l appareil et essuyer la poussi re du condenseur Bruit Refroidissement dans les appareils de r frig ration est activ par le syst me de r frig ration comportant un...

Page 27: ...27 Notes...
Page 28: ...llation une installation non conforme aux codes d lectricit ou de plomberie ou l utilisation de produits non approuv s par le garant 4 Les pi ces de rechange ou les frais de r paration pour les appare...

Reviews: