


6
7
7
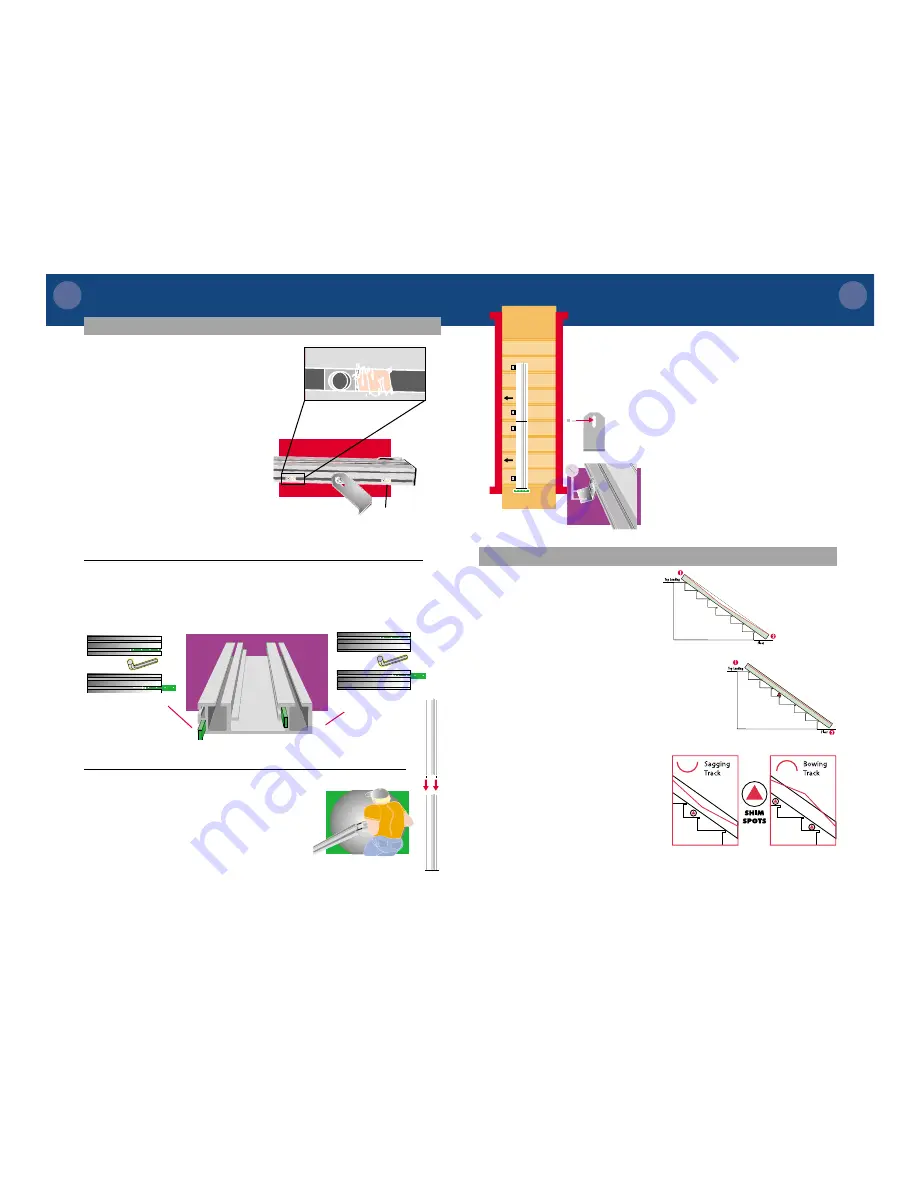
Track brackets attach to the wall
side of the track. Use the track
bracket bolts to fasten brackets to
nuts in the track channel.
Position track brackets as follows:
a) 1 bracket on bottom step
b) 1 bracket on top step
c) 1 bracket above and below
where the tracks splice together
d) Position remaining brackets
every 2 - 3 steps
Hand tighten the bolts only - the
brackets will need to slide for
correct positioning.
do not remove foam
packing
NOTE: do not attach
a bracket on the
bottom nut - it will
be used later.
I N S T A L L I N G
T H E
L O W E R
T R A C K S
8
Splice bars are used to join the track sections together. Locate the splice
bars and loosen the set screws from their shipping position. Slide the
splice bars to half way and tighten the two set screws remaining in the
track to hold them in place.
The tracks will not slide together if the set
screws protrude beyond the splice bar.
ALLEN WRENCH
ALLEN WRENCH
detail of track section
showing position of splice bars
wall-side splice bar
stair-side splice bar
9
Slide the upper track section onto the lower
track section. Tighten the splice bar set screws
to lock tracks together.
CAUTION:
Do not put your fingers between the
track sections at any time as injury could occur.
10
Slide the track and brackets against the wall or molding.
Temporarily set a book or item under the bottom of the
track to raise it 1/2” – 3/4” off the bottom landing.
This
will prevent the track from hitting the floor later when the
track brackets are tightened.
11
With bracket resting on step, position track bolt
in upper half of track bracket slot.
12
Starting with the bottom step, screw the bracket
half-way down – remove book – and finish
securely attaching bracket to the step.
13
Securely tighten remaining track
brackets to the steps using provided wood
screws.
C
H
E
C
K
I
N
G
T
H
E
T
R
A
C
K
1
Track is designed to lay directly on
the step noses. This is especially
critical on the first and last steps.
Shimming under the track may be
required to support the rail if it is not
supported by the steps.
2
Pull a piece of string taut from the
top of the track to the bottom. Mark
any places where the string is not
parallel with the track. These areas
may need shimming. Check the results
by using the string again. Track and
string should now be parallel.
The wall-side of the track may be
pulled down further than the stair-
side of the track on steps with thick
carpeting/pad.
Final track adjust-
ment should occur after the unit is
installed.
The track should still move vertically
in the bracket slots for final adjust-
ment.
Ilus1. - Track shown
with sagging area
due to “short” step
Ilus2. -
Track after
shim in
place.


