background image

13

USA

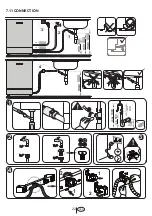
7.1.2 WATER SUPPLY CONNECTION

Water supply may be connected to the 

dishwasher in one of two ways:

•  With metal braided hose.

•  With copper tubing.

 CAUTION

•  Hot water supply line: Use minimum 3/8” 

O.D. copper tubing or metal braided 

dishwasher supply line.

•  Temperatures required for soldering and 

sweating will damage the dishwasher’s 

water inlet valve so if any such operation 

is needed, keep the heat source 

min. 77/8” (200mm) away from the 

dishwasher’s water inlet valve.

•  There should not be any sharp bends in 

the water line that may restrict the water 

flow.

•  Teflon tape or pipe tread compound 

must be used for sealing the connection. 

Before connecting the copper water 

supply line to the dishwasher, flush it with 

hot water to clear any foreign material.

 NOTICE :

After connections are made turn on the 

water supply to check for leaks.

7.1.3 ELECTRICAL CONNECTION

 WARNING

•  Make sure the voltage and frequency 

listed on the data plate correspond with 

the household electrical supply. This data 

must correspond to prevent injury and 

machine damage. Consult a qualified 

electrician if in doubt.

•  Only connect the dishwasher to the 

mains when all installation and plumbing 

work is complete.

•  Do not use any extension cord or 

portable outlet device to connect the 

dishwasher to a power supply.

•  The power-supply receptacle for the 

appliance shall be installed in a cabinet 

or on a wall adjacent to the undercounter 

space in which the appliance is to be 

installed.

•  The access hole of the supply cord to the 

installation compartment must be smooth 

and rounded and it must be large enough 

for the attachment plug to pass through. 

The longest dimension of the opening 

shall not be more than 1,5” (38 mm).If the 

partition is metal, it needs to be covered 

with an edge protector.

•  Care must be taken when the appliance 

is installed or removed, to reduce the 

likelihood of damage to the power-supply 

cord.

7.1.4 GROUNDING INSTRUCTIONS 

This appliance must be grounded. In the 

event of a malfunction or breakdown, 

grounding will reduce the risk of electric 

shock by providing a path of least 

resistance for electric current. This 

appliance is equipped with a cord having 

an equipment-grounding conductor and a 

grounding plug. The plug must be plugged 

into an appropriate outlet that is installed 

and grounded in accordance with all local 

codes and ordinances. This appliance 

must be connected to a grounded metal, 

permanent wiring system, or an equipment-

grounding conductor must be run with the 

circuit conductors and connected to the 

equipment-grounding terminal or lead on 

the appliance.

 WARNING

Improper connection of the equipment-

grounding conductor can result in a risk 

of electric shock. Check with a qualified 

electrician or service representative if 

you are in doubt whether the appliance is 

properly grounded. Do not modify the plug 

provided with the appliance, if it will not fit 

the outlet, have a proper outlet installed by 

a qualified electrician.

Summary of Contents for DW18SS3

Page 1: ...Dishwasher Installation Manual DW18SS3 USA Write Serial Number on label on side of door here...

Page 2: ...STRIPS 9 6 5 PREPARING THE WATER CONNECTION A 9 6 6 DRAIN PREPARATION 10 6 7 STEAM PROTECTION FOIL 11 7 PLACEMENT OF DISHWASHER INTO THE OPENING 12 7 1 DRAIN HOSE CONNECTION WATER SUPPLY ELECTRICAL CO...

Page 3: ...cluding the following The dishwasher could only be converted from cord connected to permanently connected by an authorized service representative If needed contact your dealer to schedule an authorize...

Page 4: ...that can be recycled Please contact your local recycling authority about the possibility of recycling these materials NOTICE The dishwasher drain hose must be installed with a drain loop at least 28 7...

Page 5: ...thread for dishwasher side and sized to fit your water supply line copper tubing compression fitting or braided hose on the other side Dishwasher connection is 3 4 male UL listed conduit connector or...

Page 6: ...Left f Mounting Bracket Right h Screw Clamp k Toe Kick Bracket Left l Toe Kick Bracket Right n Timber Centering o Timber Centering Screw p Toe Kick s Template t Hook and loop fastener v Screws 1 8 x 5...

Page 7: ...ical connection 120 V volts 12 A amps 60Hz hertz Total power 1400 W watts Heater power 1100 W watts NOTICE Because we continually strive to improve our products we may change our specifications and de...

Page 8: ...AC connected to a dishwasher dedicated properly grounded electrical circuit with a fuse or breaker rated for 15 amperes 6 2 PREPARATION FOR INSTALLING MOUNTING BRACKETS WARNING Dishwasher must be secu...

Page 9: ...7 USA d 50mm j 50 max 50...

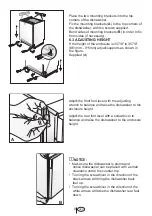
Page 10: ...gure Supplied 4 Adjust the front foot level with the adjusting wrench to balance and raise the dishwasher to the enclosure height Adjust the rear foot level with a screwdriver to balance and raise the...

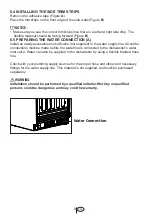
Page 11: ...e not supplied in the water supply line All solder connections must be made before the water line is connected to the dishwasher s water inlet valve Water can also be supplied to the dishwasher by usi...

Page 12: ...ged The total length of the drain hose is 763 4 1950mm If a hose extension is required a drainage hose of equal quality must be used The maximum length must not exceed 157 4000mm Otherwise the cleanin...

Page 13: ...the steam protection foil to the underside of the countertop clean the area with a damp cloth as shown in Figure A Once the area dries apply the steam protection foil CAUTION Steam protection foil mu...

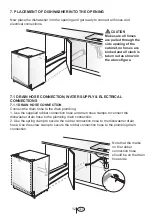
Page 14: ...OSE CONNECTION WATER SUPPLY ELECTRICAL CONNECTIONS 7 1 1 DRAIN HOSE CONNECTION Connect the drain hose to the drain plumbing 1 Use the supplied rubber connection hose and drain hose clamps to connect t...

Page 15: ...a wall adjacent to the undercounter space in which the appliance is to be installed The access hole of the supply cord to the installation compartment must be smooth and rounded and it must be large e...

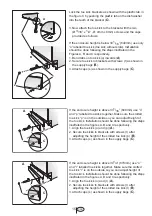
Page 16: ...m x 14mm Make sure you do not go through the top of the countertop or damage granite 7 3 ADJUSTING THE MOVABLE TOE KICK Now that you have successfully installed the dishwasher you need to attach the t...

Page 17: ...840mm use o and p labelled toe kicks together Make sure the slotted toe kick p is on the outside so you can adjust height of the toe kick Installation should be done following the steps illustrated in...

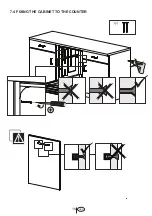
Page 18: ...16 USA 7 4 FIXING THE CABINET TO THE COUNTER y...

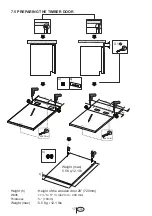
Page 19: ...A 7 5 PREPARING THE TIMBER DOOR X X Mid Point Mid Point Height h Height of the wooden door 28 720mm Width 17 to 17 442 mm 448 mm Thickness 19mm Weight max 5 5 Kg 12 1 lbs Weight max 5 5 Kg 12 1 lb o s...

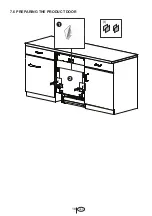
Page 20: ...18 USA 1 2 7 6 PREPARING THE PRODUCT DOOR t...

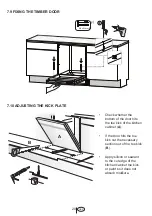
Page 21: ...19 USA 1 2 3 4 12 3 4 5 1 2 3 4 5 7 7 INSTALLING THE TIMBER DOOR 7 8 FIXING THE TIMBER DOOR...

Page 22: ...bottom of the door hits the toe kick of the kitchen cabinet A If the door hits the toe kick cut the necessary section out of the toe kick B Apply silicon or sealant to the cut edge of the kitchen cabi...

Page 23: ...of the two drawings given below Follow the same instructions on the brackets as for the removable toe kick Installation should be done following the steps illustrated in the figures A B C D respective...

Page 24: ...22 USA min 300 1500 1800 2000 min 500 max 1000 max 1000 1 2 3 4 c 1 2 1 2 1 2 4 3 min 300 min 120 max 1000 min 500 7 11 CONNECTION...

Page 25: ...d some water in the drain filter area 9 SELF HELP HINTS The screen does not come on Check to make sure the breaker to the dishwasher is in the on position Check to make sure that the Supply cord is pl...

Reviews: