background image

22

USA

selected programme will start 

automatically.

Changing the settings while Time 

Delay function is active

While the Time Delay function is 

activated, you cannot make changes 

in the washing programme, auxiliary 

functions or the duration of delay time.

C

Programme and auxiliary 

functions cannot be 

set/changed after the 

programme has started.

To cancel the Time Delay function

Open the door of the product Press 

and hold the Programme Selection 

/ Programme Cancel keys for 3 

seconds. After the 3 - 2 - 1 countdown, 

0:01 is displayed, close the door of 

the product and wait for the draining 

process complete. Draining is 

completed in 2 minutes and the 

machine gives an audible warning 

when it is completed.

C

You can select and start a 

new programme following 

the cancellation of Time 

Delay function.

C

Time Delay function cannot 

be set after the programme 

starts.

6.6 STARTING THE 

PROGRAMME

Close the door of your machine to start 

it after selecting the programme and 

auxiliary functions.

C

MODEL DEPENDING:

Your machine performs 

water softening depending 

on the hardness level of 

the supply water. Washing 

time can change while 

the programme is running 

depending on the ambient 

temperature where your 

machine is installed, 

temperature of the supply 

water and amount of the 

dishes.

C

Pay attention not to open the 

door of the machine when 

it is running. There may 

be a rush of vapour when 

you open the door of your 

machine; be careful.

C

The machine will be 

switched off if no button is 

pressed within 5 seconds 

after opening the door while 

the machine is running.

C

After the door has been 

opened, if any button is 

pressed within 5 seconds 

and the door is closed, 

the selected programme 

resumes; otherwise, the 

machine will be switched off.

Open the door after the 

machine has been switched 

off, press On/Off button 

and close the door within 5 

seconds. The programme 

will resume washing.

Summary of Contents for DW2433SS2 Series

Page 1: ...Use and Care Manual Dishwasher FOR MODELS DW2433SS2 USA Write Serial Number on label on side of door here...

Page 2: ...LING THE WASHING TIME 21 6 6 STARTING THE PROGRAMME 22 6 7 CANCELLING THE PROGRAMME 23 6 8 SALT INDICATOR 23 6 9 RINSE AID INDICATOR 23 6 10 END OF PROGRAMME 23 6 11 WATER CUT OFF WARNING 24 6 12 OVER...

Page 3: ...sing the dishwasher follow basic precautions including the following Read all instructions before using the dishwasher Save these operating instructions and pass them on to any future user Use the dis...

Page 4: ...s unless they are marked dishwasher safe or the equivalent For plastic items not so marked check the manufacturer s recommendations If a malfunction occurs switch off the appliance and turn off the wa...

Page 5: ...ain materials that can be recycled Please contact your local recycling authority about the possibility of recycling these materials Please check the water supply line periodically It is susceptible to...

Page 6: ...re the dishwasher where it can be exposed to below freezing temperatures or exposed to weather Dishwasher must be secured to adjacent cabinetry using the brackets provided Failure to do this may cause...

Page 7: ...dispenser 6 Door 7 Control panel 8 Guiding track for the upper rack 9 Lower spray arm 10 Filters 11 Lower rack 12 Model and Serial Tag 13 Turbo fan heat drying system MODEL DEPENDING 14 Removable 3rd...

Page 8: ...A CAUTION Hot steam can escape Danger of serious burns or other injury 2 Remove coarse food leftovers from tableware 3 Now you can load the dishwasher Lower rack MODEL DEPENDING Bottom rack load patte...

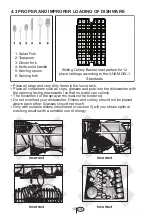
Page 9: ...shwasher Lower rack MODEL DEPENDING Additional Loading Pattern Bottom rack 10 place settings A CAUTION Large knives and other utensils with sharp tips and edges must be placed horizontally into the up...

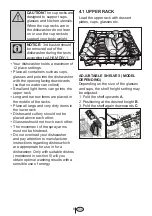
Page 10: ...e of the racks Place all large and very dirty items in the lower rack Dishes and cutlery should not be placed above each other Glasses should not touch each other The movement of the spray arms must n...

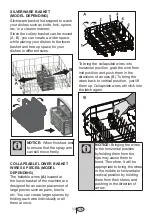
Page 11: ...ng them from their stems and pushing in the direction of arrow COLLAPSIBLE UPPER BASKET TINES MODEL DEPENDING There are foldable tines on the upper basket of the machine that you can lay down when you...

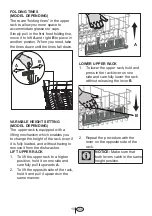
Page 12: ...the rack without releasing the lever B 2 Repeat the procedure with the lever on the opposite side of the rack C NOTICE Make sure that both levers catch in the same height position VARIABLE HEIGHT SET...

Page 13: ...while the rack contains tableware could cause the contents to dislodge causing personal injury or damage to the tableware 1 Release the latches on both the right and left tracks of the upper rack by t...

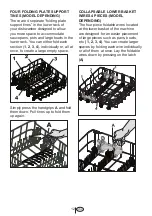
Page 14: ...ally or all at once to create a large empty space Simply press the handgrips A and fold them down Pull tines up to fold them up again COLLAPSABLE LOWER BASKET WIRES 4 PIECES MODEL DEPENDING The four p...

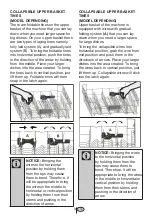
Page 15: ...e directions of arrows B To bring the wires back to vertical position just lift them up Collapsible wires will click into the latch again C NOTICE Bringing the wires to the horizontal position byholdi...

Page 16: ...and placed into the kitchen drawers or shelves If you don t want to use the upper cutlery basket pull it back to yourself to remove it from the machine rotate the rail lids towards outside and pull th...

Page 17: ...the AHAM DW 1 Standards Place all large and very dirty items in the lower rack Place all containers such as cups glasses and pots into the dishwasher with the opening facing downwards so that no water...

Page 18: ...move and hand dry these items immediately when the program ends Decorated glasses porcelain fine china and china with gold rims are sensitive to machine washing They may lose their patterns and colors...

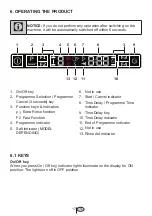
Page 19: ...ey 10 Time Delay indicator 11 End of Programme indicator 12 13 Rinse Aid indicator 6 1 KEYS On Off key When you press On Off key indicator lights illuminate on the display for ON position The lights t...

Page 20: ...unction is supported by the selected programme Function will be deemed selected when the indicator of the selected function is lit To cancel the selected function keep the function key pressed until t...

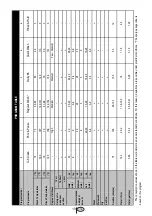
Page 21: ...12 14 4 20 2 11 6 19 0 19 11 6 4 4 3 80 5 34 3 06 5 01 5 00 3 10 1 20 Wash Temperatures Rinse Temperatures Sanitize Water gallons Wash Main wash Dry Duration minutes Water liters PROGRAM TABLE The con...

Page 22: ...ms Indicator of the auxiliary function that is not compatible with the programme will not be active Automatic Detergent Detection Feature The product has a feature to automatically detect the type of...

Page 23: ...er turning on the machine press Time Delay and P P keys simultaneously Keep them pressed until the countdown 3 2 1 is completed on the display 2 Press P P key to activate the S position 3 Each pressin...

Page 24: ...the programme starts 6 6 STARTING THE PROGRAMME Close the door of your machine to start it after selecting the programme and auxiliary functions C MODEL DEPENDING Your machine performs water softening...

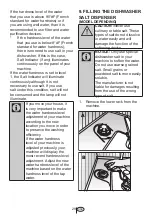
Page 25: ...ning salt in the dishwasher or not You need to refill the salt reservoir with salt whenever salt indicator appears on the display of your machine C Adjusting the water hardness level is explained in W...

Page 26: ...r machine 6 11 WATER CUT OFF WARNING If mains water is cut or water inlet tap is turned off the machine cannot take water in and E 02 icon will flash on the programme indicator As long as the problem...

Page 27: ...detergent does not dissolve properly and dishes could get scratched Too much detergent in soft water may cause glass corrosion Do not use too much detergent if your water supply is soft If you do not...

Page 28: ...sp mark When the dishes are less dirty it is generally sufficient to fill the detergent up to the 15 ml 3 tsp mark The detergent amounts for the individual cleaning programs are shown in the Quick Ref...

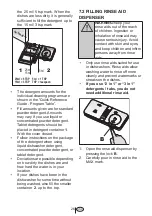
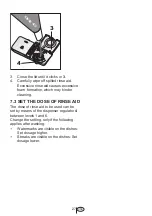
Page 29: ...on which may hinder cleaning 7 3 SET THE DOSE OF RINSE AID The dose of rinse aid to be used can be set by means of the dispenser regulator 4 between levels 1 and 6 Change the setting only if the follo...

Page 30: ...50 35 90 Press the Time Delay key to switch the water hardness level to position 5 r 5 WATER HARDNESS REGENERATION SETTINGS The dishwasher requires lime free water Hard water leaves watermarks on you...

Page 31: ...is very important to make the water hardness level adjustment of your machine according to the new location you move in order to preserve the washing efficiency If the water hardness level of your ma...

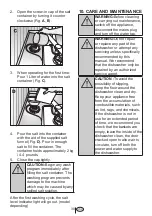
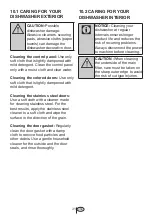
Page 32: ...nding 10 CARE AND MAINTENANCE A WARNING Before cleaning or carrying out maintenance switch off the appliance disconnect the mains plug and turn off the water tap A WARNING Do not repair or replace any...

Page 33: ...cleaning stainless steel For the best results apply the stainless steel cleaner to a soft cloth and wipe the surface in the direction of the grain Cleaning the door gasket Regularly clean the door gas...

Page 34: ...l reduce washing efficiency 10 3 CLEANING THE FILTERS Clean the filters at least once a week in order for the machine operates efficiently Check if food residues are left on the filters If there are f...

Page 35: ...clean them if necessary 1 Turn off the tap and remove the hose 2 After taking out the filter clean it under running tap water 3 Place the cleaned filter back to its seat in the hose 4 Install the hose...

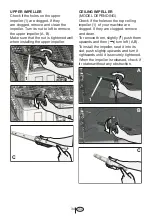
Page 36: ...lling the upper impeller CEILING IMPELLER MODEL DEPENDING Check if the holes on the top ceiling impeller 1 of your machine are clogged If they are clogged remove and clean To remove them slightly push...

Page 37: ...e that it is installed correctly Baskets are overloaded Do not overload the baskets in excess of their capacity Detergent is stored under unsuitable conditions If you are using powder detergent do not...

Page 38: ...kitchen utensils is deteriorated Tea and cafe stains or other dye spots may not be cleaned in dishwasher when they have penetrated in deteriorated surfaces Desired washing performance can not be obtai...

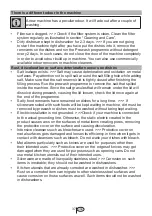
Page 39: ...lid once again at the end of the programme Salty food remnants have remained on dishes for a long time If silverware soiled with such foods will be kept waiting in machine dirt must be removed by prew...

Page 40: ...are not suitable for washing in the dishwasher Manufacturers of glassware and porcelain tableware items do not recommend washing such kitchen utensils in the dishwashers either Dishes are scratched C...

Page 41: ...re placing them into the machine Removing the coarse soil on the dishes under tap water with a tissue paper or fork will be sufficient Rinse aid has spilled into the machine when adding rinse aid Take...

Page 42: ...we continually strive to improve our products we may change our specifications and design without prior notice This device corresponds to the following directives UL 749 Household Dishwasher directive...

Reviews: