background image

PG 21

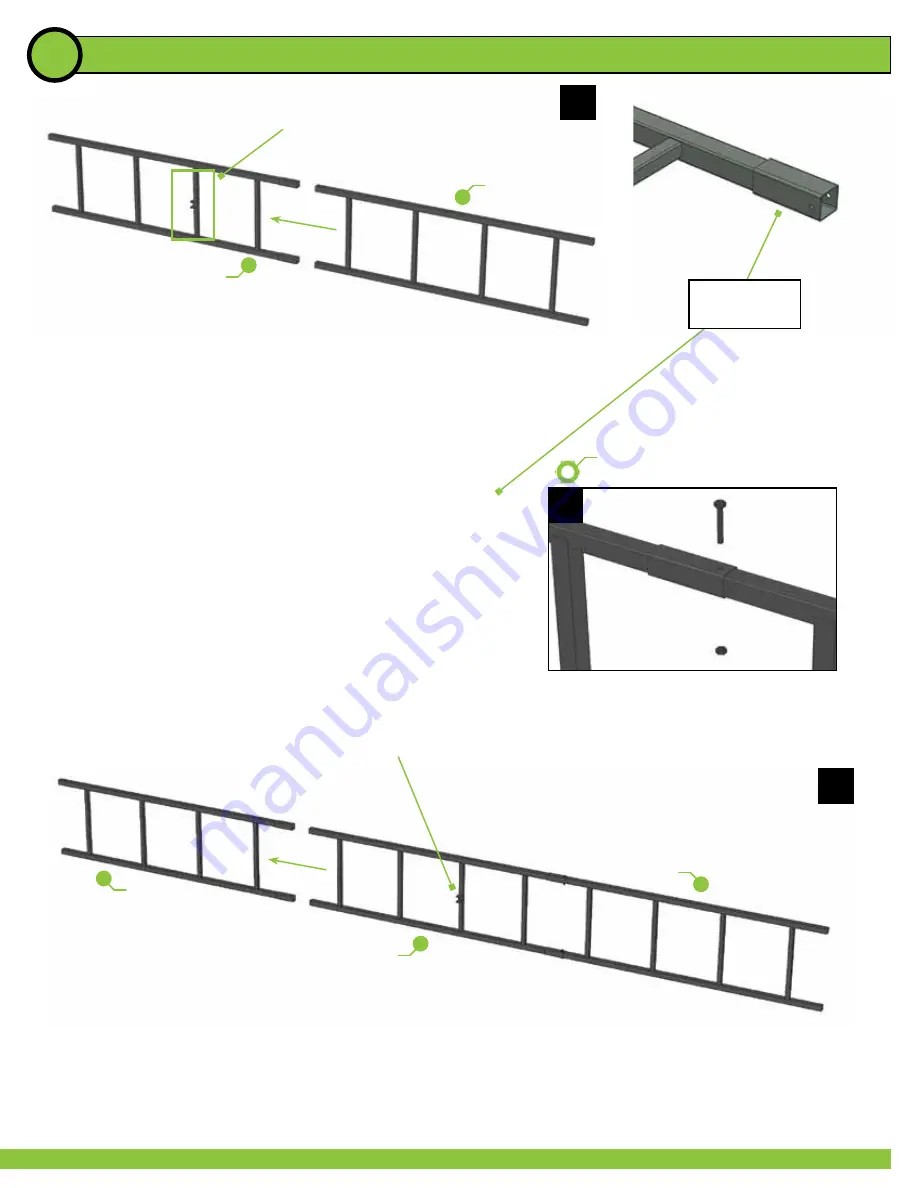
1 3/4” BOULONS, ÉCROU DE 
BLOCAGES - SERRER À CLÉ

2

3

SECTION INFÉRIEURE DE 
L’ÉCHELLE

(PN 82068.430)

SUPPORT EN 
‘’U’’ SOUDÉ 

SECTION DU MI-
LIEU DE L’ÉCHELLE

(PN 82068.420)

SECTION SUPÉRIEURE 
DE L’ÉCHELLE

(PN 82068.410)

SECTION IN-
FÉRIEURE DE 
L’ÉCHELLE

(PN 82068.430)

SECTION DU 
MILIEU DE 
L’ÉCHELLE

(PN 82068.420)

1

SUPPORT EN 
‘’U’’ SOUDÉ 

BARRE DE L’ÉCHELLE

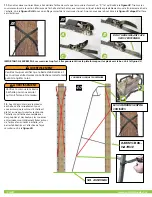
1.

 Placez la section du bas de l’échelle et la section du milieu de 

l’échelle tel qu’illustré à la 

figure 1

.  Le support en ‘’U’’ soudé fait face 

à l’arbre lorsque l’assemblage est terminé.

La partie inférieure de l’échelle ne possède pas de coupleurs soudés.

2. 

Glissez les sections de l’échelle ensemble, alignez les trous pour 

boulons et utilisez un 

boulon 1 ¾ po.

 afin de sécuriser chaque côté. 

(voir la figure 2)

.

3.

 Glissez les sections inférieure et du milieu de l’échelle dans la section 

supérieure de l’échelle tel qu’illustré à la

 figure 3

.

4.

 Sécurisez en utilisant deux 

boulons 1 ¾ po. ainsi que les écrous de 

blocage

(Voir figure 2)

.

   ASSEMBLAGE

COUPLEURS 

SOUDÉS
Summary of Contents for Solo Deluxe SU82078

Page 1: ...ONTINUOUS LEG EXERCISES TO AVOID BLOOD POOLING WHILE BEING SUSPENDED HUNTERS WITH VARYING DEGREES OF PHYSICAL FITNESS MAY REQUIRE DIFFERENT PLANS TO RECOVER ESCAPE IN ORDER TO AVOID EFFECTS OF PROLONGED SUSPENSION HAVE A PERSONAL PLAN AND PRACTICE IT IN THE PRESENCE OF A RESPONSIBLE ADULT BEFORE LEAVING THE GROUND NO ESCAPE RECOVERY PLAN WILL WORK FOR EVERY HUNTER ON EVERY TREE IN EVERY CIRCUMSTAN...

Page 2: ...HER REASON DOING THIS CAN DAMAGE THE TREESTAND CAUSING THE PRODUCT TO BE OVER LOADED WHICH COULD RESULT IN SERIOUS INJURY OR DEATH ALWAYS PULL UP A BOW BACKPACK FIREARM OR OTHER EQUIPMENT BY MEANS OF A ROPE OR HOIST SYSTEM AND ONLY AFTER BEING SECURED IN THE TREESTAND FIREARMS AND CROSSBOWS MUST BE PULLED UP UNLOADED CHAMBER OPEN AND MUZZLE DOWN TOWARDS THE GROUND NEVER MODIFY YOUR STAND IN ANY WA...

Page 3: ...ABELS FROM THE PRODUCT LADDER RATCHET STRAPS PG 3 Stand Minimum and Maximum Tree Size 8 20 Diameter Weight Limits Includes hunter s weight PLUS weight of all gear carried into the treestand DO NOT EXCEED THESE WEIGHT LIMITS 300 lb Rated Stand SU82078 Solo Deluxe Ladder Treestand THIS TREESTAND IS INTENDED FOR SINGLE PERSON USE ONLY ...

Page 4: ...mitstands com contactus if you have any questions if you need replacement parts if you have any missing parts or if the included DVD does not play www summitstands com Tools 7 16 Wrenches and or Socket Ratchet Assembly can be made easier by the use of a powered ratchet or drill with socket adapter take care not to overtighten when using power tools to assemble It is recommended that all bolts be s...

Page 5: ...tom Ladder Section and Middle Ladder Section as shown in figure 1 The welded U bracket faces the tree when fully assembled The Bottom Ladder Section has no welded sleeves 2 Slide the Ladder Sections together line up the bolt holes and use one 1 3 4 bolt and lock nut to secure each side see figure 2 3 Slide the completed Bottom and Middle ladder sections into the Top Ladder Section as shown in figu...

Page 6: ... Upright arms onto the Yoke and line up the bolt holes 3 Position the two Armrest bars as shown in figure 5 Note the correct orientation of the Armrests 4 Secure the Armrests to the Upright tube Yoke using two 2 1 4 bolts and lock nuts per side see figure 6 YOKE PN 82068 200 4 LEFT UPRIGHT PN 82068 010 RIGHT UPRIGHT PN 82068 020 ARMREST PN 82068 300 ARMREST PN 82068 300 2 1 4 BOLTS LOCK NUTS WRENC...

Page 7: ...t and Ladder Section using two 2 3 4 bolts and lock nuts see figure 10 Leave these bolts hand tight for now 6 Position one of the Platform Support bars as shown in figure 10 The bar should run from the inside of the Upright to the outside of the Platform as shown 7 Secure at the upper and lower hole using one 1 3 4 bolt and lock nut Leave these bolts hand tight until both bars are attached 8 Repea...

Page 8: ...HTEN STABILIZER FEMALE SECTION STABILIZER MALE SECTION PN 82068 440 14 1 4 WIRE LOCK PIN 15 STABILIZER BAR 1 Position the Female Section of the Stabilizer bar as shown in figure 12 The Stabilizer bar will attach to the welded U Bracket Slide the bar into the bracket and line up the hole 2 Secure using one 1 3 4 bolt and lock nut see figure 13 Do not overtighten 3 Position the Male Stabilizer bar a...

Page 9: ...ne up these holes with the holes in the Armrests Insert two 1 4 Bushings between the Gunrest tab and Armrest hole figure 22 5 Use two 1 3 4 bolts with lock nuts to secure the bar to the armrest see figure 23 6 Position the Gunrest Pad as shown in figure 24 Secure by wrapping the pad around the bar and using the hook and loop strip to secure RIGHT GUNREST ARM PN 82068 550 LEFT GUNREST ARM PN 82068 ...

Page 10: ...e at figure 26 location A and one at location B using the same cinch strap method refer to figure 27 29 for threading Finished straps should look like figure 29a Lay the Criss Cross straps on top of the ladder sections as shown in figure 30 6 Connect the remaining two looped ratchet ends to the column of the ladder section below the third 3rd ladder rung from the end Follow the procedure in step 4...

Page 11: ...o the ground up to the bottom side of bottom ladder rung Next release the Criss Cross straps ratchets so that the straps are hanging freely down Pivot the Stabilizer bar up Remove the wire lock pin from the Ladder Stabilizer bar shown in previous Page 8 figure 15 Slide the Male Section of the Stabilizer bar out until it makes contact with the tree as shown in figure 35 and 36 The Stabilizer bar sh...

Page 12: ...n the tree See figure 40 PG 12 www summitstands com 38 40 CRISS CROSS STRAPS UPPER RATCHET STRAP STABILIZER BAR AND ROPE LEVEL GROUND WARNING Always check to ensure the Stabilizer bar and Criss Cross straps are secured correctly before leaving the ground 39 A B C D 12 Before climbing up the ladder stand visibly inspect to ensure the ground below the ladder sections is flat and level all ladder sec...

Page 13: ...duct into the field If any damage or loose hardware is found discontinue use immediately ALL REPAIRS MUST BE DONE AT GROUND LEVEL 16 When descending the treestand detach your Tether Strap and carefully climb down the ladder Always use 3 points of contact as you descend Re check the Stabilizer bar to ensure it is still tight against the tree and Criss Cross straps are tight Re tighten if needed WAR...

Page 14: ...r from the tree and ladder section Next disengage the Criss Cross straps and allow them to hang freely down under the foot platform as shown in figure 41 Next secure the Criss Cross to ratchet straps connected to the ladder section below the third ladder rung and tighten until they are tight See figure 42 5 Using three 3 able adults lift up on the ladder stand to pull the bottom ladder section out...

Page 15: ... or modifications in its products at any time which in its opinion may improve the performance and efficiency of the product It shall not be obligated to make such alterations or modifications to products already in service Please take the time to fill out the warranty card online at http www summitstands com warranty LIMITED WARRANTY 9 MAINTENANCE AND CARE 7 It is necessary and very important tha...

Page 16: ......

Page 17: ...LORS D UNE SUSPENSION LES CHASSEURS POSSÉDANT DES CONDITIONS PHYSIQUES DIFFÉRENTES AURONT BESOIN DE PLANS DIFFÉRENTS POUR RÉCUPÉRER OU SE LIBÉRER ET AINSI ÉVITER LES EFFETS D UNE SUSPENSION PROLONGÉE AYEZ UN PLAN PERSONNEL ET PRATIQUEZ LE EN PRÉSENCE D UN ADULTE RESPONSABLE AVANT DE QUITTER LE SOL AUCUN PLAN DE RÉCUPÉRATION OU DE LIBÉRATION NE PEUT FONCTIONNER POUR TOUS LES CHASSEURS POUR TOUT TYP...

Page 18: ...NDRER DE SÉRIEUSES BLESSURES OU LA MORT MONTEZ TOUJOURS UN ARC UN SAC À DOS UNE ARME À FEU OU TOUT AUTRE ÉQUIPEMENT AU MOYEN D UNE CORDE OU D UN TREUIL SEULEMENT APRÈS VOTRE ARRIVÉE SÉCURITAIRE SUR LE MIRADOR LES ARMES À FEU DOIVENT ÊTRE MONTÉES DÉCHARGÉES AVEC LA CHAMBRE OUVERTE ET LE CANON POINTANT VERS LE SOL NE MODIFIEZ JAMAIS VOTRE MIRADOR EN FAISANT DES RÉPARATIONS EN REMPLAÇANT DES PIÈCES E...

Page 19: ...S X 1 TOTAL NE DÉPASSER PAS CETTE LIMITE Inclus tout l équipement Grosseur d arbre minimum et maximum pour le mirador 20 50 cm de diamètre Évalué à 136 KG SU82078 Solo Deluxe Mirador à échelle CE MIRADOR A ÉTÉ CONÇU POUR UNE SEULE PERSONNE PG 19 ÉTIQUETTE D AVERTISSEMENT DU MIRADOR COURROIES À CLIQUET DE L ÉCHELLE N ENLEVEZ PAS LES ÉTIQUETTES INDIQUANT LES AVERTISSEMENTS OU LES ÉTIQUETTES INDIQUAN...

Page 20: ...S COMPLET AVEC SYSTÈME D ARRÊT 1 DE CHUTE HCCSAC www summitstands com 82068 890 POCHETTE DE LA QUINCAILLERIE 1 4 20 Thread classe 5 PN DESCRIPTION QUANTITÉ SU10601 1 3 4 BOULON 1 4 20 11 SU10609 2 1 4 BOULON 1 4 20 4 2 3 4 BOULON 1 4 20 2 SU10612 ÉCROU DE BLOCAGE 1 4 20 17 1 4 GOUPILLE D ARRÊT 3 1 4 BAGUES 4 COUSSINETS DE CAOUTCHOUC POUR APPUI ARME 2 Appellez le 800 353 0634 ou visitez le site web...

Page 21: ...du milieu de l échelle tel qu illustré à la figure 1 Le support en U soudé fait face à l arbre lorsque l assemblage est terminé La partie inférieure de l échelle ne possède pas de coupleurs soudés 2 Glissez les sections de l échelle ensemble alignez les trous pour boulons et utilisez un boulon 1 po afin de sécuriser chaque côté voir la figure 2 3 Glissez les sections inférieure et du milieu de l é...

Page 22: ...icaux dans la fourche et alignez les trous des boulons 3 Placez les deux accoudoirs tels qu illustré à la figure 5 Veuillez noter l orientation correcte des accoudoirs 4 Sécurisez les accoudoirs avec les tubes verticaux fourche avec deux boulons 2 po et des écrous de blocage de chaque côté voir figure 6 FOURCHE PN 82068 200 4 MONTANT GAUCHE PN 82068 010 MONTANT DROIT PN 82068 020 ACCOUDOIR PN 8206...

Page 23: ...age voir figure 10 Serrez ces boulons à la main 6 Placez une des barres de la plateforme tel qu illustré à la figure 10 La barre devrait être installée à partir de l intérieur du montant jusqu à l extérieur de la plateforme tel qu illustré 7 Sécurisez le trou supérieur et inférieur en utilisant un boulon 1 po et un écrou de blocage Serrez ces boulons à la main jusqu à ce que les deux barres soient...

Page 24: ...CTION DU STABILISATEUR MÂLE PN 82068 440 14 1 4 GOUPILLE D ARRÊT 15 BARRE STABILISATRICE 1 Placez la section femelle de la barre stabilisatrice tel qu illustré à la figure 12 La barre stabilisatrice s attache au support en U soudé Glissez la barre dans le support et alignez les trous 2 Sécurisez en utilisant le boulon 1 po et un écrou de blocage voir la figure 13 Ne serrez pas trop fort 3 Placez l...

Page 25: ...ignez ces trous avec les trous des accoudoirs Insérez deux bagues de po entre l encoche et le trou de l appui arme figure 22 5 Utilisez deux boulons 1 po et des écrous de blocage pour sécuriser la barre à l accoudoir voir figure 23 6 Placez le coussinet de l appui arme tel qu illustré à la figure 24 Sécurisez en enveloppant le coussinet autour de la barre et en utilisant la bandelette auto agrippa...

Page 26: ...éthode que pour la courroie sanglée voir les figures 27 29 pour l enfilage Les courroies attachées devraient être semblables à celles de la figure 29a Placez les courroies entrecroisées au dessus des sections d échelle tel qu illustré à la figure 30 6 Raccordez les deux bouts bouclés à cliquet à la colonne de l échelle sous la troisième marche à partir de la fin Suivez la procédure à l étape 4 afi...

Page 27: ... bas Puis libérez les cliquets des courroies entrecroisées de sorte qu elles soient complètement libres Faites pivoter la barre stabilisatrice vers le haut Enlevez la goupille de verrouillage de la barre stabilisatrice de l échelle tel qu illustré à la page 8 figure 15 Faites glisser la section mâle de la barre stabilisatrice vers l extérieur jusqu à ce qu elle entre en contact avec l arbre tel qu...

Page 28: ...e 40 38 40 COURROIE À CLIQUET SUPÉRIEURE BARRE STABIL ISATRICE SOL AU NIVEAU LES COURROIES ENTRE CROISÉES 39 A B C D 12 Avant de monter dans le mirador à échelle vérifier visuellement pour vous assurer que le sol sous l échelle est plat et au niveau toutes les sections de l échelle sont attachées ensemble avec des goupilles et des boulons les courroies entrecroisées sont solidement fixées autour d...

Page 29: ...y a des pièces supplémentaires arrêtez l utilisation immédiatement TOUTES LES RÉPARATIONS DOIVENT ÊTRE FAITES AU NIVEAU DU SOL 16 Lorsque vous descendez du mirador détachez votre courroie sanglée et descendez prudemment à l aide de l échelle Veuillez toujours utiliser trois points de contact lors de la descente Revérifiez la barre stabilisatrice afin de vous assurer qu elle est toujours en contact...

Page 30: ...ilisatrice de l arbre et de la section d échelle Puis désengagez les courroies entrecroisées pour les laisser pendre librement sous la plateforme pour les pieds tel qu illustré à la figure 41 Puis attachez les courroies entrecroisées aux courroies à cliquet attachées à l échelle sous la troisième marche et serrez les Voir la figure 42 5 Avec l aide de trois 3 adultes responsables soulevez le mirad...

Page 31: ...ation sans problèmes Si les lignes directrices ci haut sont suivies votre mirador Summit vous procurera des années de succès à la chasse Essayez de voir s il y a des encoches des coupures des fissures des plis de la corrosion ou tout autre dommage que pourrait occasionner une mauvaise utilisation ou des dommages accidentels Par exemple ceci pourrait se produire si une autre personne utilise ce mir...

Page 32: ......

Reviews: