background image


appliance by pulling on the power cord.  Always grip the plug firmly and pull straight out from the receptacle. 
Repair or replace immediately all power cords that have become frayed or otherwise damaged. Do not use 
a cord that shows cracks or abrasion damage along its length or at either end. When moving the appliance, 
be careful not to damage the power cord. 
 

EXTENSION CORD 

Because of potential safety hazards under certain conditions, it is strongly recommended that you do not 
use an extension cord with this appliance. However, if you must use an extension cord, it is absolutely 
necessary that it be a UL/CUL-Listed, 3-wire grounding type appliance extension cord having a grounding 
type plug and outlet and that the electrical rating of the cord be 115 volts and at least 10 amperes. 
 

REVERSING THE DOOR SWING OF YOUR APPLIANCE 

This unit has the capability of the door opening from either the left or right side.  The unit is delivered to 
you with the door opening from the left side.  Should you desire to reverse the opening direction, please 
follow the reversal instructions shown below. 


NOTE:

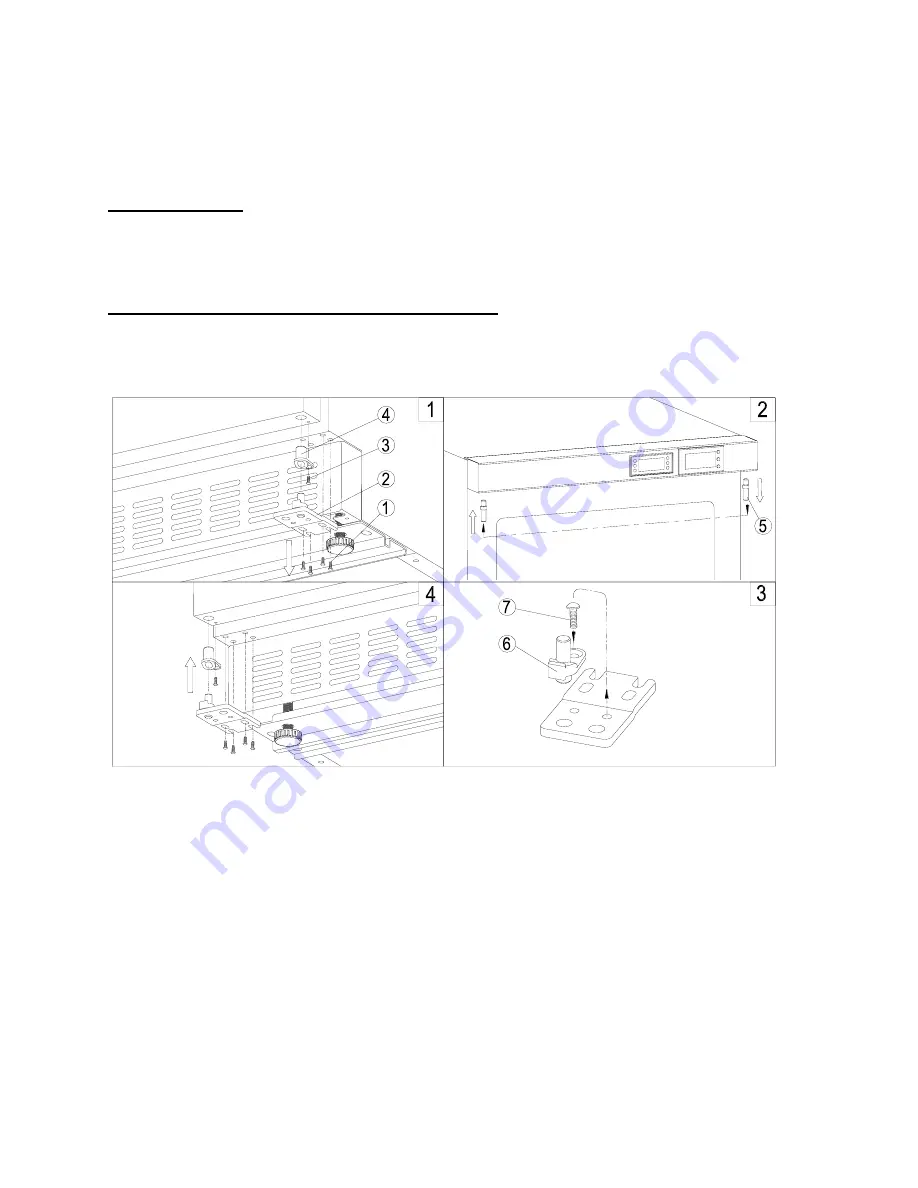
 All parts removed must be saved to allow the door swing to be reversed. 


1.  Remove the bottom hinge (2) by unscrewing the four lock screws (1).Be careful to hold the door firmly 

after removing the screws. (Fig. 1) 

2.  Gently pull down to remove the door from the right top hinge and place it on a padded surface to avoid 

the risk of damage. Then unscrew (3) and transfer the bottom hinge sleeve (4) to the opposite side. 
(Figs. 1 & 4) 

3.  Unscrew and transfer the top hinge pin (5) to the opposite side. (Fig. 2) 

4.  Unscrew (7) and transfer the bottom hinge pin (6) to the opposite side of the bottom hinge (2)

.

(Fig. 3) 

5.  Relocate  the  door  to  the  designated  position.  Then  screw  the  bottom  hinge  on  the  left  designated 

position and tighten it after the door is leveled. (Fig. 4) 

6.  Remove the handle from the left side of the door and install it on the right side. (

See next section

.) 

Summary of Contents for accucold ACF33L

Page 1: ...SE PLEASE READ AND FOLLOW ALL SAFETY RULES AND OPERATING INSTRUCTIONS Felix Storch Inc ISO 9001 2015 registered 770 Garrison Avenue Bronx NY 10474 www summitappliance com Write Model and Serial Nos on...

Page 2: ...lling the Stainless Steel Handle 8 Operating Your Appliance 8 12 Control Panel for ACR45L 8 9 Control Panel for ACF33L 9 10 Temperature Memory Function 10 Defrosting 10 Using the Freezer ACF33L 10 Doo...

Page 3: ...ed 3 prong outlet do not remove grounding prong do not use an adapter and do not use an extension cord Replace all panels before operating It is recommended that a separate circuit serving only your a...

Page 4: ...F 32 C The appliance should not be located next to ovens grills or other sources of high heat The appliance must be installed with all electrical water and drain connections in accordance with state...

Page 5: ...5 LOCATION OF PARTS MODEL ACR45L FROST FREE REFRIGERATOR MODEL ACF33L FROST FREE FREEZER...

Page 6: ...behind a cabinet door or block the base grille Avoid locating the unit in moist areas Plug the appliance into an exclusive properly grounded wall outlet ELECTRICAL CONNECTION This appliance should be...

Page 7: ...door opening from either the left or right side The unit is delivered to you with the door opening from the left side Should you desire to reverse the opening direction please follow the reversal ins...

Page 8: ...d 78 F 23 26 C If the ambient temperature is above or below the recommended temperatures the performance of the unit may be affected For example placing your unit in extremely cold or hot conditions m...

Page 9: ...tional default mode the lights will turn on only when the door is open If you are in showcase mode the lights will be on whether or not the door is open CONTROL PANEL FOR ACF33L ON OFF Power To turn t...

Page 10: ...the unit and flows through the drainage hole into the drip tray by the compressor where it evaporates However frost may accumulate on the evaporator if the unit is repeatedly opened in a high heat or...

Page 11: ...re to remove all stored items first Then move the shelf to the position where the notch of the shelf is exactly under the plastic post and lift the shelf In order to replace the shelf repeat steps des...

Page 12: ...tting Press the HI LO key ONCE then press MODE RESET to enter the High Alarm temperature setting mode Use the Up and Down arrows to adjust the temperature accordingly Press MODE RESET once again to co...

Page 13: ...not be used for several months remove all items and turn off the appliance Clean and dry the interior thoroughly To prevent odor and mold growth leave the door open slightly blocking it open if neces...

Page 14: ...g 1 2 Unscrew the three screws 2 and 7 to remove the shelf cover 3 and the glass bottle holder 6 Be careful to hold the glass bottle holder 6 and temperature sensor glass bottle 5 firmly after removin...

Page 15: ...oor gasket does not seal properly Put the appliance in a cooler place Leave the appliance to work for a while until the set temperature has been reached Do not open the door more often than necessary...

Page 16: ...uption in the power supply A large amount of content has been added to the unit If yes close the door Do not open the door more often than necessary Clear the obstructions and clean the dust Leave the...

Page 17: ...17 NOTES...

Page 18: ...18 NOTES...

Page 19: ...19 NOTES...

Page 20: ...difications made to the appliance 6 The removal and reinstallation of your appliance if it is installed in an inaccessible location or is not installed in accordance with published installation instru...
Reviews: