background image


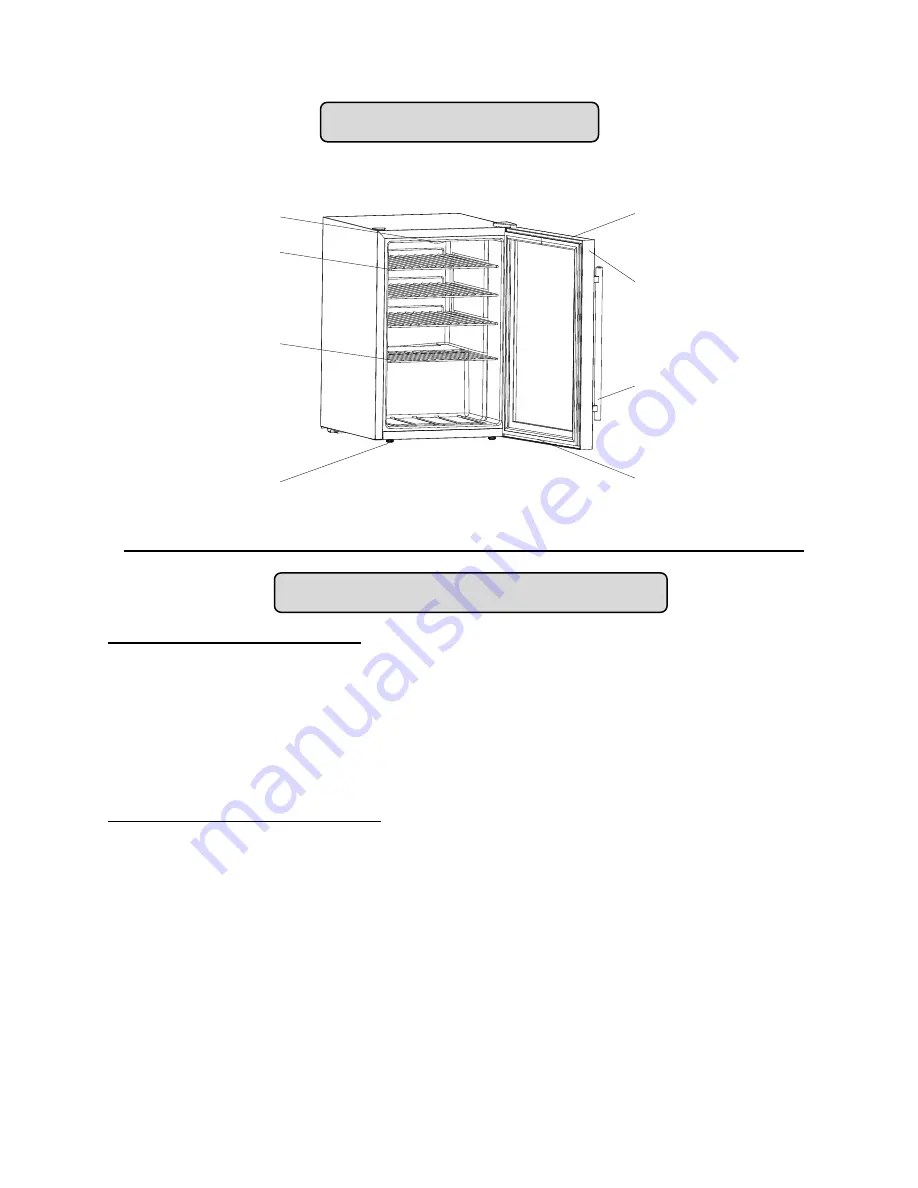
LOCATION OF PARTS 


Handle   


Half


Shelf (Total 1)

Door


Digital Control Panel

Levelling Legs

Security Lock


Interior Light

Full


Shelf (Total 3)


INSTALLATION INSTRUCTIONS 


BEFORE USING YOUR APPLIANCE 

  Remove the exterior and interior packing. 
 

CAUTION: After unpacking and b

e

fore


connecting the appliance to the power source,

 you MUST 

allow this appliance to stand upright for at least 2 hours to allow the lubricant and refrigerant to 
drain back into the compressor and stabilize. Failure to do so may adversely affect performance 
and the lifetime of this unit.


  Clean the interior surface with lukewarm water using a soft cloth. 
  Install the handle on the door. (See page 7.) 


INSTALLATION OF YOUR APPLIANCE 

  Your appliance is designed to be built-in (fully recessed). When installing the unit

, leave at least 3/16” 

at both sides, 1/16” at the top and 2” at the rear. Be sure that airflow under the appliance is not blocked. 
If  installing  your  appliance  inside  a  cabinet  where  the  front  door  may  be  blocked,  call  our  technical 
support department at 718-893-3900 ext. 597 for proper cutout and clearance dimensions.


WARNING

: Do not store or install the appliance outdoors.


CAUTION

This  appliance  is  designed  for  storing  and  cooling  beverages  and  drinks.  Do  not  store 

perishable food, medicine or other medical products. 

  Place your Beverage Merchandiser on a floor that is strong enough to support it when it is fully loaded. 

To level the unit, adjust the front leveling legs. 

  NOTE: It is recommended that you do not install the appliance near an oven, radiator or other heating 

source. Direct sunlight may affect the acrylic coating and heat sources may increase electrical 
consumption. Don’t install in a location where the temperature will fall below 60°F (16°C). For best 
performance, do not install the appliance behind a cabinet door or block the base grille. 

Summary of Contents for SCR215LBI

Page 1: ...TRUCTIONS AVANT D UTILISER S IL VOUS PLA T LIRE ET SUIVRE LES R GLES DE S CURIT ET INSTRUCTIONS DE FONCTIONNEMENT Felix Storch Inc An ISO 9001 2015 registered company 770 Garrison Avenue Bronx NY 1047...

Page 2: ...ppliance 5 6 Electrical Connection 6 Extension Cord 6 Installing the Stainless Steel Handle 7 Operating Your Appliance 7 8 Control Panel 7 8 Door Lock 8 Defrosting 8 Shelves 8 Care and Maintenance 9 C...

Page 3: ...ositioned and installed as described in this manual so read the manual carefully To reduce the risk of fire electrical shock or injury when using the appliance follow basic precautions including the f...

Page 4: ...nd ordinances is required Do not kink or pinch the power supply cord of the appliance The size of the fuse or circuit breaker should be 15 amperes It is important that the appliance be leveled in orde...

Page 5: ...at the top and 2 at the rear Be sure that airflow under the appliance is not blocked If installing your appliance inside a cabinet where the front door may be blocked call our technical support depar...

Page 6: ...should be secured behind the appliance and not left exposed or dangling The appliance should always be plugged into its own individual electrical outlet which has a voltage rating that matches the rat...

Page 7: ...perature range is 72 and 78 F 23 26 C If the ambient temperature is above or below the recommended temperatures the performance of the unit may be affected For example placing your unit in extremely c...

Page 8: ...rature slightly higher Also be sure that the door gasket is sealing well SHELVES The unit has several full sized and one half sized removable chrome plated wire shelves To take out a shelf first remov...

Page 9: ...ps to protect the contents VACATION TIME Short vacations Leave the appliance operating during vacations of less than three weeks Long vacations If the appliance will not be used for several months rem...

Page 10: ...normal A large amount of contents has been added to the beverage merchandiser The door is opened too often The door is not closed completely The temperature control is not set correctly The door gaske...

Page 11: ...cement parts or repair labor costs for units operated outside the United States 5 Repairs to parts or systems resulting from unauthorized modifications made to the appliance 6 The removal and reinstal...

Page 12: ...de l utilisation de l appareil suivrez les pr cautions de base y compris ce qui suit Branchez sur une prise 3 broches de sortie ne retirez pas la broche de terre ne pas utiliser un adaptateur et ne pa...

Page 13: ...d alimentation de l appareil L intensit du fusible ou disjoncteur doit tre de 15 amp res Il est important que l appareil soit mis niveau afin de fonctionner correctement Vous devrez peut tre faire pl...

Page 14: ...notre service de support technique au 718 893 3900 ext 597 pour la silhouette correcte et les dimensions de d gagement AVERTISSEMENT Ne pas ranger ou installer l appareil l ext rieur ATTENTION Cet app...

Page 15: ...anch dans sa propre prise lectrique qui a une tension qui correspond l tiquette appos e sur l appareil Cette offre les meilleures performances et emp che aussi la surcharge des circuits de c blage de...

Page 16: ...male se produit lorsque la temp rature est comprise entre 72 et 78 F 23 26 C Si la temp rature ambiante est sup rieure ou inf rieure la temp rature recommand e le rendement de l unit peut tre affect P...

Page 17: ...sur la paroi arri re essayer de r gler la temp rature l g rement plus lev e Aussi assurez vous que le joint de la porte est bien tanche TAG RES L unit dispose de plusieurs tag res chrom es amovibles...

Page 18: ...prendre les mesures appropri es pour prot ger le contenu VACANCES Laissez le r frig rateur fonctionner pendant des cong s de moins de trois semaines Si le r frig rateur ne sera pas utilis pendant plu...

Page 19: ...normale Une grande quantit de contenu a t ajout e au marchandiseur des boissons La porte est ouverte trop souvent La porte ne ferme pas compl tement Le contr le de la temp rature n est pas r gl corre...

Page 20: ...uits non approuv s par le garant 4 Les pi ces de rechange ou les frais de r paration pour les appareils utilis s hors des tats Unis 5 Les r parations aux pi ces ou syst mes r sultant de modifications...

Reviews: