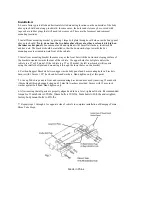
Installation:
1.
Locate factory pre-drilled and horizontal slotted mounting locations on the underside of the body
above pinch weld and along pinch weld. In some cases, the holes and slots may be covered with
tape or have rubber plugs that will need to be removed. These are the foremost and rearmost
mounting locations.
2. Install front mounting bracket by placing 1 large bolt plate through oval hole on inside body panel
above pinch weld.
(Note, do not use the two holes above the oval as they are located to high on
the inner rocker panel)
. Loose mount and hand tighten with 10mm flat washers, lock washers
and hex nuts. The bracket should be installed so that the downward slope towards the bar
mounting area is oriented toward front of the vehicle.
3. Install rear mounting bracket the same way as the front but with the downward sloping surface of
the bracket oriented towards the rear of the vehicle. Use upper holes for bolt plate unless the
vehicle is a 97 or 98 model. If the vehicle is a 97 or 98 model, the left rear bracket will require
using the smaller bolt plate and mounting it through the lower holes on the bracket.
4. Position Support Brackets between upper inside body panel and bar mounting hole on brackets.
Secure with 12mm x 1.25” hex head bolts and washers. Hand tighten only at this point.
5. Line up Tube Step ends to front and rear mounting brackets and secure by inserting 12 mm bolts
(18mm Head) through support strap and 12 mm flat washers provided. Secure with 12 mm lock
washer against bolt head. Hand tighten only.
6. After insuring that all parts are properly aligned and tube is level, tighten all bolts.
Recommended
torque for 12mm bolts is 65ft-lbs, 10mm bolts is 30ft-lbs, 8mm bolts to 30ft-lbs and retighten
factory body mount bolts to 45ft-lbs.
7.
Repeat steps 1 through 6 for opposite side of vehicle to complete installation of Rampage Perma-
Shine Tube Steps.
Made in China


