background image

7

Cylinder Specifications

-

Any  L.P.  gas supply  cylinder  used  with  this appliance must be approximately  12  inches  diameter

and  18  inches  high.  The maximum  fuel  capacity  is  80%  and  is

approximately 20 pounds of propane.

-

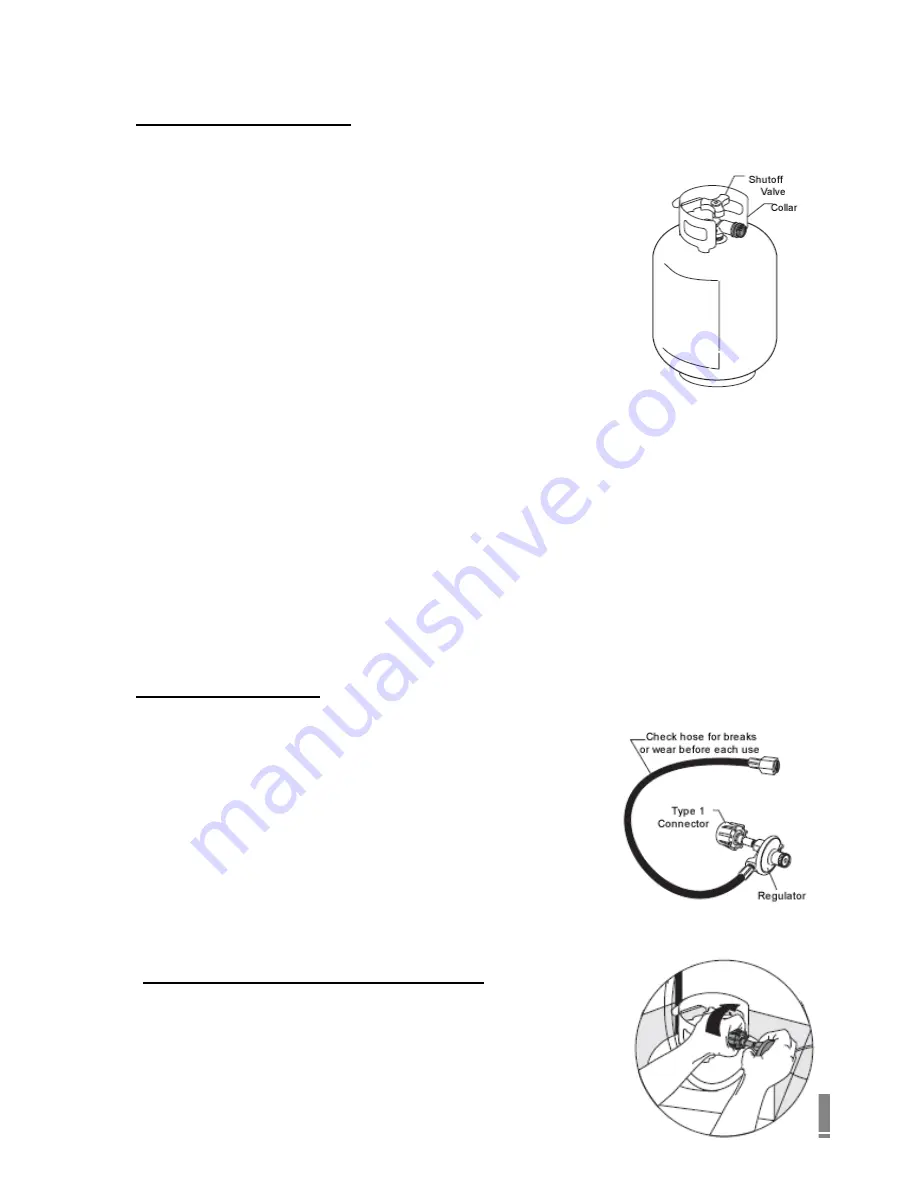
The L.P. cylinder must have a shut-off valve (see picture) terminating

in a Type 1 L.P.

-

A  Type  1  compatible  cylinder  with  a  Type  1  cylinder  valve  has a

back-check valve which does not permit gas flow, until a positive seal

has been obtained.

-

The  cylinder  must  be  arranged  for  vapor  withdrawal.  It  must also

include  a  collar  to  protect  the  cylinder  valve.  A  safety  relief device

having direct communication with the vapor space of cylinder must be

provided. This will expel high pressure gas if the cylinder is overfilled

or overheated which could result in fire or explosion.

-

All L.P. gas cylinders used with this appliance shall be constructed and marked in accordance with

the  specifications  for L.P.  gas  cylinders  of  the  U.  S.  Department  of  Transportation (DOT)  or  the

National Standard of Canada, CAN/CSA-B339

, Cylinders, Spheres and Tubes for Transportation of

Dangerous Goods;  and Commission,  as  applicable;  and shall  be  provided with  a  listed  overfilling

prevention device.

-

Read labels on the L.P. Gas Supply Cylinder.

-

New cylinders are always shipped empty for safety.

-

Allow only qualified L.P. gas dealers to fill or repair your L.P. gas supply cylinder.

-

Inform the gas dealer if it is a new or used cylinder to be filled.

-

After  filling,  have  the  gas  dealer  check  for  leaks  and  to  see  that the  relief  valve  remains  free  to

function.

Hose and Regulator

The Type 1 connection system has the following features:

-

The  system  will  not  allow  gas  to  flow  until  a  positive  connection

has been made.

NOTE: The  cylinder  control  valve  must  be  turned  off  before

any connection is made or removed.

-

The system has a thermal element that will shut off the flow of gas

in the event of a fire.

-

The system has a flow limiting device which, when activated, will

limit the flow of gas to 10 cubic feet per hour.

-

NEVER

use side burner without leak testing this connection.

LP(Propane) Gas Supply Connection

1. The tank valve should be in the “OFF” position. If not, turn the knob

clockwise until it stops.

2. Make sure all burner valves are in the “OFF” position.

3. Always connect the gas supply regulator as follows:

Summary of Contents for 1SSB

Page 1: ...ve this manual with side burner for future reference To consumer Keep this manual for future reference www sunstonegasgrills com Stainless Steel Side Burner Use Care Manual For Liquid Propane and Natural Gas Models 2CSB Double Slide In Side Burner LP NG 1SSB Single Drop In Side Burner LP NG ...

Page 2: ...nd maintain for optimum performance and longevity We know you ll enjoy your new side burner and thank you for choosing our product We hope you consider us for future purchases Please read and save the instructions This Manual provides specific operating instructions for your model Use your side burner only as instructed in this manual These instructions are not meant to cover every possible condit...

Page 3: ...tored in the vicinity of this or any other appliance WARNING DANGER indicates an imminently hazardous situation which if not avoided will result in death or serious injury CAUTION CAUTION indicates a potentially hazardous situation which if not avoided may result in minor or moderate personal injury or property damage WARNING FOR OUTDOOR USE ONLY NEVER operate side burner in enclosed areas as this...

Page 4: ...riquettes on the side burner 8 Keep children and pets away from hot burner DO NOT allow children to use or play near the side burner 9 Never attempt to repair or replace any part of the side burner yourself unless specifically recommended in this manual All other services should be performed by a qualified service technician 10 Never lean over an open burner Do not place clothing or other flammabl...

Page 5: ...ITION 65 WARNING The burning of gas cooking fuels generates some byproducts which are on the list of substances which are known by the State of California to cause cancer or reproductive harm California law requires businesses to warn customers of potential exposure to such substances To minimize exposure to these substances always operate this unit according to the Use and Care Manual ensuring yo...

Page 6: ... sure to contact your Burner dealer FIRST This propane gas side burner is designed to operate on propane gas ONLY at a pressure regulated at 11 water column W C when equipped with the correct propane orifices on the valves and a propane regulator on the supply line regulated at the residential meter The LP gas side burner is designed to be used with a standard 20 lbs gas cylinder and must be const...

Page 7: ... Tubes for Transportation of Dangerous Goods and Commission as applicable and shall be provided with a listed overfilling prevention device Read labels on the L P Gas Supply Cylinder New cylinders are always shipped empty for safety Allow only qualified L P gas dealers to fill or repair your L P gas supply cylinder Inform the gas dealer if it is a new or used cylinder to be filled After filling ha...

Page 8: ...have a safety cap installed as shown Do not store an LP tank in enclosed spaces such as a carport garage porch covered patio or other building Never leave a LP tank inside a vehicle which may become overheated by the sun Do not store LP tank in an area where children play LP Tank Filling Use only licensed and experienced dealers LP dealer must purged tank before filling Dealer should NEVER fill LP...

Page 9: ...ntractor or local gas company representative Hose and Regulator IMPORTANT NEVER use side burner without leak testing this connection Natural gas regulator model GR120N Gas pressure 4 101 6mm Quick disconnect model 1 2QDD DK Gas hose connector model CFN12 Maximum rate working pressure 1 2 Psig Natural Gas Supply Connection and Disconnection 1 Make sure all burner valves are in the OFF position 2 To...

Page 10: ...ide burner These instructions will provide you with the measurements necessary for you or your builder to construct a masonry structure to house your outdoor gas side burner IMPORTANT Gas fittings regulator and installer supplied shut off valves must be easily accessible Location Locate the side burner only in a well ventilated area Never locate the side burner in a building garage breezeway shed ...

Page 11: ... area It must not be used in or on recreational vehicles or boats INSTALLER NOTE This unit should be installed so that it can be removed at a later date if factory service is required Any protrusion into the side burner enclosure may prevent the unit from sliding into place ENSURING PROPER COMBUSTION AIR AND COOLING AIR FLOW You must maintain proper air flow for your side burner to perform as it w...

Page 12: ...ending on space and hangs from its counter top trim A deck is not required to support it from the bottom It is recommended that the enclosure have ventilation holes to prevent gas build up in the event of a leak The deck ledges and counter should be flat and level in reference to the floor LP TANK STORAGE AREA MUST BE ISOLATED FROM SIDE BURNER AND VENTED Cut out Dimensions figure A WIDTH DEPTH HEI...

Page 13: ...f equal parts mild detergent or liquid soap and water Leak Testing Valves Hose and Regulator 1 Turn all side burner control knobs to OFF 2 Be sure hose is tightly connected to LP tank 3 Completely open LP tank valve by turning cylinder valve knob counterclockwise right to left If you hear a rushing sound turn gas off immediately There is a major leak at the connection Correct before proceeding by ...

Page 14: ...detector mechanism internal to the tank when gas is allowed to escape rapidly it shuts off the gas supply A leak may significantly reduce the gas flow making the side burner difficult to light or causing low flames Double Side Burner Parts List ...

Page 15: ...15 Single Side Burner Parts List ...

Page 16: ...VALVE 25 Flare Adapter LP 1 LP FLARE 13 1SSB Valve LP NG 1 SB VALVE 26 Regulator NG 1 NG REG WARNING DO NOT use the burner if gas odor is present DO NOT stand with head body or arms over the burner when lighting Inspect the hose before using the burner If there is excessive abrasion or wear or if the hose is cut it must be replaced prior to the outdoor cooking gas appliance being put into operatio...

Page 17: ...ome reason igniters fail to light burners can be lit with a gas lighter NOTE To light gas burner with a gas lighter make sure the side burner has been leak tested and burners are properly located Remove the cooking grid from the burner you wish to light Insert long necked gas lighter placing near to burner ports Press in the control knob and rotate left to HIGH setting to release gas Turn on the b...

Page 18: ...burner and locate ceramic electrode to see the sparking 1 If burner does not light repeat previous steps or follow the following instructions 2 If ignition does not occur in 5 seconds turn the burner control knob to OFF wait 5 minutes to allow gas to dissipate and repeat the lighting process 3 To light either burner push and turn control knob counter clockwise to HIGH position and adjust to desire...

Page 19: ...ver defrost meat at room temperature or on a countertop Refrigerate leftovers within 2 hours of taking food off the grill Never let the tray boil dry That could be hazardous as grease from fatty foods that have collected in the tray could ignite and possibly cause bodily injury or property damage Use a meat thermometer to be sure food has reached a safe internal temperature Always trim excess fat ...

Page 20: ...r an extended period of time 1 Remove burners from side burner body by carefully lifting each burner up and away from gas valve orifice Wire brush entire outer surface of burner to remove food debris and dirt Clean any clogged ports with a stiff wire such as an open paper clip 2 Inspect the burner for damage cracks or holes and if such damage is found order and install a new burner 3 After install...

Page 21: ...ENANCE GUIDELINES 1 Keep outdoor cooking gas appliance area clear and free from combustible materials gasoline and other flammable vapors and liquids 2 Do not obstruct the flow of combustion and ventilation air 3 Keep the ventilation opening s of the cylinder enclosure free and clear from debris 4 Visually check burner flames Burner flames should be blue and stable with no yellow tips excessive no...

Page 22: ... dealer for service You may save yourself the cost of a service call Troubleshooting is for general purposes only If the problem still exists contact your dealer or the nearest authorized agency for service Problem Possible Causes and Solutions Burner will not light when the igniter button is pushed Is your gas supply turned on If this is an L P grill is there gas in your tank Check your gas level...

Page 23: ...ire you to move side burner away from the wind Lack of fuel Check to see cylinder valve is open and cylinder has fuel Low heat with the knob on HIGH Check to see if the fuel hose is bent or kinked Make sure the cooking area is clear of dust Check your gas supply and gas pressure If it is only one burner that appears low make sure the orifice or burner is clean Burners is Too Hot Excess grease buil...

Page 24: ... COVERED INTERNET PURCHASE DISCLAIMER SUN shall not be responsible for and shall not pay for the following Installation or start up 1 Service by an unauthorized service provider 2 Damage or repair due to service by an unauthorized service provider or use of unauthorized parts 3 Damage caused by accidents abuse alteration misuse installation that is not in accordance with the instructions contained...

Reviews: