


第
4
章
配電システムの取り付け
4-3
2.
キャリアプレートを持ち、ケーブル配線用の経路内のスロットに、プラグおよびケー
ブルの束を通します。
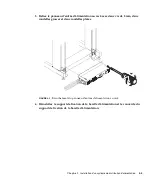
図
4-1
ケーブルハーネスおよびキャリアプレート
ケーブルに続いてキャリアプレートをスロットに通し、ラックの正面に向かって押し
ます。キャリアプレートをスライドさせて挿入し、その正面側の端を正面カバープ
レート上の垂直の溝に差し込みます。
キャリアプレートを完全に差し込むと、その底部にある小さな爪が配線経路内のス
ロットとそろって、キャリアプレートが右側に位置付けられます。小さな爪を完全に
かみ合わせると、その上の小さな垂直の溝に沿ってキャリアプレートが下がり、最終
的な位置におさまります。この位置で脱落防止機構付きねじを締めます。
3.
上部のケーブルハーネス
(A)
を行います。
Summary of Contents for 816-7766-10
Page 4: ...iv Power Distribution System Installation Guide November 2002...
Page 29: ...4 1 4 Sun Rack 3 4 1 4 6 4 7 3 1 B A B...
Page 30: ...4 2 2002 11 1...
Page 31: ...4 4 3 2 4 1 3 A 2...
Page 32: ...4 4 2002 11 4 2 4 2 B 2 1 A B 2...
Page 33: ...4 4 5 5 2 8 mm 4 3 6...
Page 34: ...4 6 2002 11 B A B 4 4 1 2 B B 5 3 4 5 A 2 4 6 A B...
Page 35: ...4 4 7 4 5 1 3 A0 B0 A1 B1 5 2 3 2 4 2...
Page 36: ...4 8 2002 11 5 6 A B 1 2...
Page 37: ...5 1 5 Sun Rack 5 1 5 6 5 7 B A B...
Page 38: ...5 2 2002 11 1...
Page 39: ...5 5 3 2 5 1 3 A 2...
Page 40: ...5 4 2002 11 4 5 2 B A B...
Page 41: ...5 5 5 5 8mm 5 3 6...
Page 42: ...5 6 2002 11 B A 5 4 1 2 B B 5 V 5 3 4 5 2 4 A 6 A B...
Page 43: ...5 5 7 5 5 1 A0 B0 A1 B1 5 2 3 4 5 6 A B...
Page 44: ...5 8 2002 11 1 2...
Page 45: ...6 1 6 Sun 6 1 6 6 6 7 B A B...
Page 46: ...6 2 2002 11 1...
Page 47: ...6 6 3 2 6 1 3 A 2...
Page 48: ...6 4 2002 11 4 6 2 B A B...
Page 49: ...6 6 5 5 8 6 3 6...
Page 50: ...6 6 2002 11 B A 6 4 1 2 B B 3 4 5 A 2 4 6 A B...
Page 51: ...6 6 7 6 5 1 A0 B0 A1 B1 2 3 4 5 6 A B...
Page 52: ...6 8 2002 11 1 2...
Page 53: ...7 1 7 Sun 7 1 7 6 7 7 B A B...
Page 54: ...7 2 2002 11 1...
Page 55: ...7 7 3 2 7 1 3 2 A...
Page 56: ...7 4 2002 11 4 7 2 B A B...
Page 57: ...7 7 5 5 8 7 3 6...
Page 58: ...7 6 2002 11 B A 7 4 1 2 B B 3 4 5 2 4 A 6 A B...
Page 59: ...7 7 7 7 5 1 A0 B0 A1 B1 2 3 4 5 6 A B...
Page 60: ...7 8 2002 11 1 2...


