9-14
SPARCstation 5 Service Manual—November 1996
9
9.3.2 Replacing the Diskette Drive
1. Remove the new diskette drive and its related parts from the antistatic
bag, and place them on an antistatic surface.
Read the diskette drive specifications sheet for related installation
information.
2. Hold the diskette drive in one hand, and lower it far enough into the
chassis to connect the cables to the back of the drive.
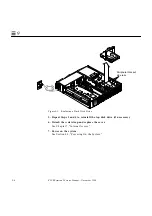
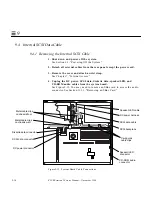
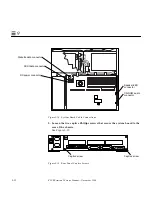
3. Attach the diskette data cable and the DC power cable (labeled P4)
to the drive connectors.
See Figure 9-11.
4. Lower the drive grommets into their corresponding slots in the side rails,
and slide the drive until it is fully secured in the bracket.
See Figure 9-11.
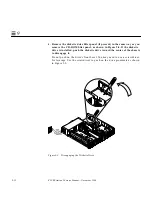
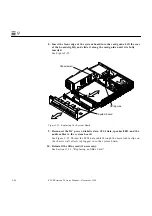
5. Install the diskette drive outer filler panel by inserting the bottom tabs
into the corresponding slots in the chassis, and rotating the panel upward
into position.
Summary of Contents for SPARCstation 5
Page 12: ...x SPARCstation 5 Service Manual November 1996...
Page 22: ...xx SPARCstation 5 Service Manual November 1996...
Page 23: ...Part 1 SystemInformation Chapter 1 Product Description...
Page 24: ......
Page 32: ......
Page 44: ...2 12 SPARCstation 5 Service Manual November 1996 2...
Page 64: ...4 10 SPARCstation 5 Service Manual November 1996 4...
Page 65: ...Part 3 PreparingforService Chapter 5 Safety and Tools Requirements Chapter 6 Power On and Off...
Page 66: ......
Page 72: ...5 6 SPARCstation 5 Service Manual November 1996 5...
Page 78: ......
Page 130: ...9 32 SPARCstation 5 Service Manual November 1996 9...
Page 132: ......
Page 136: ...10 4 SPARCstation 5 Service Manual November 1996 10...
Page 162: ...11 26 SPARCstation 5 Service Manual November 1996 11...
Page 163: ...Part 6 IllustratedPartsBreakdown Chapter 12 Illustrated Parts Breakdown...
Page 164: ......
Page 172: ......
Page 176: ...A 4 SPARCstation 5 Service Manual November 1996 A...
Page 198: ...D 10 SPARCstation 5 Service Manual November 1996 D...
Page 208: ...SPARCstation 5 Service Manual November 1996...
Page 210: ......


