System Board and Component Replacement
11-11
11
Note –
Before installing the S24 card, inspect the AFX Bus slot for bent pins. Do
not install the S24 card if a pin in the slot is bent. If necessary, straighten bent
pins with needlenose pliers.
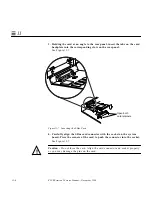
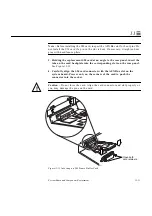
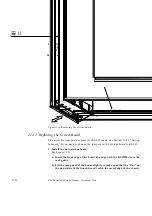
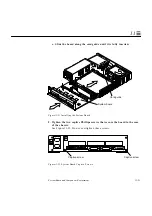
3. Holding the replacement S24 card at an angle to the rear panel, insert the
tabs on the card backplate into the corresponding slots on the rear panel.
See Figure 11-12.
4. Carefully align the S24 card connector with the AFX Bus slot on the
system board. Press evenly on the corners of the card to push the
connector into the socket.
Caution –
Do not force the card. Align the card connector and slot properly or
you may damage the pins on the card.
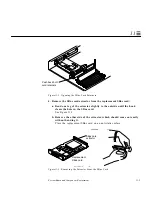
Figure 11-12 Inserting an S24 Frame Buffer Card
!
Open both
card retainers.
Summary of Contents for SPARCstation 5
Page 12: ...x SPARCstation 5 Service Manual November 1996...
Page 22: ...xx SPARCstation 5 Service Manual November 1996...
Page 23: ...Part 1 SystemInformation Chapter 1 Product Description...
Page 24: ......
Page 32: ......
Page 44: ...2 12 SPARCstation 5 Service Manual November 1996 2...
Page 64: ...4 10 SPARCstation 5 Service Manual November 1996 4...
Page 65: ...Part 3 PreparingforService Chapter 5 Safety and Tools Requirements Chapter 6 Power On and Off...
Page 66: ......
Page 72: ...5 6 SPARCstation 5 Service Manual November 1996 5...
Page 78: ......
Page 130: ...9 32 SPARCstation 5 Service Manual November 1996 9...
Page 132: ......
Page 136: ...10 4 SPARCstation 5 Service Manual November 1996 10...
Page 162: ...11 26 SPARCstation 5 Service Manual November 1996 11...
Page 163: ...Part 6 IllustratedPartsBreakdown Chapter 12 Illustrated Parts Breakdown...
Page 164: ......
Page 172: ......
Page 176: ...A 4 SPARCstation 5 Service Manual November 1996 A...
Page 198: ...D 10 SPARCstation 5 Service Manual November 1996 D...
Page 208: ...SPARCstation 5 Service Manual November 1996...
Page 210: ......


