8-6
SPARCstation 5 Service Manual—November 1996
8
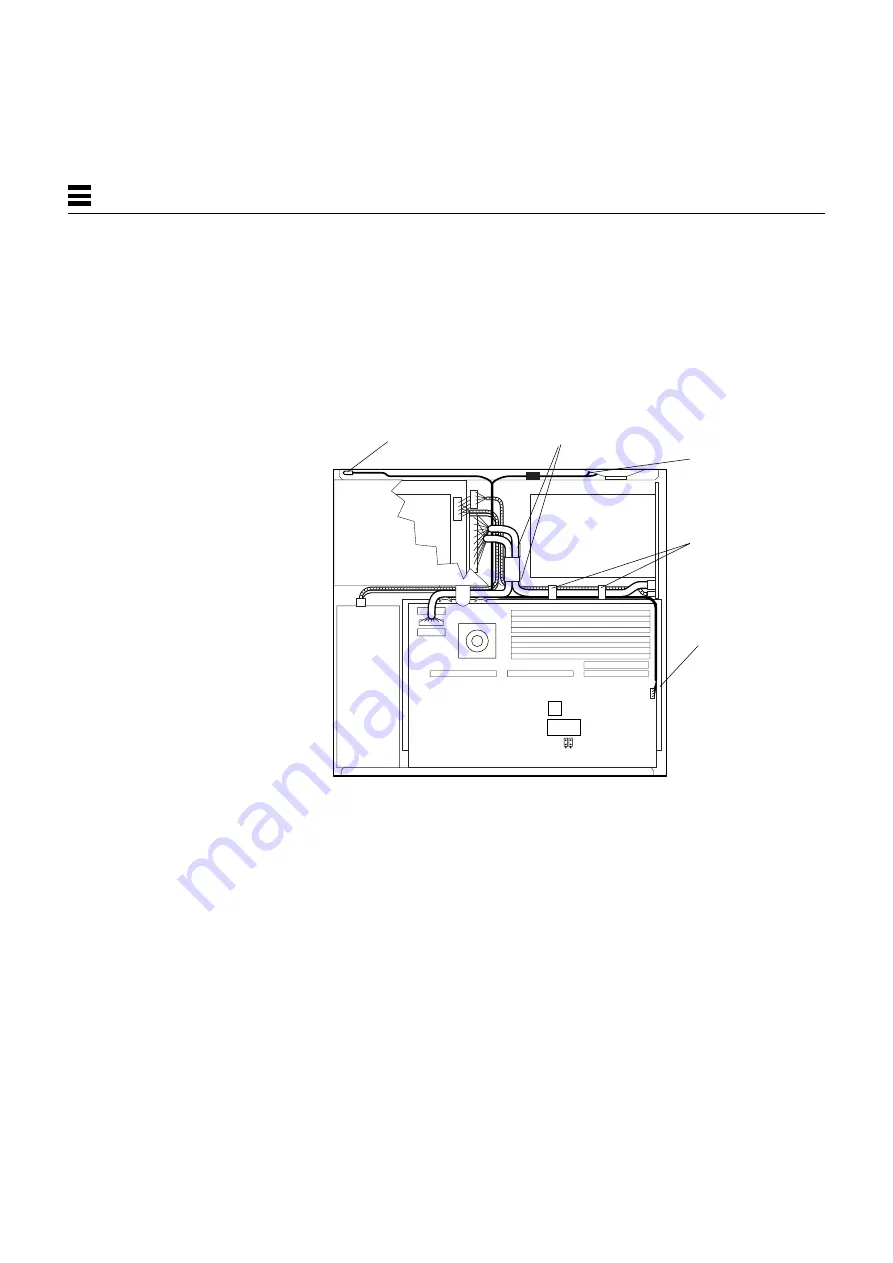
5. The LED is located at the shrink-wrapped end of the speaker/LED cable.
Using the tip of a small, flat-blade screwdriver, work the cable and LED
free from the plastic tabs that hold them in place.
See Figure 8-3.
6. Disconnect the speaker/LED connector from the system board.
See Figure 8-3.
Figure 8-3
Speaker/Power LED Cable Connections
7. Carefully free the speaker/LED harness from the card guide cable clips,
and lift the harness out of the system chassis.
Speaker/LED
cable connector
Power LED
Speaker cable
connectors
Card guide cable clips
on chassis floor
Metal cable clips
Summary of Contents for SPARCstation 5
Page 12: ...x SPARCstation 5 Service Manual November 1996...
Page 22: ...xx SPARCstation 5 Service Manual November 1996...
Page 23: ...Part 1 SystemInformation Chapter 1 Product Description...
Page 24: ......
Page 32: ......
Page 44: ...2 12 SPARCstation 5 Service Manual November 1996 2...
Page 64: ...4 10 SPARCstation 5 Service Manual November 1996 4...
Page 65: ...Part 3 PreparingforService Chapter 5 Safety and Tools Requirements Chapter 6 Power On and Off...
Page 66: ......
Page 72: ...5 6 SPARCstation 5 Service Manual November 1996 5...
Page 78: ......
Page 130: ...9 32 SPARCstation 5 Service Manual November 1996 9...
Page 132: ......
Page 136: ...10 4 SPARCstation 5 Service Manual November 1996 10...
Page 162: ...11 26 SPARCstation 5 Service Manual November 1996 11...
Page 163: ...Part 6 IllustratedPartsBreakdown Chapter 12 Illustrated Parts Breakdown...
Page 164: ......
Page 172: ......
Page 176: ...A 4 SPARCstation 5 Service Manual November 1996 A...
Page 198: ...D 10 SPARCstation 5 Service Manual November 1996 D...
Page 208: ...SPARCstation 5 Service Manual November 1996...
Page 210: ......

