Major Subassemblies
8-11
8
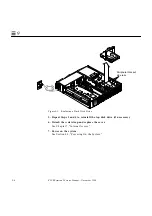
Figure 8-7
Speaker Connectors
8.3.2 Replacing the Internal Speaker
Caution –
Do not touch the black inner surface of the speaker. Handle the
speaker only by the metal frame to avoid damage.
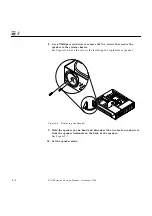
1. Pull the speaker end of the speaker/LED cable through the speaker
opening in the chassis wall.
2. Unpack the replacement speaker.
3. Slide the fast-on connectors at the end of the speaker/LED cable onto the
terminals of the replacement speaker.
See Figure 8-7.
Note –
One connector and terminal pair is larger than the other. They are sized
differently to ensure proper connection.
Small fast-on
connector
Large fast-on
connector
Speaker
Rear View
!
Summary of Contents for SPARCstation 5
Page 12: ...x SPARCstation 5 Service Manual November 1996...
Page 22: ...xx SPARCstation 5 Service Manual November 1996...
Page 23: ...Part 1 SystemInformation Chapter 1 Product Description...
Page 24: ......
Page 32: ......
Page 44: ...2 12 SPARCstation 5 Service Manual November 1996 2...
Page 64: ...4 10 SPARCstation 5 Service Manual November 1996 4...
Page 65: ...Part 3 PreparingforService Chapter 5 Safety and Tools Requirements Chapter 6 Power On and Off...
Page 66: ......
Page 72: ...5 6 SPARCstation 5 Service Manual November 1996 5...
Page 78: ......
Page 130: ...9 32 SPARCstation 5 Service Manual November 1996 9...
Page 132: ......
Page 136: ...10 4 SPARCstation 5 Service Manual November 1996 10...
Page 162: ...11 26 SPARCstation 5 Service Manual November 1996 11...
Page 163: ...Part 6 IllustratedPartsBreakdown Chapter 12 Illustrated Parts Breakdown...
Page 164: ......
Page 172: ......
Page 176: ...A 4 SPARCstation 5 Service Manual November 1996 A...
Page 198: ...D 10 SPARCstation 5 Service Manual November 1996 D...
Page 208: ...SPARCstation 5 Service Manual November 1996...
Page 210: ......


