Chapter 5
FC Module FRUs
5-11
3. To implement the revised configuration settings from step 1 or step 2, choose
“system Functions” from the Main Menu, choose “Reset controller” and press
Return. Then choose Yes to confirm.
5.2
Replacing I/O Expansion Modules
Be sure to follow
“Static Electricity Precautions” on page 1-5
.
All I/O expansion modules are hot-serviceable. Hot-serviceable means that the
module can be replaced while the array and hosts are powered on but the connected
hosts must be inactive.
Caution –
When you replace an I/O expansion module, the connected hosts must
be inactive during the replacement procedure.
5.2.1
Removing the I/O Expansion Module
Keep the array powered on, and be sure that the connected hosts are inactive during
this procedure.
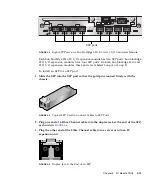
1. Turn the thumbscrews on the left and right sides of an I/O expansion module
counterclockwise until the thumbscrews are disengaged from the chassis.
2. Hold the thumbscrews and pull out the I/O expansion module.
5.2.2
Installing the I/O Expansion Module
Keep the array powered on, and be sure that the connected hosts are inactive during
this procedure.
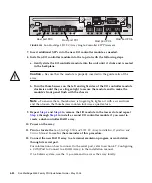
1. Slide the I/O expansion module into the chassis until the module is firmly seated
in the backplane, and the module’s front panel is flush with the chassis.
Caution –
Be sure that the I/O expansion module is properly inserted in the guide
rails of the array.
2. Turn the thumbscrews on the left and right sides of the I/O expansion module
clockwise until the thumbscrews are finger-tight to secure the module.


