background image

Chapter 3

Understanding the Status Indicators

37

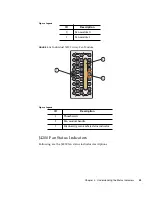
SIM Board Status Indicators

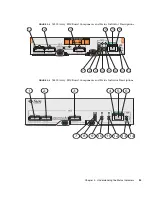
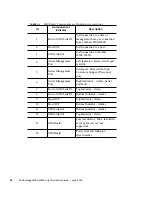
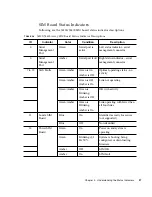
Following are the J4200/J4400 SIM board status indicator descriptions:

TABLE 3-4

J4200/J4400 Array SIM Board Status Indicator Descriptions

ID

Indicator

Color

Condition

Description

4

Serial
Management
Port

Green

Serial port is
active

Left status indicator - serial
management connector

6

Serial
Management
Port

Amber

Serial port fault Right status indicator - serial

management connector

7 to 12

SAS Faults

Green/Amber

Green is On

Amber is Off

Optimal operating status - no
activity

Green/Amber

Green is Off

Amber is On

Link not operating

Green/Amber

Green is
Blinking

Amber is Off

OK with activity

Green/Amber

Green is
Blinking

Amber is On

Link operating with fewer than
all four links

13

Locate SIM
Board

Blue

On

Identified as ready for service
(not supported)

Blue

Off

Not identified

14

Power SIM
Board

Green

On

Power on and system is
operating

Green

Blinking @ 1
Hz 50%

System is booting, being
configured, or downloading
firmware

Amber

Off

SIM OK

Amber

On

SIM fault

Summary of Contents for Sun Storage J4200

Page 1: ...Sun Microsystems Inc www sun com Submit comments about this document at http www sun com hwdocs feedback Sun Storage J4200 J4400 Array System Overview Part No 820 3223 14 June 2009 ...

Page 2: ...INVALID Copyright 2009 Sun Microsystems Inc 4150 Network Circle Santa Clara Californie 95054 États Unis Tous droits réservés Sun Microsystems Inc possède les droits de propriété intellectuels relatifs à la technologie décrite dans ce document En particulier et sans limitation ces droits de propriété intellectuels peuvent inclure un ou plusieurs des brevets américains listés sur le site http www su...

Page 3: ...Access Tray Components 11 J4200 J4400 Array SIM Board 13 SIM Board Status Indicators 16 J4200 J4400 Array Power Supplies 17 J4200 Power Supply Status Indicators 19 J4400 Power Supply Status Indicators 21 J4200 Array Fan Modules 22 J4200 Fan Status Indicators 23 Customer Replaceable Units 24 Management Software 24 Full Management Software 25 Remote Proxy 25 Command Line Interface 25 ...

Page 4: ...dicators 40 41 J4400 Power Supply Status Indicators 42 J4200 Array Fan Modules 42 J4200 Fan Status Indicators 43 44 4 Understanding the J4000 Family Event Log 45 5 SAS Multipathing 49 System Requirements 49 Required Operating Systems 50 Required Patch for Solaris 10 U6 With SATA Drives 50 Required Firmware and Drivers 50 Where to Get Drivers 51 Required HBA 51 Required CAM Versions for Multipathin...

Page 5: ... Discovery of SAS Devices 60 Enabling and Disabling Multipathing in the Windows Operating System 61 To Enable Multipathing in Windows 2008 61 To Discover Device Multipaths 64 To Select a Load Balancing Policy 68 To Disable Multipathing in Windows 2008 71 Enabling and Disabling Multipathing in the Linux Operating System 79 To Enable Multipathing in Linux 79 To Disable Multipathing in Linux 80 81 6 ...

Page 6: ...vi Sun Storage J4200 J4400 Array System Overview June 2009 Problem Viewing the Number of Disks 86 LED Problems 87 Disk Swapping 87 Contacting Sun Technical Support 87 Glossary 89 Index 95 ...

Page 7: ...ray 8 FIGURE 1 8 Disk Drive 10 FIGURE 1 9 J4200 Array Rear Access Components 11 FIGURE 1 10 J4400 Array Rear Access Components 12 FIGURE 1 11 J4200 Array SIM Board Components and Status Indicator Descriptions 14 FIGURE 1 12 J4400 Array SIM Board Components and Status Indicator Descriptions 14 FIGURE 1 13 J4200 Array Power Supplies 17 FIGURE 1 14 J4400 Array Power Supplies 18 FIGURE 1 15 Individual...

Page 8: ... FIGURE 5 5 Server Manager Feature Display 62 FIGURE 5 6 Add Features Wizard Select Features Window 63 FIGURE 5 7 Confirm Installation Selections Window 63 FIGURE 5 8 Add Features Wizard Installation Results Window 64 FIGURE 5 9 MPIO Properties Window 65 FIGURE 5 10 MPIO Properties Window Device Multi Paths Tab 66 FIGURE 5 11 Highlighted Device Hardware for Discovering Multipaths 67 FIGURE 5 12 Re...

Page 9: ...s ix FIGURE 5 23 Remove Features Wizard Window 77 FIGURE 5 24 Confirm Removal Selections Window 78 FIGURE 5 25 Removal Results Window 78 FIGURE 5 26 Restart Now Window 79 FIGURE 5 27 Removal Results Window 79 ...

Page 10: ...x Sun Storage J4200 J4400 Array System Overview June 2009 ...

Page 11: ...s Indicators 21 TABLE 1 9 J4200 Fan Status Indicators 23 TABLE 2 1 Sun Storage J4200 J4400 Specifications 27 TABLE 3 1 J4200 J4400 Front Panel Status Indicators 32 TABLE 3 2 J4200 J4400 Disk Drive Status Indicators 33 TABLE 3 3 SIM Board Components and Indicator Associations 36 TABLE 3 4 J4200 J4400 Array SIM Board Status Indicator Descriptions 37 TABLE 3 5 J4200 Array Power Supply Components 40 T...

Page 12: ... J4400 Array System Overview June 2009 TABLE 5 1 Operating Systems That Support J4200 J4400 Multipathing 50 TABLE 5 2 Required Drivers By Operating System 51 TABLE 5 3 stmsboot Options 56 TABLE 5 4 Load Balance Policies 70 ...

Page 13: ...ent describes the individual components and status indicators specifications the event log and troubleshooting information Refer to the Sun Storage J4200 J4400 Array Release Notes 820 3222 nn for any late breaking information Before You Read This Book Before you begin to install the Sun Storage J4200 J4400 you must have already prepared the site as described in these books Sun Storage J4200 J4400 ...

Page 14: ... Release Notes 820 3222 nn General operation and troubleshooting Sun Storage J4200 J4400 Array System Overview 820 3223 nn Disk drive replacement procedures Sun Storage J4200 J4400 Array Disk Drive Replacement Guide 820 3225 nn SIM board replacement procedures Sun Storage J4200 Array SIM Board Replacement Guide 820 3226 nn SIM board replacement procedures Sun Storage J4400 Array SIM Board Replacem...

Page 15: ...onsible or liable for any actual or alleged damage or loss caused by or in connection with the use of or reliance on any such content goods or services that are available on or through such sites or resources Contacting Sun Technical Support If you have technical questions about this product that are not answered in this document go to http www sun com service contacting Sun Welcomes Your Comments...

Page 16: ...xvi Sun Storage J4200 J4400 Array System Overview June 2009 ...

Page 17: ... designed to fit into a standard 19 inch cabinet This renders a raw storage capacity of 14 4 TB for SAS disks 300 GB per disk or 36 TB for SATA II disks 750 GB per disk for the J4200 and 28 8 TB for SAS disks 300 GB per disk or 72 TB for SATA II disks 750 GB per disk for the J4400 Refer to the Sun Storage J4200 J4400 Array Release Notes 820 3222 nn for a complete listing of supported drives The J4...

Page 18: ... rails The J4200 J4400 array can be delivered fully assembled or packaged as individually ordered components that you install into the chassis Customer Replaceable Units on page 24 provides a list of these components All CRUs have a document describing installation instructions FIGURE 1 1 shows the Sun Storage J4200 SAS connection to a data and management host FIGURE 1 1 J4200 Array Connected to a...

Page 19: ...URE 1 2 shows the Sun Storage J4400 SAS connection to a data and management host FIGURE 1 2 J4400 Array Connected to a Data and Management Host FIGURE 1 3 shows a Sun Storage J4200 interconnected with other J4200 arrays Server Connection Host Link In ...

Page 20: ... Interconnected With Three Additional J4200s FIGURE 1 4 shows a Sun Storage J4400 interconnected with other J4400 Arrays Host or SIM Link In Host or SIM Link In Tray 0 To Host Server Tray 1 Tray 2 Tray 3 Host or SIM Link In SIM Link Out Host or SIM Link In SIM Link Out SIM Link Out ...

Page 21: ...J4200 J4400 Array 5 FIGURE 1 4 J4400 Array Interconnected With Three Additional J4400s Tray 0 Tray 1 Tray 2 Tray 3 To Host Server Host or SIM Link In Host or SIM Link In Host or SIM Link In SIM Link Out SIM Link Out SIM Link Out ...

Page 22: ...00 Array Features that are accessed from the front see FIGURE 1 5 for the J4200 and FIGURE 1 6 for the J4400 of the Sun Storage J4200 J4400 include the following End caps Plastic caps on the right and left sides of the tray The left side has the device s serial number The right side includes the audible alarm silence button you can press to turn off an alarm The system identifier dial is not curre...

Page 23: ...Chapter 1 The Sun Storage J4200 J4400 Array 7 FIGURE 1 5 J4200 Array Front Access Components FIGURE 1 6 J4400 Array Front Access Components 2 1 1 3 1 1 2 3 ...

Page 24: ...Sun Storage J4200 J4400 are located on the right side end cap of the tray FIGURE 1 7 FIGURE 1 7 Indicators on the Front of a Sample J4200 Array Following are the J4200 J4400 Array front panel status indicator descriptions ID Description 1 End caps with serial number left and status indicators right 2 Disks 3 Audible alarm silence button 1 2 3 4 ...

Page 25: ...ays can be interconnected for a maximum of 96 disk drives in a chain You must have at least two drives in either array Refer to the Sun Storage J4200 J4400 Array Release Notes for a complete listing of the supported drives Twelve or 24 removable disk drives are numbered from left to right labeled from 0 on the lower left to 11 J4200 or 23 J4400 on the upper right TABLE 1 1 J4200 J4400 Front Panel ...

Page 26: ...Description 1 Release button press to the right to disengage the release handle 2 Disk handle 3 OK status indicator 4 Ready to Remove Fault status indicators ID Indicator Color Condition Description 3 OK Green On Ready for access Green Blinking Spinning down or accessing drives Green Off Offline or inactive 4 Ready to Remove Fault Blue On Drives have no pending writes and can be removed safely Amb...

Page 27: ...9 shows the J4200 Array rear access components FIGURE 1 9 J4200 Array Rear Access Components Figure Legend ID Component Description 1 SIM Modules Two removable SAS Interface Module SIM boards Each has a Host or SIM Link In port a Host Out port a SIM Link Out port and an RJ 45 port for serial console access reserved for Sun Customer Support personnel The SIM boards are identified as SIM 0 bottom an...

Page 28: ...wer supply modules with built in fans Power Supply 0 is on the left and Power Supply 1 is on the right 2 SIM Modules Two removable SAS Interface Module SIM boards Each has a Host or SIM Link In port a Host Out port a SIM Link Out port and an RJ 45 port for serial console access reserved for Sun Customer Support personnel The SIM boards are identified as SIM 0 left and SIM 1 right 2 1 ...

Page 29: ...s required by the array s form factor Each hot swappable SIM board has one SAS inbound connector and two SAS outbound connectors and one serial management port that is reserved for Sun Customer Support Personnel only FIGURE 1 11 and FIGURE 1 12 call out the individual components on the back of the SIM boards and TABLE 1 3 provides descriptions of these components TABLE 1 4 describes the SIM board ...

Page 30: ...Overview June 2009 FIGURE 1 11 J4200 Array SIM Board Components and Status Indicator Descriptions FIGURE 1 12 J4400 Array SIM Board Components and Status Indicator Descriptions 7 8 9 10 11 12 13 14 1 2 3 5 6 4 12 14 13 1 2 3 11 10 9 8 7 6 5 4 ...

Page 31: ...t Port Left Indicator Green Serial port is active 5 Serial Management Port Serial port Reserved for Sun Customer Support Personnel only 6 Serial Management Port Right Indicator Amber Serial port fault 7 Host or SIM Link IN Top Indicator Green 8 Host or SIM Link IN Bottom Indicator Amber 9 Host OUT Top Indicator Green 10 Host OUT Bottom Indicator Amber 11 SIM Link Out Bottom Indicator Amber 12 SIM ...

Page 32: ...ght status indicator serial management connector 7 to 12 SAS Faults Green Amber Green is On Amber is Off Optimal operating status no activity Green Amber Green is Off Amber is On Link not operating Green Amber Green is Blinking Amber is Off OK with activity Green Amber Green is Blinking Amber is On Link operating with fewer than all four links 13 Locate SIM Board Blue On Identified as ready for se...

Page 33: ...ctrical power to the tray Caution The power supplies in this equipment can produce high energy hazards Only instructed personnel with authorized access to this equipment can remove and replace modules in the system Caution For products with multiple power cords all power cords must be disconnected to completely remove power from the system FIGURE 1 13 shows J4200 array power supplies and FIGURE 1 ...

Page 34: ...URE 1 15 shows an individual J4200 array power supply and FIGURE 1 16 shows an individual J4400 array power supply FIGURE 1 15 Individual J4200 Power Supply TABLE 1 5 describes the J4200 power supply components and TABLE 1 8 provides the J4200 power supply status indicator descriptions 0 1 1 2 3 5 4 6 ...

Page 35: ...BLE 1 8 3 Universal power input connector Power cord connector 4 Power supply latch Holds the power supply handle down 5 Power cord clamp Holds the power cord in place 6 Power supply handle Used to remove the power supply from and insert the power supply into the J4200 enclosure ID Indicator Color Condition Description 1 Power Status Green On AC DC Power Ready Green Off No AC DC Power Input Green ...

Page 36: ...nts ID Component Description 1 Cooling fan status indicator See TABLE 1 8 2 AC power status indicator See TABLE 1 8 3 DC power status indicator See TABLE 1 8 4 Power supply status indicator See TABLE 1 8 5 Power on off switch Turns power to the array on or off 6 Power cord tie wrap Holds the power cord in place 7 Universal power input connector Provides power to the array 8 Right ejection arm and ...

Page 37: ...atus Indicators ID Indicator Color Condition Description 1 Cooling fan status indicator Amber On Fan failure Amber Off Fans healthy 2 AC power status indicator Green On AC power ready Green Off No AC power input 3 DC power status indicator Green On DC power ready Green Off No DC power input 4 Power supply status indicator Amber On Power supply failure Amber Off Power supply healthy ...

Page 38: ... the vents on the back of each fan Each J4200 array contains two hot swappable fans for redundant cooling Fan Module 0 is on the left and Fan Module 1 is on the right If one fails the remaining fan continues to provide sufficient cooling to operate the array The remaining fan runs at a higher speed until the failed fan is replaced Replace a failed fan as soon as possible FIGURE 1 17 J4200 Array Fa...

Page 39: ... Individual J4200 Array Fan Module Figure Legend J4200 Fan Status Indicators Following are the J4200 fan status indicator descriptions ID Description 0 Fan module 0 1 Fan module 1 ID Description 1 Thumbscrew 2 Fan module handle 3 Bicolored green amber status indicator 1 2 3 ...

Page 40: ... replacements The J4200 J4400 CRUs are designed for customers to install without turning off the power with the exception of the Chassis CRU which by necessity must be shut down and replaced by another chassis The following hardware components are designed to be customer installable SIM Board Power Supply Fan J4200 only Disk Drives Chassis Management Software The Sun StorageTek Common Array Manage...

Page 41: ...tion http www sun com storagetek management_software resource_management cam Note If you are using the J4400 array as part of a Sun Storage 7000 Unified Storage System configuration you do not use the CAM software suite Instead you manage the array using the management software provided with the Unified Storage System Full Management Software The full management software is installed on a manageme...

Page 42: ...select the J4000 array The remote proxy must be enabled while running the installation wizard or script The remote proxy should not be enabled for directly connected arrays Command Line Interface The Sun StorageTek Common Array Manager software s command line interfaces provide the same control and monitoring capability as the Web browser and it is scriptable for running frequently performed tasks...

Page 43: ...tion Host Interface Three 3 G SAS ports on each SIM module Hard Disk Interface SAS Disk Drives 73 GB 146 GB and 300 GB at 15 K RPM SATA II Disk Drives 250 GB 500 GB and 750 GB at 7 2 K RPM Drive Slots J4200 A maximum of 12 disks per system with a two drive minimum interconnects up to four systems and 48 disk drives J4400 A maximum of 24 disks per system with a two drive minimum interconnects up to...

Page 44: ...ating Current Maximum Operating Current J4200 9 A maximum operating 100 VAC to 127 VAC range 47 to 63 Hz 4 5 A maximum operating 200 VAC to 240 VAC range 47 to 63 Hz 1 51 A maximum operating 240 VAC 198 VAC to 264 VAC range 50 to 60 Hz J4400 10 A maximum operating 100 VAC to 127 VAC range 47 to 63 Hz 2 47 A maximum operating 240 VAC 198 VAC to 264 VAC range 50 to 60 Hz Operating Environment Heat o...

Page 45: ...stralia and New Zealand Safety Standards UL CUL U S with Canada UL60950 1 TUV Sud Europe EN60950 1 CB by TUV IEC60950 1 BSMI Taiwan CNS14336 CCC China Sun Supported Racks Sun Rack 900 1000 cabinet Sun StorEdge Expansion cabinet Sun Fire Expansion Cabinet Any 19 inch wide 4 post EIA compatible rack or cabinet with a front to back depth between vertical cabinet rails of 61 cm to 91 cm 24 in to 36 in...

Page 46: ...30 Sun Storage J4200 J4400 Array System Overview June 2009 ...

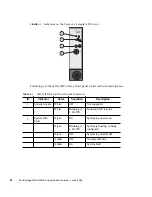
Page 47: ...t and back of the J4200 J4400 arrays This chapter includes the following sections Front Status Indicators Rear Status Indicators Front Status Indicators This section provides information on the disk drive status indicators Two indicators on the front of the Sun Storage J4200 J4400 are located on the right side end cap of the tray FIGURE 3 1 ...

Page 48: ...criptions TABLE 3 1 J4200 J4400 Front Panel Status Indicators ID Indicator Color Condition Description 1 System Locate White Off Not supported White Blinking 1 Hz 50 Location LED is active 2 System OK Fault Green On System is powered on Green Blinking 4 Hz 50 System is booting or being configured Green Off System is powered off Amber Off No current faults Amber On System fault 1 2 3 4 ...

Page 49: ... disk drive status indicator descriptions TABLE 3 2 J4200 J4400 Disk Drive Status Indicators ID Description 1 Release button Press to the right to disengage the release handle 2 Disk handle 3 OK status indicator 4 Ready to Remove Fault status indicators ID Indicator Color Condition Description 3 OK Green On Ready for access Green Blinking Spinning down or accessing drives Green Off Offline or inac...

Page 50: ...describes the status indicators on the back of the J4200 J4400 array J4200 SIM Board Following are the J4200 SIM board components and indicator descriptions Amber On HDD fault Service Action Required Amber Blinking 4 Hz 50 HDD locator Amber Off No failures ID Indicator Color Condition Description ...

Page 51: ... Indicators 35 FIGURE 3 3 J4200 Array SIM Board Components and Status Indicator Descriptions FIGURE 3 4 J4400 Array SIM Board Components and Status Indicator Descriptions 7 8 9 10 11 12 13 14 1 2 3 5 6 4 12 14 13 1 2 3 11 10 9 8 7 6 5 4 ...

Page 52: ...agement Port Left Indicator Green Serial port is active 5 Serial Management Port Serial port Reserved for Sun Customer Support Personnel only 6 Serial Management Port Right Indicator Amber Serial port fault 7 Host or SIM Link IN Top Indicator Green 8 Host or SIM Link IN Bottom Indicator Amber 9 Host OUT Top Indicator Green 10 Host OUT Bottom Indicator Amber 11 SIM Link Out Bottom Indicator Amber 1...

Page 53: ...tatus indicator serial management connector 7 to 12 SAS Faults Green Amber Green is On Amber is Off Optimal operating status no activity Green Amber Green is Off Amber is On Link not operating Green Amber Green is Blinking Amber is Off OK with activity Green Amber Green is Blinking Amber is On Link operating with fewer than all four links 13 Locate SIM Board Blue On Identified as ready for service...

Page 54: ...can produce high energy hazards Only instructed personnel with authorized access to this equipment can remove and replace modules in the system FIGURE 3 5 shows J4200 array power supplies and FIGURE 3 6 shows J4400 array power supplies FIGURE 3 5 J4200 Array Power Supplies Figure Legend ID Component 0 Power Supply 0 1 Power Supply 1 0 1 ...

Page 55: ...3 7 shows an individual J4200 array power supply and FIGURE 3 8 shows an individual J4400 array power supply FIGURE 3 7 Individual J4200 Power Supply TABLE 3 5 describes the J4200 power supply components and TABLE 3 6 provides the J4200 power supply status indicator descriptions 0 1 1 2 3 5 4 6 ...

Page 56: ...See TABLE 3 6 3 Universal power input connector Power cord connector 4 Power supply latch Holds the power supply handle down 5 Power cord clamp Holds the power cord in place 6 Power supply handle Used to remove the power supply from and insert the power supply into the J4200 enclosure ID Indicator Color Condition Description 1 Power Status Green On AC DC Power Ready Green Off No AC DC Power Input ...

Page 57: ... Component Description 1 Cooling fan status indicator See TABLE 3 8 2 AC power status indicator See TABLE 3 8 3 DC power status indicator See TABLE 3 8 4 Power supply status indicator See TABLE 3 8 5 Power on off switch Turns power to the array on or off 6 Power cord tie wrap Holds the power cord in place 7 Universal power input connector Provides power to the array 8 Right ejection arm and captiv...

Page 58: ... provides the fan module indicator descriptions FIGURE 3 9 J4200 Array Fans ID Indicator Color Condition Description 1 Cooling fan status indicator Amber On Fan failure Amber Off Fans healthy 2 AC power status indicator Green On AC power ready Green Off No AC power input 3 DC power status indicator Green On DC power ready Green Off No DC power input 4 Power supply status indicator Amber On Power s...

Page 59: ...0 Individual J4200 Array Fan Module Figure Legend J4200 Fan Status Indicators Following are the J4200 fan status indicator descriptions ID Description 0 Fan module 0 1 Fan module 1 ID Description 1 Thumbscrew 2 Fan module handle 3 Bicolored green amber status indicator 1 2 3 ...

Page 60: ...4200 J4400 Array System Overview June 2009 TABLE 3 9 J4200 Fan Status Indicators Indicator Color Condition Description Fan Status Green Amber Off Off No Power Green Amber On Off Fan Healthy Green Amber Off On Fan Fault ...

Page 61: ... SYSLOG_SYSTEM_POWER_ON System was powered on and booted 2 SYSLOG_SYSTEM_POWER_OFF System was shut down Not currently supported 3 SYSLOG_STATUS_FAIL_SIM0 SIM 0 was disabled due to runtime failure Contact Sun Service http www sun com su pport contacting 4 SYSLOG_STATUS_FAIL_SIM1 SIM 1 was disabled due to runtime failure Contact Sun Service http www sun com su pport contacting 5 SYSLOG_PLUGOUT_FAN0 ...

Page 62: ...GIN_FAN0 Fan 0 is present 14 SYSLOG_PLUGIN_FAN1 Fan 1 is present 15 SYSLOG_PLUGIN_SPS0 Power 0 is present 16 SYSLOG_PLUGIN_SPS1 Power 1 is present 17 SYSLOG_POWER_BTN Front panel button is pressed to mute alarm 18 SYSLOG_PHY_ERR_CNT PHY error count exceeds threshold value The drive slot or SAS port is unstable Check disk status and SAS cable connections 19 SYSLOG_PWROK_SPS0 Power supply 0 has powe...

Page 63: ... of fault tolerance 29 SYSLOG_OK_SPS0 Power Supply 0 was installed J4400 only 30 SYSLOG_OK_SPS1 Power Supply 1 was installed J4400 only 31 SYSLOG_PLUGIN_PORT SAS port 1 is up 32 SYSLOG_WDT_TIMEOUT SIM 1 is disabled due to timeout 33 SYSLOG_DIAG_PASS Completed and passed diagnostic test 34 SYSLOG_DIAG_FAIL Completed and failed diagnostic test Contact Sun Service http www sun com su pport contacting...

Page 64: ...e 2009 41 SYS Fan 1 has failed 42 SYSLOG_TEMP_WARN Nominal temperature has been exceeded 43 SYSLOG_TEMP_CRIT Maximum temperature has been exceeded 44 SYSLOG_VOLT_WARN Nominal voltage has been exceeded 45 SYSLOG_VOLT_CRIT Maximum voltage has been exceeded ...

Page 65: ...00 J4400 arrays You enable disable and configure multipathing through the operating software This chapter includes the following information System Requirements on page 49 Configuration Examples on page 52 Enabling and Disabling Multipathing in the Solaris Operating System on page 56 Enabling and Disabling Multipathing in the Windows Operating System on page 61 Enabling and Disabling Multipathing ...

Page 66: ...s Required Firmware and Drivers To use multipathing with the J4200 J4400 arrays the firmware in your configuration must meet these requirements Every J4200 J4400 must have the latest SIM firmware available from the Common Array Manager CAM version 6 1 2 Every server must have the latest operating system firmware For each operating system TABLE 5 2 lists the required drivers TABLE 5 1 Operating Sys...

Page 67: ...de Version 1 00 49 2007 09 21 Required CAM Versions for Multipathing For the latest information about which versions of the Sun StorageTek Common Array Manager CAM you must use in a multipathing configuration refer to the Sun Storage J4200 J4400 Array Release Notes part number 820 3222 xx which is available at the following location http docs sun com app docs prod j4200 array TABLE 5 2 Required Dr...

Page 68: ...Sun Storage J4200 J4400 Array System Overview June 2009 Configuration Examples This section includes examples of how to cable J4200 J4400 arrays to each other and to host HBAs in a multipathing environment ...

Page 69: ...ne Host FIGURE 5 1 shows an example of SAS cables connecting the ports on the host s HBA to the SIM boards on the back of an array FIGURE 5 1 Cabling Example for Multipathing With One Array and One Host Figure Legend 1 Host or SIM Link In 2 Host Out 3 SIM Link Out ...

Page 70: ...d Two Hosts FIGURE 5 2 shows an example of cabling for multipath in a configuration with two hosts with two HBAs on each host and two arrays cabled together FIGURE 5 2 Cabling Example for Multipathing With Two Arrays and Two Hosts Figure Legend 1 Host or SIM Link In 2 Host Out 3 SIM Link Out ...

Page 71: ...GURE 5 3 shows an example of cabling for multipath in a configuration with one host with two HBAs on that host and two arrays cabled together FIGURE 5 3 Cabling Example for Multipathing With Two Arrays and One Host Figure Legend 1 Host or SIM Link In 2 Host Out 3 SIM Link Out ...

Page 72: ...vices trees multipathing enabled devices receive new names that indicate that they are under multipathing control This means a device has a different name from its original name after enabling when it is under multipathing control The stmsboot command automatically updates etc vfstab and dump configuration to reflect the device names changes when enabling or disabling Multipathing One reboot is re...

Page 73: ...oller ports Multipath capable ports include SAS mpt 7D controller ports Prompts you to reboot During reboot vfstab and the dump configuration update to reflect the device name changes Specifying D mpt limits the disabling operation to ports attached using the specified driver u Updates vfstab and the dump configuration after manually enabling or disabling multipathing on specific multipath capable...

Page 74: ... your system these controllers are devices pci 780 pci 0 pci 8 SUNW qlc 0 fp 0 0 devices pci 780 pci 0 pci 8 SUNW qlc 0 1 fp 0 0 devices pci 7c0 pci 0 pci 1 pci 0 2 LSILogic sas 1 devices pci 7c0 pci 0 pci 1 pci 0 2 LSILogic sas 1 devices pci 7c0 pci 0 pci 1 pci 0 2 LSILogic sas 2 devices pci 7c0 pci 0 pci 9 LSILogic sas 0 devices pci 7c0 pci 0 pci 9 LSILogic sas 0 If you do NOT wish to operate on...

Page 75: ... pci 0 pci 8 SUNW qlc 0 fp 0 0 devices pci 780 pci 0 pci 8 SUNW qlc 0 1 fp 0 0 devices pci 7c0 pci 0 pci 1 pci 0 2 LSILogic sas 1 devices pci 7c0 pci 0 pci 1 pci 0 2 LSILogic sas 1 devices pci 7c0 pci 0 pci 1 pci 0 2 LSILogic sas 2 devices pci 7c0 pci 0 pci 9 LSILogic sas 0 devices pci 7c0 pci 0 pci 9 LSILogic sas 0 If you do NOT wish to operate on these controllers please quit stmsboot and re inv...

Page 76: ...o update vfstab 4 and dumpadm 1M configurations to reflect the changed device names type stmsboot u Dynamic Discovery of SAS Devices SAS devices added and removed dynamically with the mpt 7d driver enable your system to detect specific targets and LUNs attached with these conditions If you add or remove a device in your SAS domain messages are written to the var adm messages file indicating presen...

Page 77: ...sable multipathing in the Windows 2008 operating system To Enable Multipathing in Windows 2008 1 From the Start menu select Server Manager as shown in FIGURE 5 4 The Server Manager opens FIGURE 5 4 Start Menu With Server Manager Selection 2 Select Features from the list of folders on the left to open the Features panel as shown in FIGURE 5 5 ...

Page 78: ...ry arrow to open or close the Features Summary and click the Features arrow to view the status of installed features 3 Click Add Features to enable the Add Features Wizard The Add Features Wizard Select Features window opens with the default Features selected and a list of optional features available for installation in your system as shown in FIGURE 5 6 ...

Page 79: ...tipath I O option from the Message Queuing sublist 5 Click Next The Add Features Wizard Confirm Installation Selections window opens as shown in FIGURE 5 7 FIGURE 5 7 Confirm Installation Selections Window 6 Click Install The Add Features Wizard Installation Results window opens as shown in FIGURE 5 8 ...

Page 80: ...atures Wizard Installation Results Window 7 Click Close 8 Close the Server Manager main window To Discover Device Multipaths 1 From the Windows Start menu FIGURE 5 4 select Administrative Tools The MPIO Properties window as shown in FIGURE 5 9 FIGURE 5 9 MPIO Properties Window ...

Page 81: ...ing 65 2 Select the Discover Multi Paths tab as shown in FIGURE 5 10 FIGURE 5 10 MPIO Properties Window Device Multi Paths Tab 3 Highlight the Device Hardware for which you want to discover multipaths as shown in FIGURE 5 11 ...

Page 82: ...ardware for Discovering Multipaths 4 Click OK The Reboot Required window opens as shown in FIGURE 5 12 FIGURE 5 12 Reboot Required Window 5 Click Yes Note For best results after reboot log in and change the default settings of the MPIO policies See To Select a Load Balancing Policy on page 68 ...

Page 83: ...rom the list of folders on the left to open the Device Manager window as shown in FIGURE 5 13 FIGURE 5 13 Device Manager Window 3 Click the Device name 4 Click Disk drives The list of disk drives opens as shown in FIGURE 5 13 5 Move your cursor over the device drive name for which you want information 6 Right click to open a menu and select Properties as shown in FIGURE 5 14 ...

Page 84: ...un Storage J4200 J4400 Array System Overview June 2009 FIGURE 5 14 Menu to Modify Device Configuration The Disk Drive Properties window opens as shown in FIGURE 5 15 FIGURE 5 15 Disk Drive Properties Window ...

Page 85: ... will be tried round robin upon failure of the active optimized path until an available path is found Round Robin The round robin policy attempts to evenly distribute incoming requests to all processing paths Round Robin with Subset The round robin with subset policy executes the round robin policy only on paths designated as active optimized The non active optimized paths will be tried on a round...

Page 86: ...per device basis Repeat this procedure for each disk drive To Disable Multipathing in Windows 2008 1 From the Windows Start menu select Administrative Tools MPIO as shown in FIGURE 5 17 The MPIO Properties window opens as shown in FIGURE 5 18 FIGURE 5 17 Selecting Administrative Tools MPIO From the Start Menu ...

Page 87: ...Chapter 5 SAS Multipathing 71 FIGURE 5 18 MPIO Properties Window 2 Highlight a device in the list as shown in FIGURE 5 19 ...

Page 88: ...pathing 3 Click Remove The Reboot Required window opens as shown in FIGURE 5 20 FIGURE 5 20 Reboot Required Window 4 Click Yes The system reboots 5 After reboot select Administrative Tools MPIO from the Windows Start menu The MPIO Properties window opens showing the device removed from the list as shown in FIGURE 5 21 ...

Page 89: ... List 6 Repeat Step 2 through Step 5 until all devices are removed from the Device Hardware Id list 7 From the Windows Start menu select Server Manager to open the Server Manager window 8 Select Features from the list of folders on the left to open the Features panel as shown in FIGURE 5 22 ...

Page 90: ... Sun Storage J4200 J4400 Array System Overview June 2009 FIGURE 5 22 Server Manager Window With Features Panel Open 9 Select Remove Features The Remove Features Wizard window opens as shown in FIGURE 5 23 ...

Page 91: ...hing 75 FIGURE 5 23 Remove Features Wizard Window 10 Highlight Multipath I O from the Message Queuing sublist The Confirm Removal Selections window opens as shown in FIGURE 5 24 FIGURE 5 24 Confirm Removal Selections Window ...

Page 92: ... window opens as shown in FIGURE 5 25 FIGURE 5 25 Removal Results Window 12 Click Close The system asks if you want to restart the server now as shown in FIGURE 5 26 FIGURE 5 26 Restart Now Window 13 Click Yes When the sever has restarted the Removal Results window opens as shown in FIGURE 5 27 ...

Page 93: ...4200 or a J4400 to a server with a supported version of Linux installed 2 On the server edit or create the etc multipath conf file 3 Reboot the server 4 After the reboot make sure that the OS discovers all the disks in the J4200 J4400 arrays either by using the Linux commands fdisk or lsscsi 5 Partition any disks you want to the desired sizes 6 Use the Linux command modprobe to add the loadable ke...

Page 94: ...ume mount have been placed over the device node of the multipathed disk quiesce the volume 2 Use the multipath f command to disable multipathing to a specific device multipath f mpath1 3 Use the multipath F command to disable multipathing on all multipathed devices multipath F Note If the message map in use appears for a device when you attempt to disable multipathing the device is still in use Yo...

Page 95: ...Chapter 5 SAS Multipathing 79 ...

Page 96: ...80 Sun Storage J4200 J4400 Array System Overview June 2009 ...

Page 97: ...Chapter 5 SAS Multipathing 81 ...

Page 98: ...82 Sun Storage J4200 J4400 Array System Overview June 2009 ...

Page 99: ...acement of Customer Replaceable Units CRUs In addition Service Advisor provides troubleshooting procedures for alarms Before you can access Service Advisor procedures you must have already installed the Common Array Manager software as described in Sun StorageTek Common Array Manager User Guide for the J4000 Array Family 820 3765 nn Host management data host management and remote command line inte...

Page 100: ... under Storage Systems 4 At the top right of the Storage System Summary page click Service Advisor The Service Advisor application is displayed in a separate window 5 In the left pane select the type of hardware replacement procedure you want to perform CRU FRU Removal Replacement Procedures X Options Array Troubleshooting Procedures Service Only Note Service only procedures are password protected...

Page 101: ...stic vinyl and foam material from the work area Before handling any CRU discharge any static electricity by touching a grounded surface Wear an anti static wrist strap at all times when handling any CRU Do not remove a CRU from its anti static protective bag until you are ready to install it After removing a CRU from the cabinet immediately place it in an anti static bag or anti static packaging H...

Page 102: ... Number of Disks LED Problems Disk Swapping If you are unable to resolve your issues you can browse the online Sun Solve repository to view additional suggestions http sunsolve sun com Additionally you can refer to Contacting Sun Technical Support on page 87 Problem Viewing the Number of Disks The number of disks present is not shown in the Device Management screen Action Verify that the J4200 J44...

Page 103: ...on the SIM board of the JB4200 is amber Action Make sure the SIM board is not disconnected from the SAS cable Disk Swapping When swapping out disks from a J4200 J4400 Array always replace a removed disk back into the same slot it had been in prior to the fault Failure to do this could result in lost or corrupted data Contacting Sun Technical Support If you are unable to resolve your problem go to ...

Page 104: ...88 Sun Storage J4200 J4400 Array System Overview June 2009 ...

Page 105: ...lso event alert A subtype of an event that requires user intervention The term actionable event often describes an alert See also event B block The amount of data sent or received by the host per I O operation the size of a data unit C capacity The amount of available physical capacity whether of a disk a tray of disks or an interconnected environment with several trays of disks CLI The command li...

Page 106: ...le unit CRU D data host Any host that uses the array for storage A data host is connected directly to the device See also host data path The route taken by a data packet between a data host and the storage device direct attached storage DAS A storage architecture in which one or two hosts that access data are connected physically to a storage array disk A physical drive component that stores data ...

Page 107: ...rage J4200 J4400 Array configuration a data host connected to the device using an HBA host bus adapter HBA An I O adapter that connects a host I O bus to a computer s memory system Abbreviated HBA Host bus adapter is the preferred term in SCSI contexts I in band management Software management traffic that uses the data path between a host and a storage device IOPS A measure of transaction speed re...

Page 108: ...The redundant design uses two power supplies in each array so that the array s data path continues to function if one of the power supplies fails provisioning The process of allocation and assignment of storage to hosts R RAID An acronym for Redundant Array of Independent Disks a family of techniques for managing multiple disks to deliver desirable cost data availability and performance characteri...

Page 109: ...tripe A striped array s stripe size is the stripe depth multiplied by the number of member extents A parity RAID array s stripe size is the stripe depth multiplied by one less than the number of member extents See also striping striping Short for data striping also known as RAID Level 0 or RAID 0 A mapping technique in which fixed size consecutive ranges of virtual disk data addresses are mapped t...

Page 110: ...94 Sun Storage J4200 J4400 Array System Overview June 2009 ...
Page 111: ...lated xiv E end caps alarm silence button 6 system identifier switch 6 F fan LEDs 23 43 fans Fan 0 11 Fan 1 11 LEDs 11 H HBA required for multipathing 51 L LEDs back 14 35 front 6 tray front 8 M management software 24 multipathing 49 P power supplies 11 12 power supply 0 11 12 power supply 1 11 12 power supply LEDs 19 21 40 42 product overview software management software 24 remote CLI client 25 R...

Page 112: ...ew June 2009 SIM 1 11 12 serial port 11 12 SIM SAS Interface Module 1 11 12 93 SIM boards 1 11 12 software overview management software 24 remote CLI client 25 T technical support contacting xv 87 third party web sites xv W web sites third party xv ...

Reviews: