2
Sun Storage J4400 Array Chassis Replacement Guide • April 2008
■
The audible alarm is sounding.
■
All of the component fault LEDs are green.
■
Disk drive ID/Status LEDs (front) are green
■
SIM Power LED (back) is green
■
Power supply module LEDs (back) are green
Note –
A steady amber LED on any component indicates a problem with that
component.
ESD Precautions
Observe the following electrostatic discharge (ESD) precautions:
■
Remove all plastic, vinyl, and foam material from the work area.
■
Wear an antistatic wrist strap at all times when handling any CRU.
■
Before handling any CRU, discharge any static electricity by touching a grounded
surface.
■
After removing a CRU from the cabinet, immediately place it on an antistatic mat.
■
Handle any card that is part of a CRU by its edges only and avoid touching the
components or circuitry.
■
Do not slide a CRU over any surface.
■
Limit body movement (which builds up static electricity) during the removal and
replacement of a CRU.
Removing a Chassis
Caution –
You must remove power from the chassis that needs to be replaced
before starting this procedure. All interconnected trays will be disrupted during this
procedure. Powering off one J4400 Array tray causes loss of access to other
interconnected trays.
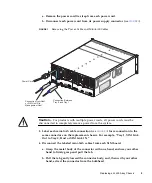
1. From the back of the cabinet, locate the chassis (also referred to as a tray) that is
being replaced (
see
“Verifying a Chassis Failure” on page 1
2. Disconnect the power cord from each power supply (
see
):


