background image

After each use

1. Turn the power off and remove the plug 

from the power outlet.

2. Allow the iron to cool before winding  

the cord around the built-in cord wrap.

Storage  

Empty the tank before storage.
Always store the iron on the base of the 
steam generator.

Cleaning 

To clean the exterior of your iron, wipe  
over with a damp soft cloth and wipe dry.

Caution:

 Do not use harsh abrasives, 

chemical cleaners or solvents to clean the 
exterior of your iron as these will damage 
the surface.

Cleaning the steam holes 

To remove build up from the steam holes 
which may affect steam performance,  
use a cotton wool tip moistened in 
methylated spirits.

Cleaning the soleplate


Wipe with a soft damp cloth and wipe dry.

Caution:

 Do not use scouring pads, 

abrasives or harsh cleaners to clean 
your soleplate, as these will scratch and 
damage the surface.

Calc Clean Reminder

Mineral deposits in tap water solidify 
when the water is heated and can build 
up in the steam holes and boiler system 
which can affect steam performance. It is 
important to regularly flush out the boiler 
to maintain the performance of the ironing 
system.
The Calc Clean light illuminates BLUE to 
remind you when it is time to flush the 

boiler. The Calc Clean light illuminates 
after approximately 8 hours of use.

Calc Clean instructions – using Sunbeam 
Ironing System Descaling Tablets

1. To flush the boiler, turn the unit off and 

wait for it to cool completely (approx 2 
hours).

2. Place the unit on a waterproof surface, 

or on the edge of the sink. 

3. Tilt the steam generator onto its side so 

that the bottom surface is visible.

Caution:

 if the unit has been used prior to 

cleaning the boiler cap will be very hot. 
Ensure that the unit has cooled completely 
before commencing the Calc cleaning 
process.
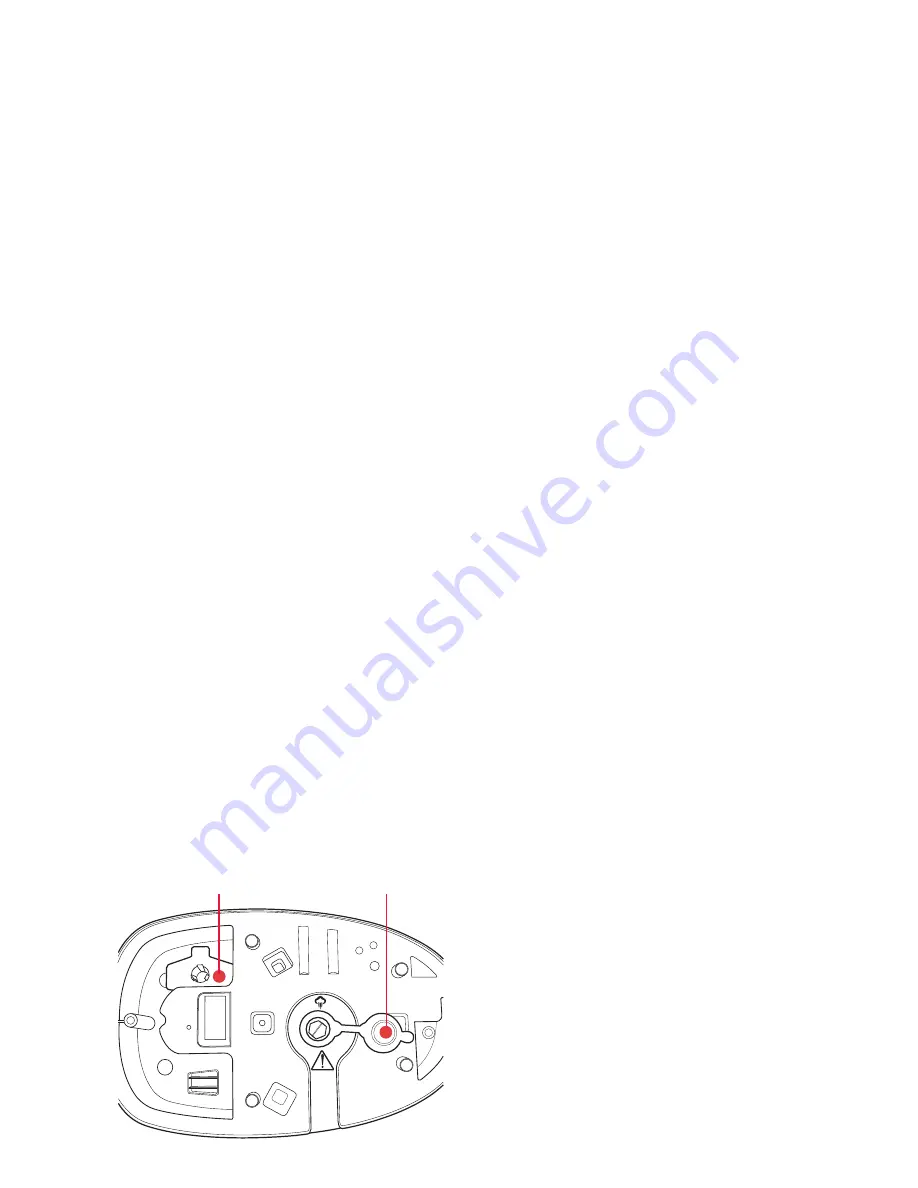
4.  Use the screw driver provided to slowly 

release the boiler cap. See fig 6.

Note:

 The boiler cap needs to be turned 

slowly to release any remaining steam.

Care and Cleaning

11

Figure 6

Screw driver

Boiler cap

Summary of Contents for Pro Glide 8300

Page 1: ...Please read these instructions carefully and retain for future reference Pro Glide 8300 Steam Generator Instruction Booklet SR8300...

Page 2: ...Features of your Pro Glide 8300 Steam Generator 4 Using your Pro Glide 8300 Steam Generator 7 Care and Cleaning of your Pro Glide 8300 Steam Generator 11 Ironing Tips Tricks 13 Ironing Chart 14 Impor...

Page 3: ...recommend the use of a residual current device RCD with a tripping current not exceeding 30mA in the electrical circuit supplying power to your appliances Do not immerse the appliance in water or any...

Page 4: ...reduce your ironing time and effort Steam will not be emitted from the iron when the steam release button is not depressed Iron rest Place the iron on the heat resistant iron rest between garments Re...

Page 5: ...stat light cycles on and off during ironing as the iron sole plate maintains the selected temperature Variable temperature dial The variable temperature dial adjusts the temperature of the iron sole p...

Page 6: ...the water tank Calc Clean Indicator The Calc Clean indicator illuminates to alert you when its is time to flush the boiler On Off Switch This switch controls the internal boiler and the element in the...

Page 7: ...e Filling the steam generator tank with water Slide the water tank out and lift the cover Using a jug slowly pour water into the water inlet until the maximum water level is reached Do not exceed the...

Page 8: ...e iron temperature is stable at the new setting by allowing the thermostat to cycle once the thermostat light will turn on off once 4 Select the desired steam level by pressing the low medium or high...

Page 9: ...ing a jug slowly pour water into the water inlet until the maximum water level is reached Do not exceed the maximum water level indicator 3 Push the water inlet cover firmly to close and slide the tan...

Page 10: ...Calc Clean light illuminates after approximately 8 hours of use Mineral deposits in tap water solidify when the water is heated and can build up in the steam holes and boiler system which can affect s...

Page 11: ...ater solidify when the water is heated and can build up in the steam holes and boiler system which can affect steam performance It is important to regularly flush out the boiler to maintain the perfor...

Page 12: ...To flush the boiler turn the unit off and wait for it to cool completely approx 2 hours 2 Place the unit on a waterproof surface or on the edge of the sink 3 Slowly release the boiler cap to release...

Page 13: ...lways use a pressing cloth to avoid shine marks Tip 6 Ironing the seam Always press seams in the same direction they were made When a garment is produced the fibres will naturally settle in the direct...

Page 14: ...er manufacturer s instructions Wool Steam iron on wrong side or use an ironing cloth Wool Blends Steam iron on wrong side or use an ironing cloth Cotton Blends Check label and follow manufacturer s in...

Page 15: ...guarantees that cannot be excluded under the Australian Consumer Law and under the New Zealand Consumer Guarantees Act In Australia you are entitled to a replacement or refund for a major failure and...

Page 16: ...sunbeam co nz Or call 0800 786 232 Solus and Resilium are registered trademarks of Sunbeam Corporation Made in China Due to minor changes in design or otherwise the product may differ from the one sho...

Reviews: