background image

8013ADELUXE/8013ABKDELUXE/8013ABLDELUXE


rev. 06/04/18


Do not fully tighten fasteners 


until prompted.

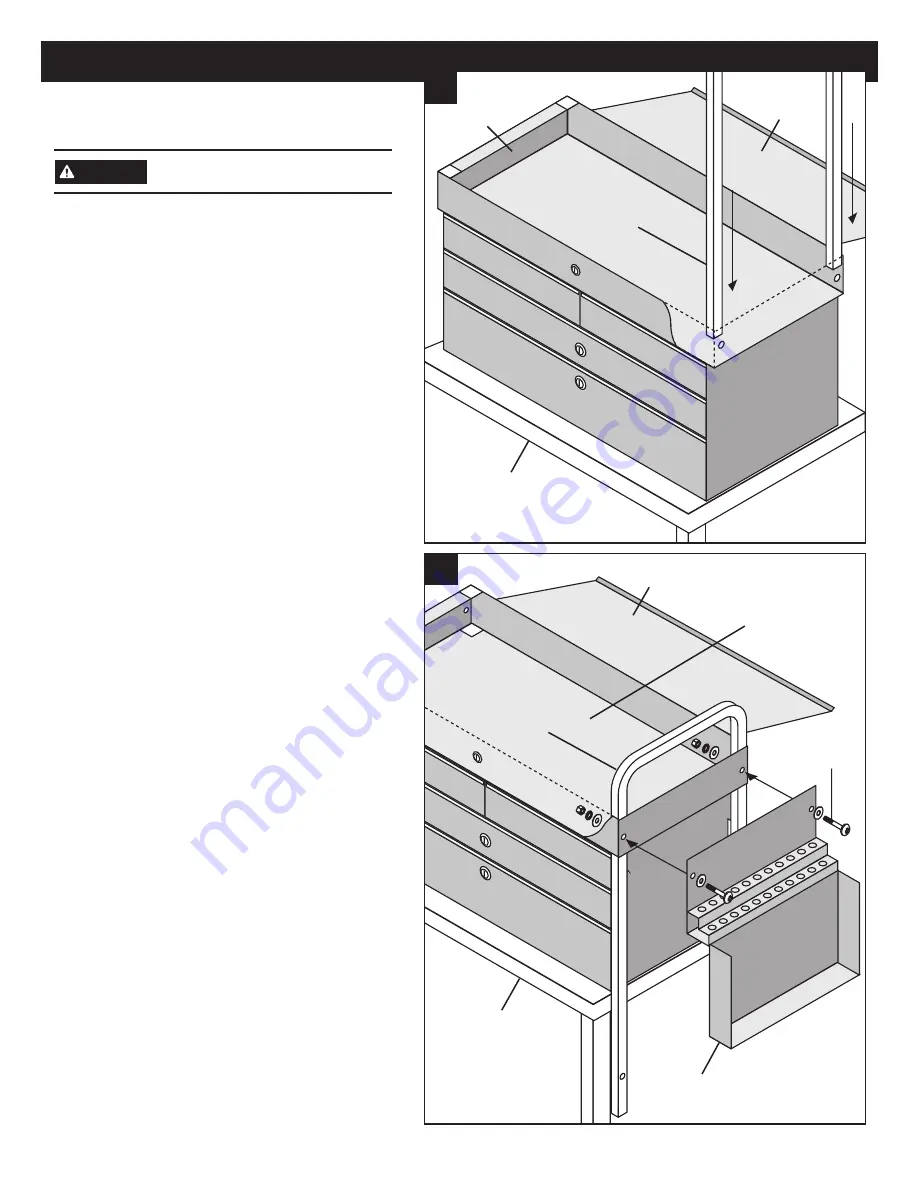
Step 1: Assembly preparation.

Clear table top and set Locking Drawer Assembly 
on table top, with lid facing up. Position the Locking 
Drawer Assembly so that one end hangs off of the 
table enough to allow the chrome legs to go through 
the square holes. Insert one set of chrome legs 
through the overhanging holes as shown in Figure 1. 
Do not bolt legs to top. 

Step 2: Connecting legs and side 

accessory to drawer assembly

Choose one of the side accessories (Pry Bar Holder 
or Side Work Bench - Figure 2 shows Pry Bar Holder) 
for attachment to the overhanging end of the service 
cart. Align the outermost bolt holes in the accessory 
with the bolt holes in the end of the cart and with 
the uppermost holes in the chrome legs. Position a 
washer and insert a 6mm bolt through the washer, 
bolt holes, and legs as shown. Secure bolts with  
a flat washer, lock washer, and nut on inside of  
Locking Drawer Assembly. Tighten bolts until parts  
fit together firmly.

Repeat steps 1 and 2 for other end of cart, 
using remaining side accessory.

2.

3.2

Locking

Drawer Assy.

Chrome

Legs

Table or 

workbench

6mm

Bolt

Table or 

workbench

Pry Bar

Holder

Chrome

Legs

Locking

Drawer Assy.

1.

2.

Locking Top

Locking Top

ASSEMBLY INSTRUCTIONS

NOTE

Summary of Contents for 8013ABKDELUXE

Page 1: ...KING TOP DRAWERS INCLUDES PRY BAR HOLDER AND SIDE WORK BENCH WARNING This product can expose you to chemicals including nickel which is known to the State of California to cause cancer and birth defects or other reproductive harm For more information go to www P65Warnings ca gov Chrome Legs 2 With Inserts Installed Keys Attached to Legs Locking Casters 2 Non Locking Casters 2 Locking Drawer Assemb...

Page 2: ...es Pry Bar Holder or Side Work Bench Figure 2 shows Pry Bar Holder for attachment to the overhanging end of the service cart Align the outermost bolt holes in the accessory with the bolt holes in the end of the cart and with the uppermost holes in the chrome legs Position a washer and insert a 6mm bolt through the washer bolt holes and legs as shown Secure bolts with a flat washer lock washer and ...

Page 3: ...ottom drawer so that the channel in the handle covers all six holes in the front of the drawer Insert screws through each hole from inside the drawer and into the drawer handle channel Tighten the screws Repeat for all remaining drawers using short handles Do not allow the handles to over hang the ends of the drawer faces as they will interfere with the operation of the drawer Step 6 Attaching cas...

Page 4: ... 2 1 4 3 6 7 1 8 Part Description RS3DHDL Short Chrome Drawer Handle RS8006HDL Long Chrome Drawer Handle RS8006HDLS Handle Screws Set of 6 RSRBSLIDEC2 Clip On Roller Bearing Slide pr 8006RB Red Replacement Large Drawer 8006CRBBK Black Replacement Large Drawer 8006CRBL Blue Replacement Large Drawer 8016 Red Replacement 3 Drawer Unit 8016BK Black Replacement 3 Drawer Unit 8016BL Blue Replacement 3 D...

Page 5: ...lugar Mueva el carrito lentamente cuando éste esté cargado evite las grietas agujeros y otras irregularidades del piso No jalar empujar para dezplazar El deplazami to o carga inadecuados puede ocasionar lesiones No cumplir con estas indicaciones puede provocar lesiones graves o peligro de muerte así como daños materiales ADVERTENCIA Patas cromo 2 con inserciones intaladas Llaves Sujetadas a las pa...

Page 6: ...muestra el sujetador para barra de apalancamiento para sujeción al extremo sobresaliente del carrito de servicio Alinee los agujeros de perno más alejados en el accesorio con los agujeros de perno en el extremo del carrito y con los agujeros más altos en las patas de cromo Coloque una arandela e inserte un perno 6mm por la arandela los agujeros de perno y las patas según se ilustra Fije los pernos...

Page 7: ...nal en el mango cubra los seis agujeros en la parte delantera del cajón Inserte los tornillos por cada agujero desde la interior del cajón y por el canal del mango del cajón Apriete los tornillos Repita los pasos para todos los cajones restantes usando los mangos cortos No permita que los mangos cuelguen sobre los extremos de las carátulas de los cajones ya que lo mismo podría interferir con la op...

Page 8: ...nd il est chargé éviter les fissures les trous et toute autre irrégularité du plancher Ne pas tirer pousser pour déplacer Tout déplacement ou chargement incorrect peut causer des blessures Le manque d observer ces avertissements peut avoir comme conséquence des blessures corporelles et ou des dégâts ma tériels AVERTISSEMENT Pattes en chrome 2 avec garniture installée Clés fixées aux montants Roule...

Page 9: ...téral le schéma 2 illustre le support de barre de levier pour le raccordement à l extrémité surplombante du chariot de service Alignez les trous de boulons extérieurs dans l accessoire avec les trous de boulons à la fin du chariot et avec les trous les plus élevés dans les montants de chrome Positionnez une rondelle et insérez un boulon 6 mm dans la rondelle les trous de boulons et les montants te...

Page 10: ...ns la poignée recouvre les six trous dans le devant du tiroir Insérez les vis dans chaque trou à partir de l intérieur du tiroir et passez les ensuite dans la rainure de la poignée du tiroir Serrez les vis Répétez pour tous les tiroirs qui utilisent les poignées courtes Ne laissez pas les poignées dépasser les extrémités du devant des tiroirs pour éviter qu elles nuisent au bon fonctionnement de c...

Reviews: