


•
When the system is appropriately set up, the “Working” LED will remain illuminated
,
If the battery is empty, and
therefore does not have sufficient power to support applications the “Working” LED will go off. Once this happens
please be sure to stop any running application, and charge the battery using the Folding Solar Charger.
•
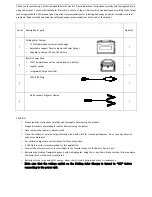
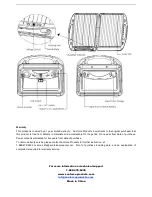
The Power Pack has two outputs:
12V DC plug:
To supply power to any device that can be powered through a 12 Volt unit, such as laptops, mobile phones, video games etc…
* Connect these applications to 12Volt DC socket only.
Inverter:
•
An external inverter (not included) can be connected to this output, in order to enable power to run AC (110V or 220V)
applications. Such as small TV, electric fan…. Please note that total power output of the AC application is
recommended to be below 100W.
* Insure that the inverter is disconnected from the 12 Volt DC output. Failure to follow these
suggestions may cause damage to the internal charge controller.
•
USB output: Can be used to support electronic and portable devices.
•
Additional batteries may be attached via the “Output to DC applications” input located on the back of the power pack.
This feature can be used to connect an external battery (12V battery only). This will in essence increase the amperage
of the total battery capacity of the 7Ah battery. Increased battery capacity can help extend the period of time you
operate your applications.
•
Fuse Replacement:
There are two fuses (10A car fuse) within the power pack to prevent accidental short-circuiting from damaging the power
pack. The fuses are located in the 12V DC adapter.
1. Remove the 10 screws located on the power pack panel.
2. Remove cover.
3. Replace fuse with 10 Ah.
4. Replace cover and secure it with screws.
•
Battery Replacement:
Internal 12V/7Ah battery must be replaced once every two years under normal working condition, or if the battery is
over-discharged.
1. Remove the 10 screws located on the power pack panel.
2. Remove cover.
3. Remove the battery and disconnect it from the sleeve connector
4. Replace battery with a 12V/7Ah and attach the sleeve connector. Make sure to connect
with correct polarity (Red for positive & Black for negative)
5. Replace cover and secure it with screws.


