background image

OPERATING INSTRUCTIONS

Lighting:
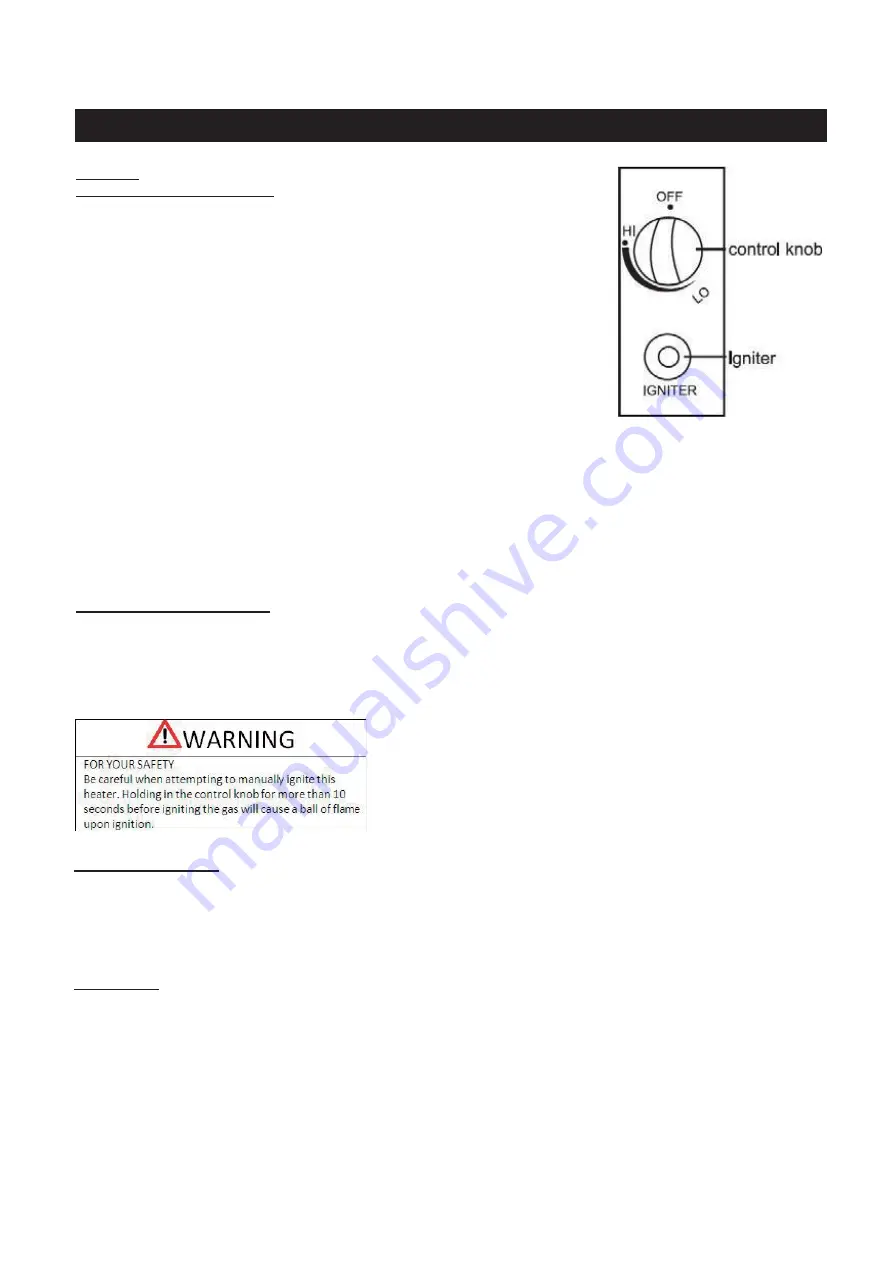
TO TURN ON THE HEATER
1. Turn the control knob to the “OFF” position.
2. Fully open the LP cylinder valve.
3. Press and turn the control knob to “HI” position (counterclockwise 90°).
Press down the control knob and hold for 3-5 seconds. While holding down
the control knob, press the igniter several times until the flame ignites.
Hold the control knob in for about 30 seconds and release.
4. To decrease the flame, turn the control knob counterclockwise to “LO”
position; to increase the flame, turn the control knob clockwise to “HI”
position.
Note: If the flame does not light or goes out, repeat Step 3.

WARNING: FOR YOUR SAFETY: If at any time you are unable to light the
burner and smell gas, wait 5 minutes to allow gas to dissipate before
attempting to light heater. If after 1 minute, you are unable to light
burner, wait 5 minutes and allow flammable vapors to dissipate before attempting to light heater again.

NOTE: If a new tank has just been connected, please allow at least one minute or more for the air in the gas line to
purge out through the hole, or simply complete Step 3. When lighting the heater make sure that the control knob is
continuously depressed while pressing the igniter button. Control knob can be released after the flame has been lit for
20~30 seconds. Flame can be watched and checked from the peephole located on the base of burner. If the flame does
not light or it goes out, repeat Step 3. If the burner flame goes out accidentally or it is blown out by wind, turn off the
heater and wait at least 5 minutes or more to let the gas dissipate before relighting to avoid possible gas explosion.
Repeat steps as listed above.

TO TURN OFF THE HEATER
1. Press and turn the control knob clockwise to “OFF” position.
2. Turn the gas cylinder valve to OFF or closed and disconnect the cylinder.

If you experience any ignition problems, please consult “Troubleshooting” on page 15.
Caution: Avoid inhaling fumes emitted from the heater’s first use. Smoke and odor from the burning of oils used in the manufacturing will
appear. Both smoke and odor will dissipate after approximately 30 minutes. The heater should NOT produce thick black smoke.

When Heater is ON:
Emitter screen will become bright red due to intense heat. The color is more visible at night. Burner will display
tongues of blue and yellow flame. These flames should not be yellow or produce thick black smoke, indicating an
obstruction of airflow through the burners. The flame should be blue with straight yellow tops. If excessive yellow
flame is detected, turn off heater and consult “Troubleshooting” on page 15.

Re-Lighting:
Note: For your safety, control knob cannot be turned OFF without first depressing the control knob and then
rotating to OFF.

1. Turn control knob to “OFF” position.
2. Wait at least 5 minutes to allow gas to dissipate before re-lighting.
3. Repeat the “Lighting” steps as listed above.

- 12 -

Summary of Contents for PHRDBK

Page 1: ...of California to cause birth defects or other reproductive harm For more information go to www P65Warnings ca gov Outdoor Patio Heater Owner s Manual MODEL PHRDBK and PHRDMO MADE IN CHINA Questions problems missing parts Before returning to your retailer call our customer service department at 1 877 467 8643 8 a m 5 30 p m CST Monday Friday or email info sunheat com 1 5 0 0 0 1 9 9 ...

Page 2: ...Package Contents Page 3 Hardware Page 4 Safety Information Page 4 6 Assembly Page 6 10 Operating Instructions Page 11 13 Care and Maintenance Page 14 Troubleshooting Page 15 Warranty Page 16 2 ...

Page 3: ...Chain PACKAGE CONTENTS 3 ...

Page 4: ...l should be read in conjunction with the labeling on the appliance Safety precautions are essential when any mechanical or propane fueled equipment is involved These precautions are necessary when using storing and servicing this appliance Using this appliance with the respect and caution demanded will reduce the possibilities of personal injury or property damage The following symbols shown below...

Page 5: ...SAFETY INFORMATION 5 ...

Page 6: ...for replacement parts ESTIMATED ASSEMBLY TIME 60 minutes Tools Required for Assembly NOT included 7 16 open end wrench Philips screwdriver with medium blade Adjustable opening wrench Leak Test Solution see instructions on page 11 on how to make solution 6 ATTACHING ANCHORING ARM Attach 1 anchoring arm to base with 2 screws and nuts as shown repeat with the other 2 anchoring arms so all 3 are attac...

Page 7: ...ll Flange Nuts 7 2 Attach the Post to the Support Brackets Once you have tightened the bolts holding the Support Brackets to the Base align the holes in the bottom of the Post with the holes on the tops of the Support Brackets and insert 6 Large Bolts through the hole in the Post and through the hole in the Support Bracket Affix 6 Small Flange Nuts to the bottom of the Large Bolts Hand tighten ini...

Page 8: ...lector Studs 3 Large Flat Washers 5 Remove 4 Small Bolts that are pre assembled in the Head Assembly Attach Head Assembly to Post Route Gas Hose down into post and then place Head Assembly on top of Post Note Control knob should be above the decal on Post Attach Head Assembly to Post by inserting bolts through lock washers and into holes on Head Assembly and Post Once all bolts have been inserted ...

Page 9: ...t one Small Screw and screw on Cap Nut loosely Repeat with two more Small Screws and Cap Nuts to complete reflector assembly Fully tighten all the screws and cap nuts Hardware Used 9 Small Screws 9 Cap Nuts 7 Attach Reflector Assembly to heater While supporting heater tilt the Head Assembly and slide 3 Large Flat Washers over the Reflector Studs Place the Reflector Assembly onto the Reflector Stud...

Page 10: ...tdoors in a well ventilated area out of the reach of children A disconnected cylinder must have dust caps tightly installed and must not be stored in a building garage or any other enclosed area The minimum permissible gas supply pressure of 11 W C is required for purpose of hose adjustment The minimum hourly of 17 500 BTU is required input rating for a heater for automatic operation rating less t...

Page 11: ...isapplianceuntilyouhaveread andunderstandallSafetyInformationin this manual and all assembly is complete and leak tests have been performed Before Turning Gas SupplyON 1 Your heater was designed and approved for OUTDOOR use only Do NOT use it inside a building garage or any other enclosed area 2 Make sure surrounding areas are free of combustible materials gasoline and other flammable vapors or li...

Page 12: ...e located on the base of burner If the flame does not light or it goes out repeat Step 3 If the burner flame goes out accidentally or it is blown out by wind turn off the heater and wait at least 5 minutes or more to let the gas dissipate before relighting to avoid possible gas explosion Repeat steps as listed above TO TURN OFF THE HEATER 1 Press and turn the control knob clockwise to OFF position...

Page 13: ...no signs of spider or insect nests in heater orifices 14 All burner passages are clear 15 All air circulation passages are clear 16 Children and adults should be alerted to the hazards of high surface temperatures and should stay away to avoid burns or clothing ignition 17 Young children should be carefully supervised when they are in the area of the heater 18 Clothing or other protective material...

Page 14: ... 14 ...

Page 15: ...ck lighter to manually light Gas pressure low with valve open full Replace cylinder or regulator New cylinder or 1st ignition Purge air from lines Cylinder valve on no gas flow Replace hose regulator assembly Low burner flame Pressure is low Replace LPG tank Tank is low on fuel Fill LPG tank Gas hose is kinked Check straighten or replace Control knob at max Check for obstruction at passageways and...

Page 16: ...r repair defective parts at our discretion Any expenses or damage resulting from the installation removal or transportation of the product will the responsibility of the owner and are not covered by this warranty The owner assumes all other risks arising out from the use or misuse of the product The warranty will be void if the product damage or failure is deemed by the Company to be caused by acc...

Reviews: