background image

12

5.  Timely recharging of the battery will help prolong the 

battery's life. You must recharge the battery pack when 

you notice a drop in the equipment's power.

IMPORTANT! Never allow the battery pack to become fully 

discharged as this will cause irreversible damage to the 

battery. 

6.  When charging is complete, remove the battery from the 

charger by pulling the push lock button and sliding the 

battery backward to unlock it from the charger.

Assembly

m

DANGER!

 Never start the motor before installing the 

guide bar, chain, and chain/sprocket end cover. Without all 

these parts in place, the clutch can fly off or explode, exposing 

the user to potentially serious injuries.

Installing/Replacing Guide Bar +  

Cutting Chain

Tools and supplies required:

•  Hex key wrench (provided)
•  Heavy-duty work gloves

NOTE: When replacing the guide bar and chain, use only 

identical replacement parts. Make sure the pole chain saw 

is disconnected with the battery before proceeding with 

installation.

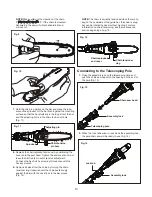
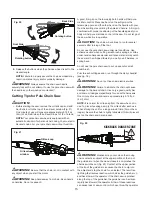
1.  Remove the hex bolt by screwing it counterclockwise with 

the hex key wrench (Fig. 4).

2.  Screw the chain/sprocket end cover knob 

counterclockwise to release chain/sprocket end cover  

(Figs. 5 – 6).

3.  Remove the bar and chain from the mounting surface  

(Fig. 7).

4.  Remove the old chain from the bar.
5.  Lay out the new saw chain in a loop and straighten 

any kinks. THE SHARP SIDE OF THE TEETH MUST 

FACE AWAY FROM YOU IN THE DIRECTION OF THE 

CHAIN ROTATION INDICATED ON THE GUIDE BAR 

. If the teeth face backwards, 

turn the loop over (Fig. 8).

6.  Starting at the tip, mount the chain drive links into the  

bar groove, leaving a loop at the back of the bar. The 

chain will loosely fit until it is placed on the sprocket 


(Figs. 9 – 10).

Chain/sprocket 

end cover

Hex bolt

Hex key wrench

Fig. 4

Fig. 5

Chain/sprocket 

end cover

Chain/sprocket 

end cover knob

Chain/sprocket 

end cover

Fig. 6

Cutting chain

Guide bar

Fig. 7

Chain rotation

Sharp cutting edge

Chain drive link

Fig. 8

Summary of Contents for 24V-PS8-CT-RM

Page 1: ...CT snowjoe com To make sure you get the most out of your product be sure to register online at to enjoy full product support PASTE UPC LABEL HERE A Division of Snow Joe LLC Model 24V AJC LTE RM Form N...

Page 2: ...ing outdoors 6 mCAUTION Exercise caution to avoid slipping or falling Wear protective footwear that will protect your feet and improve your footing on slippery surfaces 7 Stay alert Watch what you are...

Page 3: ...g the tool under such circumstances is extremely dangerous mWARNING Do not let familiarity with this type of tool prevent you from taking all necessary precautions Remember that a careless fraction of...

Page 4: ...saw and at a safe distance away from the work area Kickback mWARNING Kickback may occur when the nose or tip of the guide bar touches an object or when the wood closes in and pinches the saw chain in...

Page 5: ...the charger with a damaged cord or plug Replace a damaged charger immediately Do not use an extension cord unless it is absolutely necessary Using the wrong damaged or improperly wired extension cord...

Page 6: ...s eyes additionally seek medical help Liquid ejected from the battery may cause irritation or burns This advice is considered correct for conventional NiMh NiCd lead acid and lithium ion cell types If...

Page 7: ...reach over 105 F 40 5 C In particular do not leave the battery charger in a car that is parked in the sunshine 6 Protect batteries from overheating Overloads overcharging and exposure to direct sunlig...

Page 8: ...nst injury wear ear defenders and safety goggles WARNING Do not expose the unit to rain or wet conditions Keep dry Symbols Symbols Descriptions Descriptions Indoor use only Only use battery charger in...

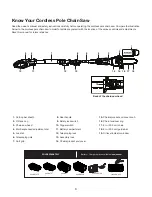
Page 9: ...5 6 7 8 9 2 1 17 16 15 14 13 12 11 10 1 Cutting bar sheath 2 Oil tank cap 3 Chain saw head 4 Multi angle head adjustment dial 5 Lock tab 6 Telescoping pole 7 Soft grip 8 Rear handle 9 Safety lock swi...

Page 10: ...ng is made of recyclable materials Properly dispose of these materials in accordance with local regulations IMPORTANT The equipment and packaging material are not toys Do not let children play with pl...

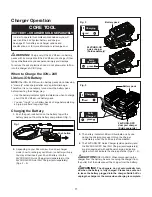
Page 11: ...RG DPC Dual Port Charger sold separately Figs 2 3 3 The battery indicator LEDs will illuminate one by one during the charging process Unplug the charger immediately when the 3 LEDs are all illuminated...

Page 12: ...placement parts Make sure the pole chain saw is disconnected with the battery before proceeding with installation 1 Remove the hex bolt by screwing it counterclockwise with the hex key wrench Fig 4 2...

Page 13: ...urning the chain tensioner ring clockwise until the chain seats snugly against the bar with the drive links in the bar groove Fig 12 NOTE The chain is correctly tensioned when there is no sag on the u...

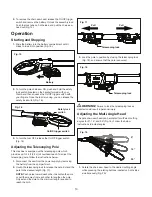
Page 14: ...tions below 1 Disconnect the saw from the power supply by removing the battery from the compartment 2 Unclip the telescoping lock to release the pole Extend the pole to the desired length Fig 17 NOTE...

Page 15: ...nditions Use extreme caution when cutting small brush saplings or limbs under tension because slender and tense material may catch the saw and be whipped toward you pull you off balance or spring back...

Page 16: ...t can result PUSH and PULL This reaction force is always opposite to the direction the chain is moving when it is in contact with the wood Thus the operator must be ready to control the PULL when cutt...

Page 17: ...e bar groove Fig 25 Be aware that a chain tensioned while warm may be too tight upon cooling Check the cold tension before next use The chain must be re tensioned whenever the flats on the drive links...

Page 18: ...ere is too much play between the links and the rivets Guide Bar Maintenance When the guide bar shows signs of wear turn it over on the saw to distribute the wear for maximum bar life Feathering or bur...

Page 19: ...ve minutes for the saw to cool before servicing or storing your unit If you drop the saw carefully inspect it for damage If the guide bar is bent the housing is cracked the handle is broken or if you...

Page 20: ...es and materials are emitted into the surrounding atmosphere 1 Batteries vary according to device Consult your manual for specific information 2 Install only new batteries of the same type in your pro...

Page 21: ...OE 1 866 766 9563 24V iON 2 0 Ah Lithium Ion Battery Battery Charge Time Max 24VCHRG AC 1 hr 20 min 24VCHRG QC 55 min 24VCHRG DPC 55 min Battery Runtime Max 40 min 24V iON 2 5 Ah Lithium Ion Battery B...

Page 22: ...22 NOTES...

Page 23: ...ined in this warranty shall be construed as obligating Snow Joe Sun Joe to incorporate such design changes into previously manufactured products nor shall such changes be construed as an admission tha...

Page 24: ...sunjoe com...
Reviews: