background image

10

Maintenance

m

WARNING!


Always turn off the dethatcher and 

unplug the power cord from the outlet before performing any 

maintenance task.

General Maintenance

•  Clean the unit with a slightly damp cloth and pH-neutral 

soap. Use a brush for areas that are hard to reach.

•  Pay close sttention to cleaning the air vents with a cloth 

and a brush after EVERY use.

•  Remove stubborn dirt with high pressure air (max 3 bar).
•  Check for worn or damaged parts. Replace worn parts as 

necessary or contact an authorized Snow Joe

®

 + Sun Joe

®


service center for repair before resuming work with the 

dethatcher.

•  Regularly check for obvious defects such as loose, 

dislodged or damaged cutting devices, loose fixings and 

worn or damaged components.

•  Check that covers are undamaged and correctly fitted. 

Carry out necessary maintenance or repairs before 

resuming work with the dethatcher.

•  This product does not contain any parts that can be 

repaired by the consumer. Contact a qualified service 

technician at an authorized Snow Joe

®

 + Sun Joe

®

 service 

center to have the unit checked and repaired.

Cutting Device

m

WARNING!

 Wear safety gloves when working near or 

on the cutting device. Use appropriate tools to remove debris. 

Never use your bare hands!

•  Keep the raker tines clean and free of debris. 
•  Apply a small amount of suitable lubricant along the edge 

of the tine cylinder to maintain good cutting performance.

Replacing the Tine Cylinder

When your dethatcher's raking performance diminishes, it's 

time to replace the tine cylinder to get your dethatcher back in 

optimal working order. The replacement tine cylinder (Model 

AJ800ETNS) is available online for purchase at snowjoe.com.

m

WARNING!

 Before performing any maintenance, always 

disconnect the power supply to the unit and wait until the tine 

cylinder comes to a complete stop. Wear protective gloves 

when handling the tines.

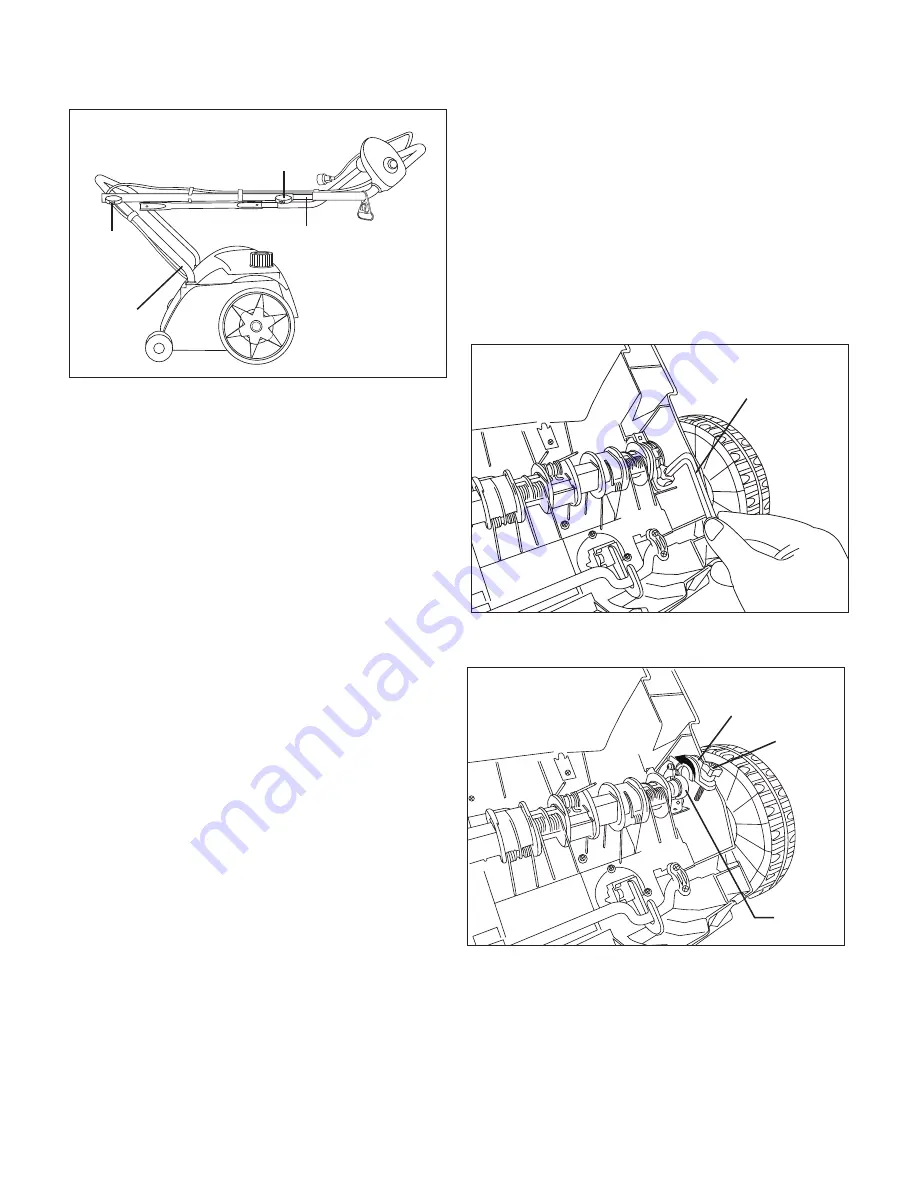
1.  Turn the unit over. Using an 8 mm Allen wrench, unfasten 

the screw on the right side of the tines (Fig. 7).

2.  Lift the screw and the bearing block cover to expose the 

bearing (Fig. 8).

Fig. 6

Upper handle knob

Upper handle

Lower 

handle 

knob

Lower 

handle

Fig. 7

8 mm Allen wrench

Fig. 8

Bearing block cover

Screw

Bearing

Summary of Contents for AJ799E-RM

Page 1: ... com To make sure you get the most out of your product be sure to register online at to enjoy full product support PASTE UPC LABEL HERE A Division of Snow Joe LLC OPERATOR S MANUAL Model AJ799E RM Form No SJ AJ799E RM 880E V1 R ELECTRIC DETHATCHER 14 INCH 11 AMP ...

Page 2: ...ep proper footing and balance at all times 7 Stay alert Always be alert and watch what you are doing Use common sense Do not operate the dethatcher when you are tired or under the influence of alcohol or drugs 8 Disconnect the dethatcher Disconnect the dethatcher from the power supply when it is not in use before servicing it when changing accessories and when performing any other maintenance task...

Page 3: ...er wall outlet Do not modify the appliance plug extension cord receptacle or extension cord plug in any way 4 To prevent the appliance cord from disconnecting from the extension cord during operation make a knot with the two cords as shown in Table 1 5 Do not abuse the cord Never pull the dethatcher by the cord or yank the cord to disconnect it from the receptacle Keep the cord away from heat oil ...

Page 4: ...ave come to a complete stop Never operate the machine without proper guards plates or other safety protective devices in place and in proper working order Keep children and pets away Do not overload the machine capacity by attempting to dethatch too deep at too fast a rate Never operate the machine at high transport speeds on hard or slippery surfaces Never allow bystanders near the unit when oper...

Page 5: ...fety goggles Double Insulation Do not use in wet weather conditions Wear safety gloves for hand protection Wear foot protection Thrown objects picked up by the rotating tines can cause severe injury SWITCH OFF Remove plug from outlet immediately if the cord is damaged or cut SWITCH OFF Remove plug from outlet before cleaning or performing other maintenance work Do not push down stairs Symbols Symb...

Page 6: ...er 4 Cable clip 2 5 Appliance cord 6 Rear wheel 2 7 Front wheel 2 8 Upper handle 9 Upper handle knob and bolt 2 10 Middle handle bar 2 11 Lower handle knob and bolt 2 12 Lower handle 13 Motor housing 14 Raking depth control knob Technical Data Rated Voltage 120 V 60 Hz Motor 11 amp No Load Speed 4 600 rpm Rotor 24 spring steel tines Raking Width 14 in 35 6 cm Raking Depth 0 12 in to 0 35 in 3 mm t...

Page 7: ...ackaging is made of recyclable materials Properly dispose of these materials in accordance with regulations mWARNING Do not connect the dethatcher to the power supply until assembly is complete Failure to comply could result in accidental starting and severe personal injury Connecting the Handle Bars 1 Insert the lower handle into the motor housing and secure it with the two Phillips screws Fig 1 ...

Page 8: ...ig 3 mWARNING The adjustment knob is not intended for height adjustment but rather to compensate for tine wear Selection of a readjustment position without the corresponding wear can overload the motor and damage the cylinder Starting Stopping mWARNING Before switching on the dethatcher make sure that it is not in contact with any foreign objects Keep your feet and hands a safe distance away from ...

Page 9: ...nner so that the cable relief holder on the bar always faces the side that has been treated mWARNING When your dethatching session is complete disconnect the power supply and wait until the cylinder has come to a complete stop before transporting the unit Set the tine adjustment knob to the transport position setting 0 when transporting the unit see Setting the working positions on page 7 Lift the...

Page 10: ...an authorized Snow Joe Sun Joe service center to have the unit checked and repaired Cutting Device mWARNING Wear safety gloves when working near or on the cutting device Use appropriate tools to remove debris Never use your bare hands Keep the raker tines clean and free of debris Apply a small amount of suitable lubricant along the edge of the tine cylinder to maintain good cutting performance Rep...

Page 11: ...der to avoid a safety hazard Troubleshooting mWARNING Only perform the steps described within these instructions All further inspection maintenance and repair work must be performed by an authorized service center or a similarly qualified specialist if you cannot solve the problem yourself Suspected malfunctions disturbances or damages are often due to causes that the user can fix themselves Follo...

Page 12: ...power Unsatisfying result a Not connected to power supply b Power cord or plug is defective c Other electrical defect to the product a Connect to power supply b Contact an authorized service agent c Contact an authorized service agent a Extension cord not suitable for operation with this product b Power source e g generator has too low voltage c Air vents are blocked a Use a proper extension cord ...

Page 13: ...acement part or accessory with your pressure washer The use of any other attachment or accessory can be dangerous and could cause injury or mechanical damage Raking cylinder with fine needles AJ800ETNS Model Accessories Item 1 NOTE Accessories are subject to change without any obligation on the part of Snow Joe Sun Joe to provide notice of such changes Accessories can be ordered online at snowjoe ...

Page 14: ...14 NOTES ...

Page 15: ...in this warranty shall be construed as obligating Snow Joe Sun Joe to incorporate such design changes into previously manufactured products nor shall such changes be construed as an admission that previous designs were defective This warranty is intended to cover product defects only Snow Joe LLC is not liable for indirect incidental or consequential damages in connection with the use or misuse of...

Page 16: ...snowjoe com ...

Reviews: