background image

4

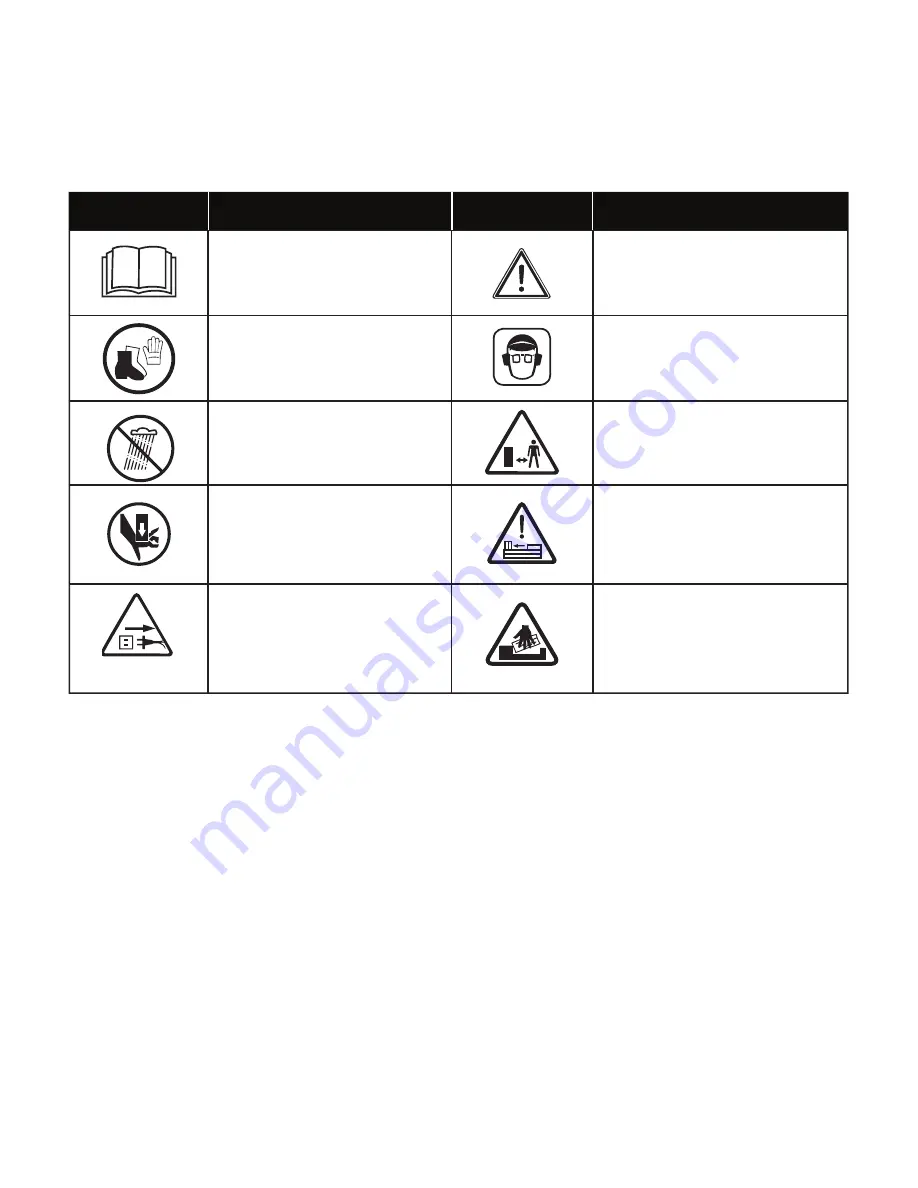
Safety Symbols

The following table depicts and describes safety symbols that may appear on this product. Read, understand, and follow all 

instructions on the machine before attempting to assemble and operate.

SAFETY ALERT – Indicates a 

precaution, a warning, or a danger.

Moving parts can crush and cut 

hands and fingers. Keep hands 

clear of the ram plate, wedge, and 

logs while splitting.

WARNING! Always be aware of 

the movement of the log splitter.

Wear eye and hearing protection. For 

protection against injury, wear ear 

defenders and safety goggles.

Wear heavy-duty gloves and 

steel-toed boots when using the 

machine and handling debris.

To reduce the risk of injury, user 

must read instruction manual.

Symbols

Symbols

Descriptions

Descriptions

WARNING! Do not expose or 

operate the unit in rain or wet 

conditions. Keep dry.

Keep bystanders and children  

a safe distance away.

Disconnect the mains plug if the 

cord is damaged or entangled.

Keep you hands away from splits 

and cracks which open in the log. Do 

not remove jammed logs with you 

hands.

Summary of Contents for LJ602E

Page 1: ...ne is on is 23 6 inch 29 5 inch 60 cm 75 cm high stable level and free from overhanging items such as limbs wires etc 3 All visitors children adults and pets should be kept at a distance from working area at least 16 5 ft 5 m from the log splitter while it is in operation Stop the log splitter if people or pets enter the discharge area 4 Always observe the surface conditions to avoid slipping fall...

Page 2: ...om the tool before cleaning repairing or inspecting the log splitter 3 For best operation keep the blade sharp moving parts lubricated and the machine cleaned 4 Always check for damaged or worn parts alignment of moving parts and tightness of bolts and screws before each use 5 Replace oil as specified in the Maintenance section Follow all local regulations and laws concerning disposal of waste oil...

Page 3: ...e damaged or worn cord immediately 8 This tool is intended for use on a circuit that has an outlet that looks like the one illustrated in Sketch A in Figure 2 The tool has a grounding plug that looks like the plug illustrated in Sketch A in Figure 2 A temporary adapter which looks like the adapter illustrated in Sketches B and C may be used to connect this plug to a 2 pole receptacle as shown in S...

Page 4: ...vement of the log splitter Wear eye and hearing protection For protection against injury wear ear defenders and safety goggles Wear heavy duty gloves and steel toed boots when using the machine and handling debris To reduce the risk of injury user must read instruction manual Symbols Symbols Descriptions Descriptions WARNING Do not expose or operate the unit in rain or wet conditions Keep dry Keep...

Page 5: ...f switch 12 Switch box 13 Rear wheels 14 Hydraulic control lever 15 Control lever guard 16 Max pressure limit screw 17 Beam 7 8 9 10 11 12 13 14 Technical Data Motor 15A S3 5 min on 10 min off Rated Voltage 120 V AC 60 Hz Splitting Force Max 5 ton Ram Force 5 ton Continuous Force Material Steel Log Length Max 20 5 in 52 cm Log Diameter Max 10 in 25 4 cm Wedge Height 5 in 12 7 cm Beam Height 5 5 in...

Page 6: ...kaging material are not toys Do not let children play with plastic bags foils or small parts These items can be swallowed and pose a suffocation risk Assembly mWARNING Do not connect to the power supply until assembly is complete Failure to comply could result in accidental starting and serious personal injury mWARNING The product must be fully assembled before operation Do not use a product that ...

Page 7: ...be difficult to split Do not force the log splitter if the log fails to split on the first attempt 2 When loading or positioning a log always handle the bark side never handle the ends Never place your hands or body parts between the log and the splitter 3 Make sure all moving parts is completely stop Never load or unload logs while the log pusher is moving 4 Check that bleed Screw is open 5 Load ...

Page 8: ...e log and will not completely split or separate from the log follow the directions below to remove the log m WARNING Do not attempt to remove the jammed log with your hands or knock it off It may cause serious injury or damage to the machine 1 Release both the hydraulic control lever and the On Off switch 2 After the log pusher moves back and completely stops at its starting position insert a wedg...

Page 9: ... to ensure years of trouble free performance Lightly lubricate all metal surfaces before storing Store the machine in a secure location that children cannot access Store the machine in a dry environment The machine can be transported or stored in the ambient temperature between 77ºF 131ºF 25ºC 55ºC Examine the log splitter thoroughly for worn loose or damaged parts Should you need to repair or rep...

Page 10: ...level Refill the hydraulic oil if needed Air sealed in hydraulic system while operating Bleed screw is not tightened before moving the log splitter Oil drain bolt with dipstick is not tightened Hydraulic control valve assembly and or seal s is worn Problem Possible Causes Recommended Remedy Overload protection device disengaged to protect the log splitter from being damaged Log is improperly posit...

Page 11: ...n a registration card available online from our website or calling our Customer Service Department at 1 866 SNOWJOE 1 866 766 9563 or by e mailing us at help snowjoe com Failure to register your Product will not diminish your warranty rights However registering your Product will allow Snow Joe to better serve you with any of your customer service needs WHO CAN SEEK LIMITED WARRANTY COVERAGE This W...

Page 12: ...sunjoe com ...

Reviews: