background image


6


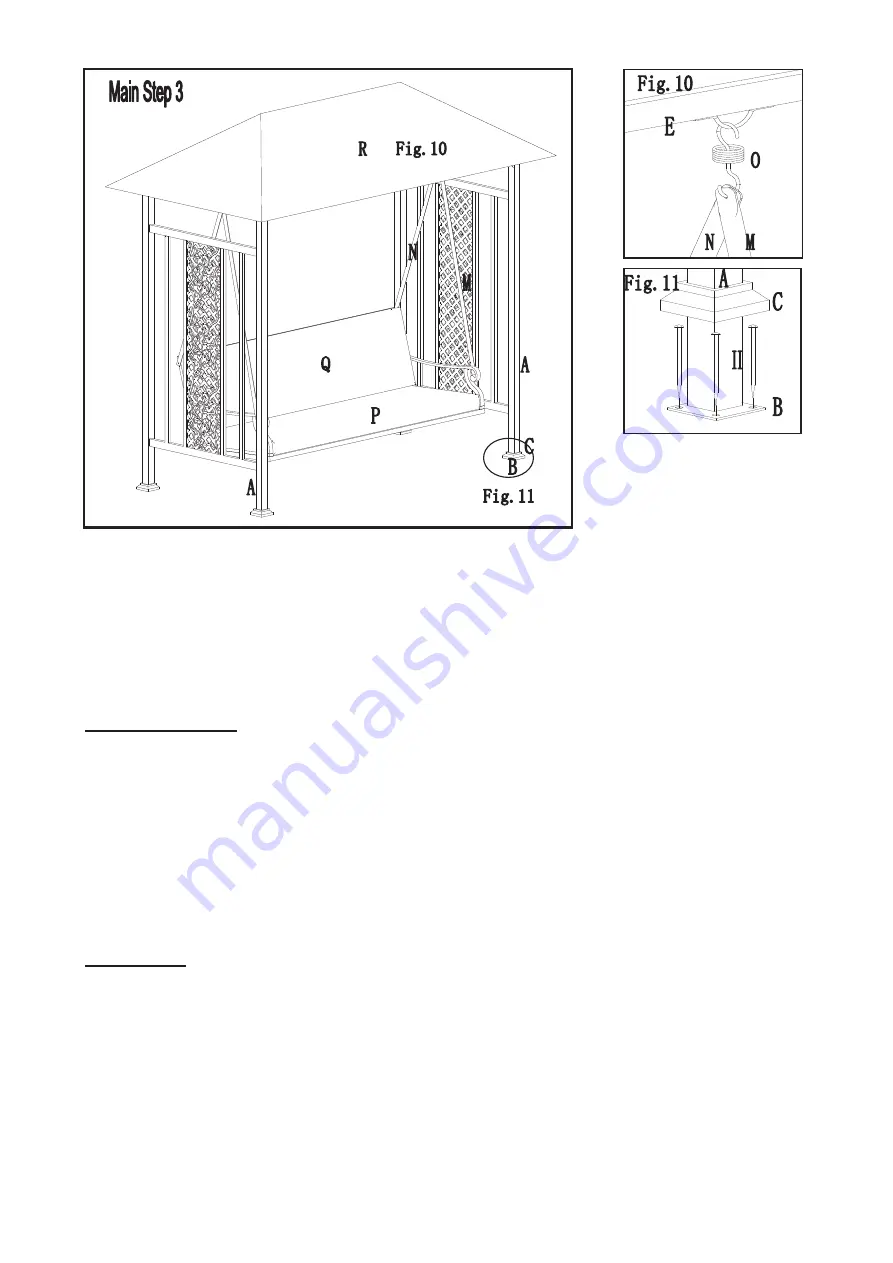
Step 10 

Hang the assembled seat to Middle Cross Beam E with Support Hook O. 

Place Seat Cushion P and Back Cushion Q onto the seat and place Canopy R onto top (Fig10). 


Step 11 

Secure the swing into the ground using the Ground Stakes II (Fig 11). 


Limited Warranty:


Sunjoy Industries warrants to the original purchaser that this item is free from defects in workmanship 
and materials for a period of 1 year from the date of purchase, provided the item was factory-sealed at 
the time of purchase and is maintained with care and used only for personal, residential purposes. 
Should any manufacturing defect arise within this warranty period, Sunjoy Industries will repair or 
replace (at our option) any defective merchandise upon proof of purchase; however, transportation and 
delivery costs, as well as payments to a third party for assembly or disassembly of the item, remain the 
responsibility of the purchaser. A purchaser of an "open box," previously-returned, or "clearance" item, 
as well as original purchasers outside of the warranty period, may obtain replacement parts from Sunjoy 
Industries for products in current production, at nominal cost. 


Exclusions:


Items used for commercial, contract, or other non-residential purposes, or items damaged due to acts of 

nature, vandalism, misuse, or improper assembly are not covered. Corrosion or rusting of hardware is 

not covered.   Proof of purchase (dated register receipt) is required for warranty claims. Warranty is to 

the original purchaser and is non-transferable. Any replacement of warranted items will be in the original 

style and color, or a similar style and color if the original is unavailable or has been discontinued. As 

some states do not allow exclusions or limitations on an implied warranty, the above exclusions and 

limitations may not apply. This warranty gives you specific rights, and you may also have other rights, 

which vary from state to state.


Summary of Contents for L-GZ330PCO-1

Page 1: ...ntainer sharp edges Wear protective gloves as necessary z Keep children away from assembly area z Install on level ground z Do not over tighten any of the bolts or nuts tighten each bolt and nut until...

Page 2: ...ss Beam E 1 Tilt Top Girder F 4 Short Girder G 2 Long Girder H 2 Top Connection I 1 Back Panel J 1 Seat Panel K 1 Right Arm L1 1 Left Arm L2 1 Long Suspender M 2 Short Suspender N 2 Support Hook O 2 S...

Page 3: ...3 Hardware Pack 1 AA Bolt M6X15 20 PCS BB Flat Washer M6 34 PCS CC Bolt M6X15 4 PCS DD Bolt M6X35 4 PCS EE Nut M6 4 PCS JJ Bolt M6X40 2 PCS LL Split washer M6 4pcs W1 Wrench M6 1 PC...

Page 4: ...her BB Fig 3 Step 4 Insert Short Girder G and Long Girder H into the connection tubes of Tilt Top Girder F Fig 4 Step 5 Insert Tilt Top Girder F into Top Connection I Fig 5 Step 6 Lift the entire top...

Page 5: ...Panel J tighten with bolt GG and Flat Washer HH Split washer MM and Nut KK Fig 8 Step 9 Align Long Suspender M to seat Panel K tighten with bolt GG and Flat Washer HH Split washer MM and Nut KK Fig 9...

Page 6: ...y of the item remain the responsibility of the purchaser A purchaser of an open box previously returned or clearance item as well as original purchasers outside of the warranty period may obtain repla...

Page 7: ...tectores si es necesario z Mantenga a los ni os fuera de la zona de montaje z Monte sobre una superficie nivelada z No apriete los tornillos ni las tuercas demasiado pero apri telos hasta que queden f...

Page 8: ...clinaci n F 4 Viga Corta G 2 Viga Larga H 2 Conexi n del Techo I 1 Panel Trasero J 1 Panel del Asiento K 1 Brazo Derecho L1 1 Brazo Izquierdo L2 1 Viga de Suspensi n Larga M 2 Viga de Suspensi n Corta...

Page 9: ...r a 1 AA Tornillo M6X15 20 Piezas BB Arandela Llana M6 34 Piezas CC Tornillo M6X15 4 Piezas DD Tornillo M6X35 4 Piezas EE Tuerca M6 4 Piezas JJ Tornillo M6X40 2 Piezas LL Arandela a Presi n M6 4pcs W1...

Page 10: ...andelas Llanas BB Fig 3 Etapa 4 Introduzca la Viga Corta G y la Viga Larga H en los tubos de conexi n de la Viga de Inclinaci n F Fig 4 Etapa 5 Introduzca la Viga de Inclinaci n Superior F en la Conex...

Page 11: ...Brazo Derecho L1 con Tornillos FF y Arandelas Llanas Fig 7 Etapa 8 Ali e la Viga de Suspensi n Corta N con el Panel Trasero J Fije con tornillo GG arandela llana HH Arandela a Presi n MM y tuerca KK...

Page 12: ...nal que este articulo esta libre de defectos en mano de obra y materiales por un periodo de 1 a o a partir de la fecha de compra siempre y cuando el articulo este sellado por la fabrica al momento de...

Page 13: ...o el oxido de la ferreter a no est n cubiertos Se requiere una prueba de compra recibo fechado para cualquier reclamaci n bajo garant a La garant a es para el comprador original y no se puede traspasa...

Reviews: