background image


WARNINGS:   

1. Assembly Instructions must be followed. 
2. Pegs supplied must be used to hold this gazebo in place when upright. 
3. Warranty does not cover damage due to extreme weather conditions. 

WARNING: KEEP ALL FLAME AND HEAT SOURCES AWAY FROM THIS TENT FABRIC. 


This tent meets the flammability requirements of CPAI-84. The fabric may burn if left in continuous contact 
with any flame source. The application of any foreign substance to the tent fabric may render the 
flame-resistant properties ineffective. 

This unit is heavy. Do not assemble this item alone.   
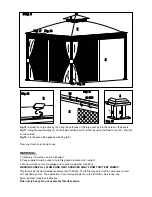
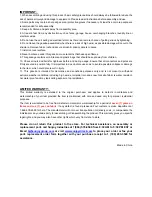
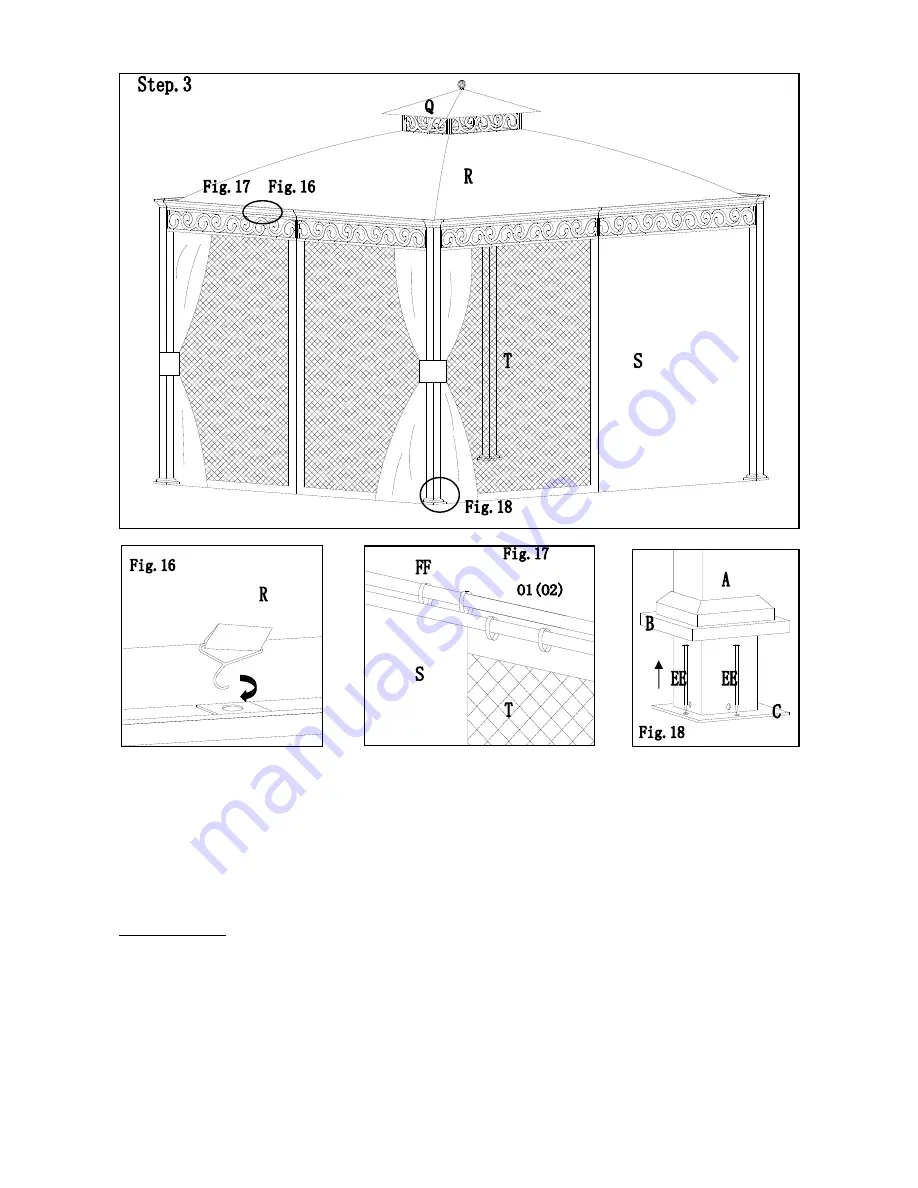
 

Fig.16:

 Spread the Large canopy (R), hang the pothooks of the large canopy into the holes on the panels.   

Fig.17:

 Hang Mosquito netting (T) on the inside netting bar (O1 & O2) by using the Plastic ring (FF). Wall (S) 

on the outside. 


Fig.18: 

Fix the assembled gazebo with Peg (EE). 

 
Now, your Gazebo is ready for use.


Summary of Contents for L-GZ399PAL-B

Page 1: ...sure safe and proper assembly Check inside all posts and other parts which are hollow as smaller parts are regularly packed inside them in order to reduce carton size wherever possible Repeated assembly can weaken the locking ability of the washers Periodically check all bolted connections on your gazebo to make sure they are tight and secure Please keep the instructions for future reference All y...

Page 2: ... 1 E1 2 Short panel 2 E2 2 Slanting bar F 4 Long mid top bar G1 2 Short mid top bar G2 2 Slanting bar Connector H 4 Mid top bar connector I 4 Conner decor block J 4 Small top connector K 1 Small top bar 1 L1 2 Small top bar 2 L2 2 Pothook M 1 Long panel of top frame N1 2 Small panel of top frame N2 2 ...

Page 3: ... Top Finial P 1 Small canopy Q 1 Large canopy R 1 Wall S 1 Mosquito netting T 1 NOTE We put Netting bar O1 O2 into two Posts A Hardware Pack 1 AA M6 15 bolt 32PCS BB M6 flat washer 64 PCS CC M6 15 bolt 16 PCS DD M6 25 bolt 16 PCS W M6 wrench 1 PC ...

Page 4: ...t the Short panels E1 E2 in the same way Please note the screw position Fig 4 Fix the Mid top bar connector I on the middle of the panels D1 D2 E1 E2 by bolt CC and washer BB Fig 5 Fix the long netting bar O1 to long panels short netting bar O2 to short panels by using bolt AA and flat washer BB Fig 6 Fix the assembled panels to the post A by using bolt DD and flat washer BB Hardware Pack 2 AA M6 ...

Page 5: ...id top bar connector I Fig 11 Fix long mid top bar G1 to short panel of top frame N2 and short mid top bar G2 to long panel of top frame N1 by using bolt CC and washer BB Put the Large canopy R on the big top do not spread it Fig 12 Insert Small top bar L1 L2 to Small top connector K screw the Pothook M to Small top connector K Fig 13 Place the Small canopy Q on the small top bar L1 L2 and tighten...

Page 6: ...ric may burn if left in continuous contact with any flame source The application of any foreign substance to the tent fabric may render the flame resistant properties ineffective This unit is heavy Do not assemble this item alone Fig 16 Spread the Large canopy R hang the pothooks of the large canopy into the holes on the panels Fig 17 Hang Mosquito netting T on the inside netting bar O1 O2 by usin...

Page 7: ...ge to the item which could also result in injury 11 This gazebo is intended for decorative and sunshade purposes only and is not meant to withstand extreme weather conditions including high winds torrential rain and snow Gazebo fabric is water resistant not water proof and may leak during exposure to precipitation LIMITED WARRANTY This limited warranty is extended to the original purchaser and app...

Reviews: