F
ig.3: Insert the upper bar (C4) into the connecting tube of large roof connector(A2), secure the hook
(
B2
)
to the large roof connector
(A2)
Fig.4: Insert the beam 1(D1) and beam 2(E2) into the connecting tube of upper bar (C4)
Fig.5: Insert the slant beam 1(E2) and slant beam 2(D1) into the connecting tube of slant beam connector (E3)
Fig.6: Insert the slant beam connector (E3) into the post I (J) ,then put the large canopy (M) on the assembled large roof, do not unfold
Fig.7: Insert the small roof pole (C3) into the connecting tube of small roof connector (A1) ,then put the small canopy (L)
on the assembled small roof ,do not unfold it completely.
Fig.8: Screw the decoration
(
B1
)
into the small roof connector (A1),then attach the small canopy along the small roof
pole(C3), aligning the corners and stretching it to fit it.
Fig.9: Put the large canopy (M) on the beam, do not spread it .Insert the small roof pole (C3) into the connecting tube of
upper bar (C4) .Then put the large canopy on top of the assembled beam.
Fig.10: Secure the completely assembled gazebo on the ground by using stake (FF)
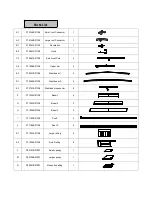
FF
stake
Ф
6*
23
0
16 PCS
P12406C01002
Hardware Pack 2


